How to Build a Content Management System Using the Notion API

At Appsmith, we use Notion to manage our content calendar. We also work with a few external agencies and freelancers for some of our content. It is impossible to create granular access control and develop a workflow on Notion to run the process smoothly and thus, as soon as Notion released its API, we decided to build an application that helps us manage our entire content management in one place while giving our collaborators the necessary access only.
Our application uses our Notion Table as a data source and lets you plant, submit and edit articles on the application, while at the same time has a provision for integrating with an email service of your choice (we use SendGrid here) to send reminder emails or updates to people in the project.
In this tutorial, we’ll build an essential Notion Content Management System, which will let you:
Submit new content idea submissions from authors
Set deadlines for submissions
Follow up with authors directly with their Emails
Organize all data on a Notion page
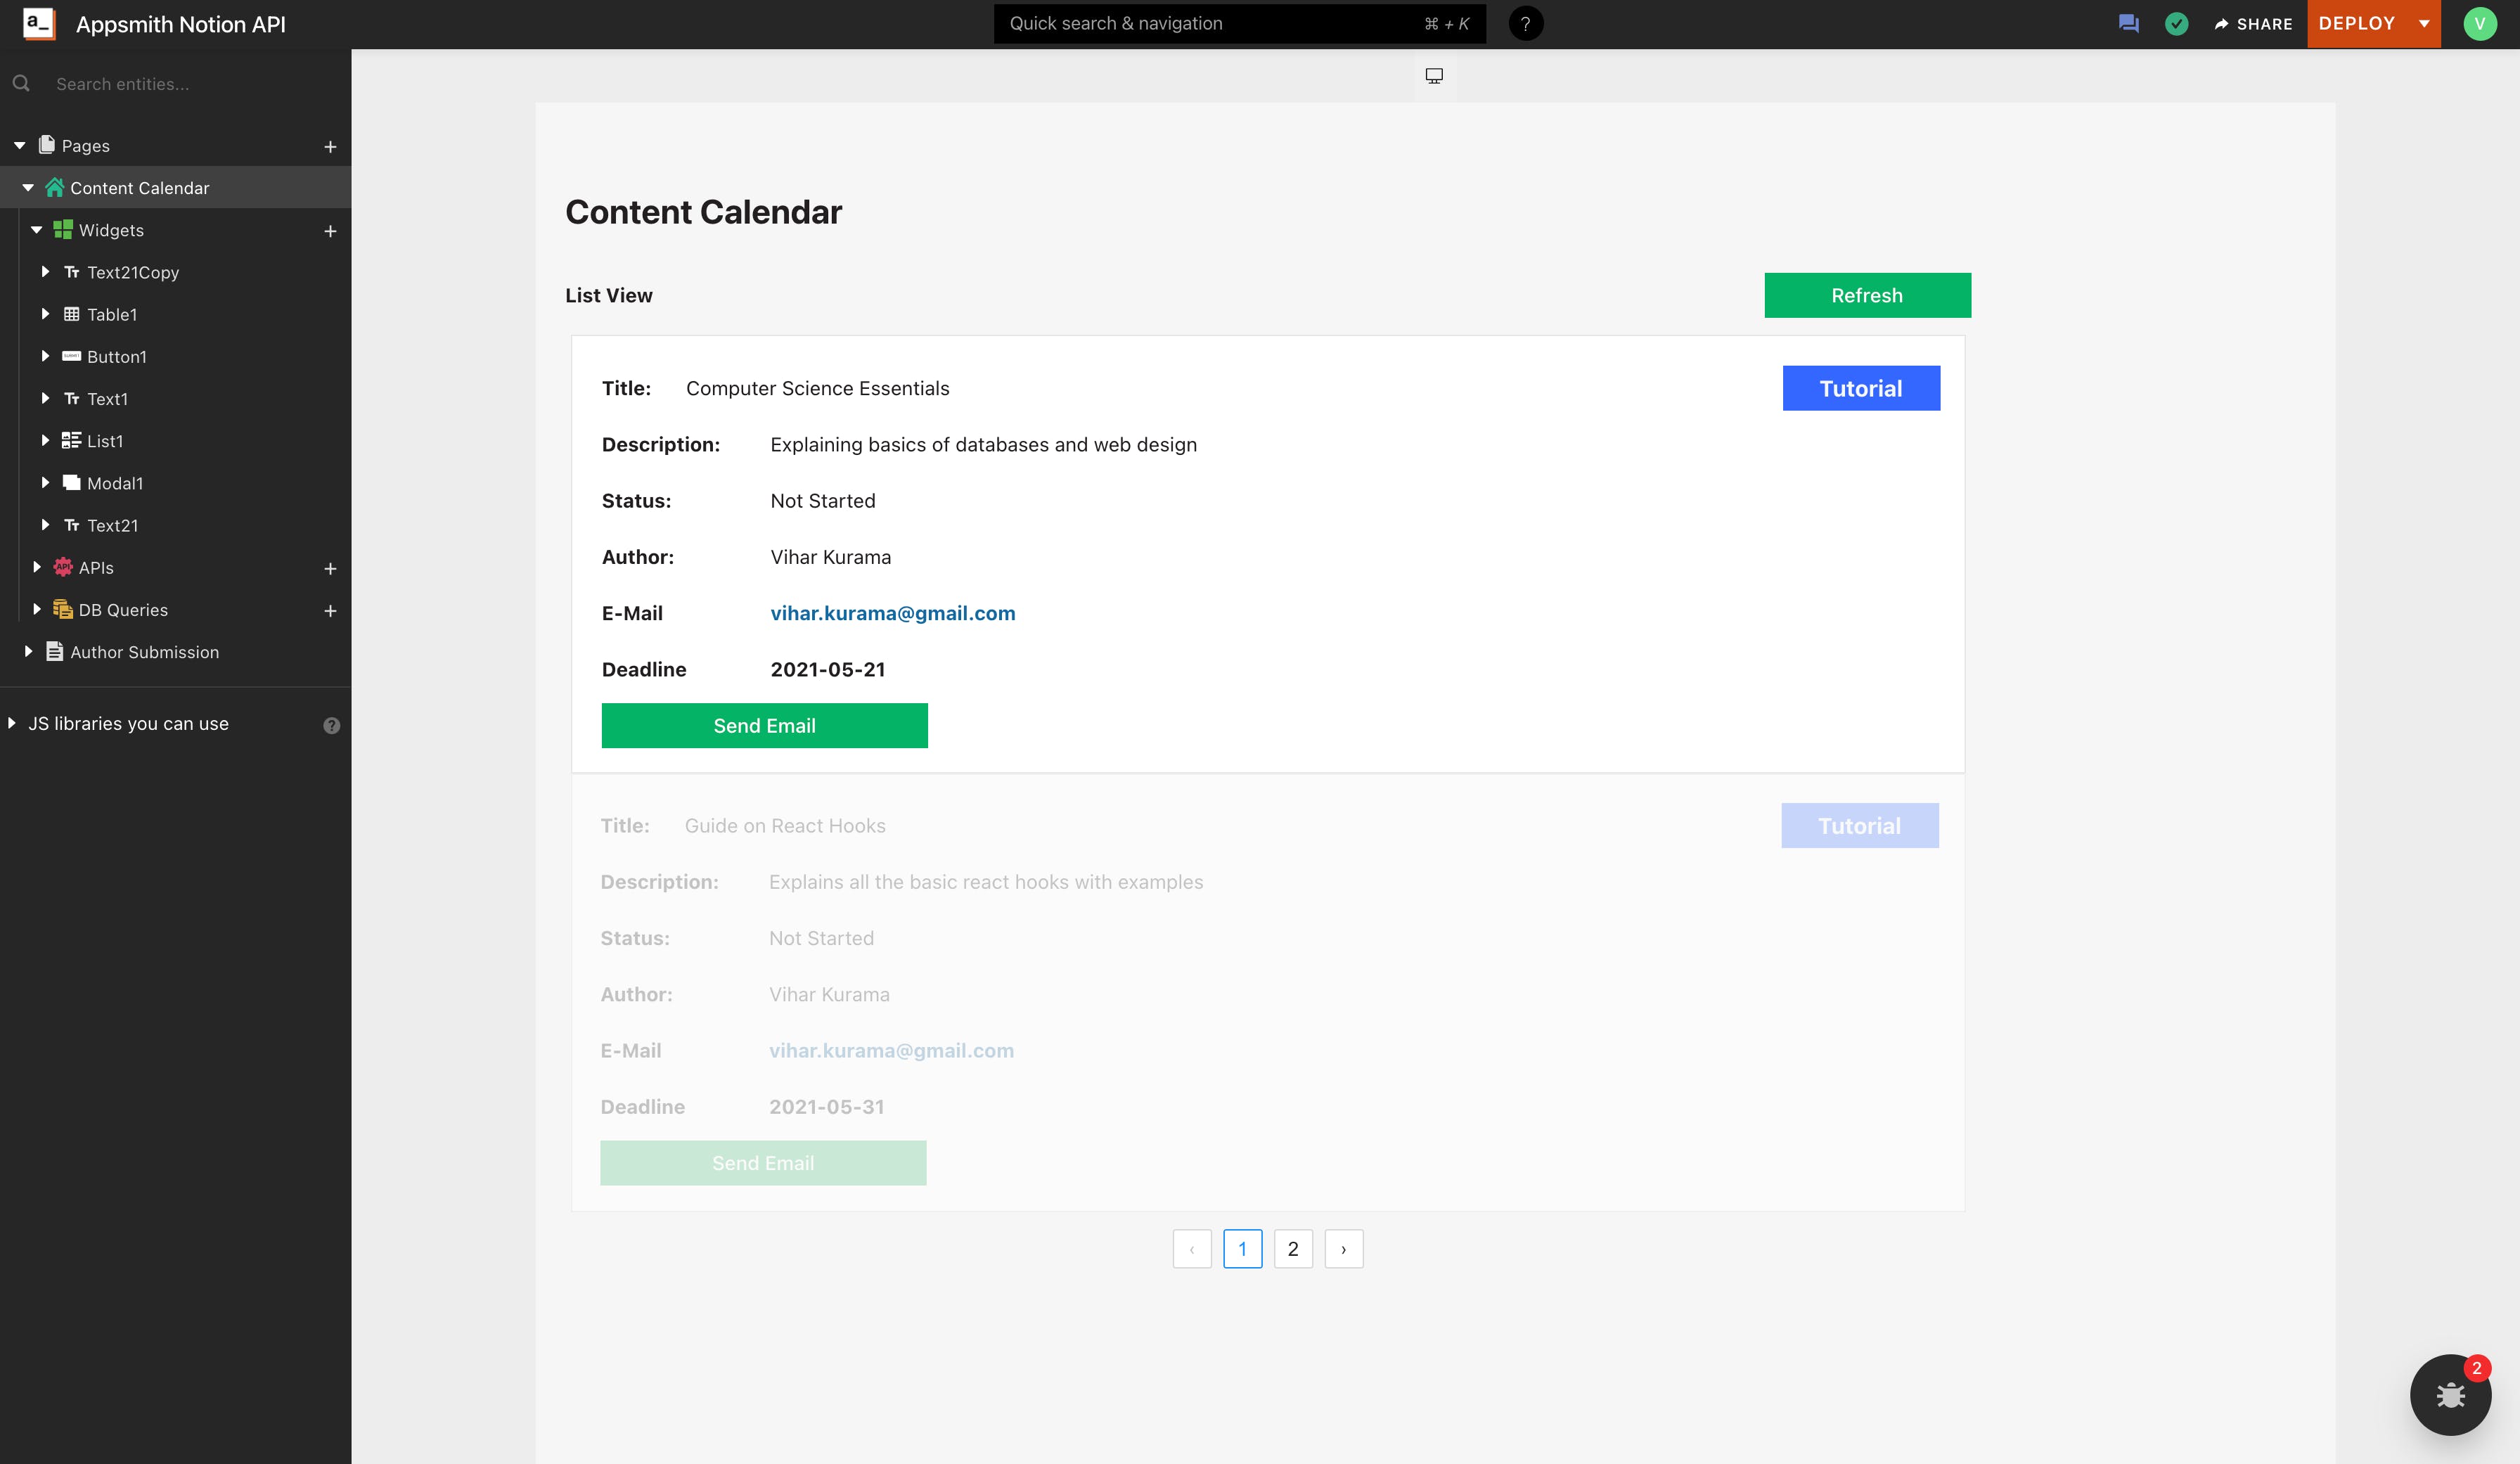
Here's a screenshot of how the app looks like:
Appsmith is an open-source framework that lets developers build dashboards, workflows, and CRUD apps with only the necessary code. You can connect to any API or database like MongoDB, PostgreSQL, or MYSQL and get access to multiple widgets, including charts, tables, and forms, for building a UI fast.
Let’s dive right in!
Configuring the Notion API
Notion API lets us connect to Notion Pages and Databases. Now, let's look at how we can set up the API, gather all the required keys, and connect to Appsmith.
Firstly, choose the workspace you want to work with on your Notion. If you want to test it, feel free to create a new workspace.
Now, open the workspace setting by clicking on the Settings and Members option on the left navigation bar. We should see a new modal with all the settings.
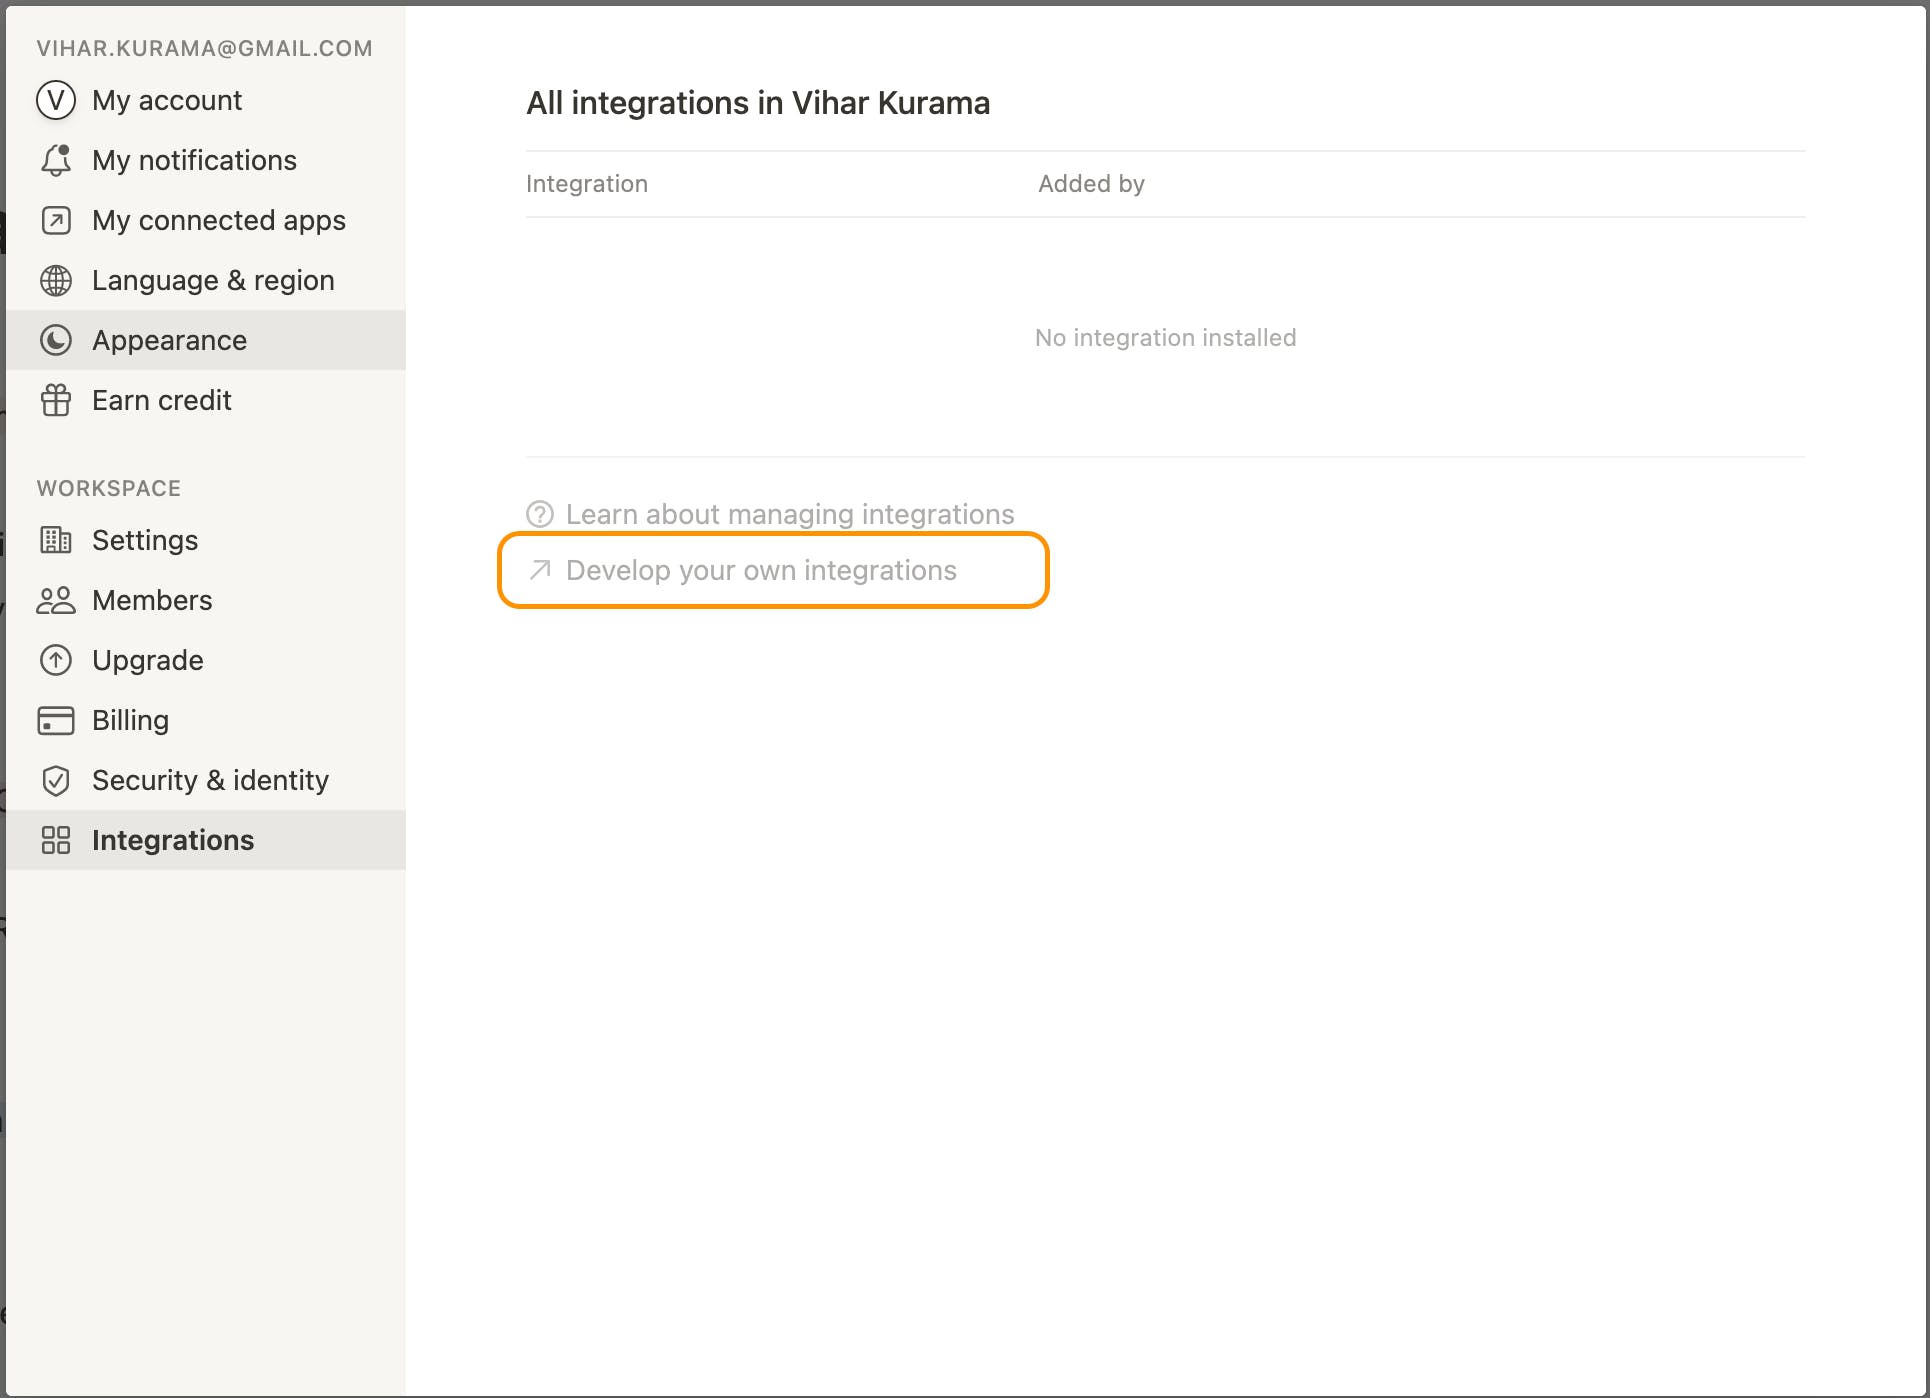
Select the Integrations option under Workspace options in the settings modal. This will redirect to the integrations tab.
Next, choose the Develop your integration option. Now we'll be redirected to our integration page.
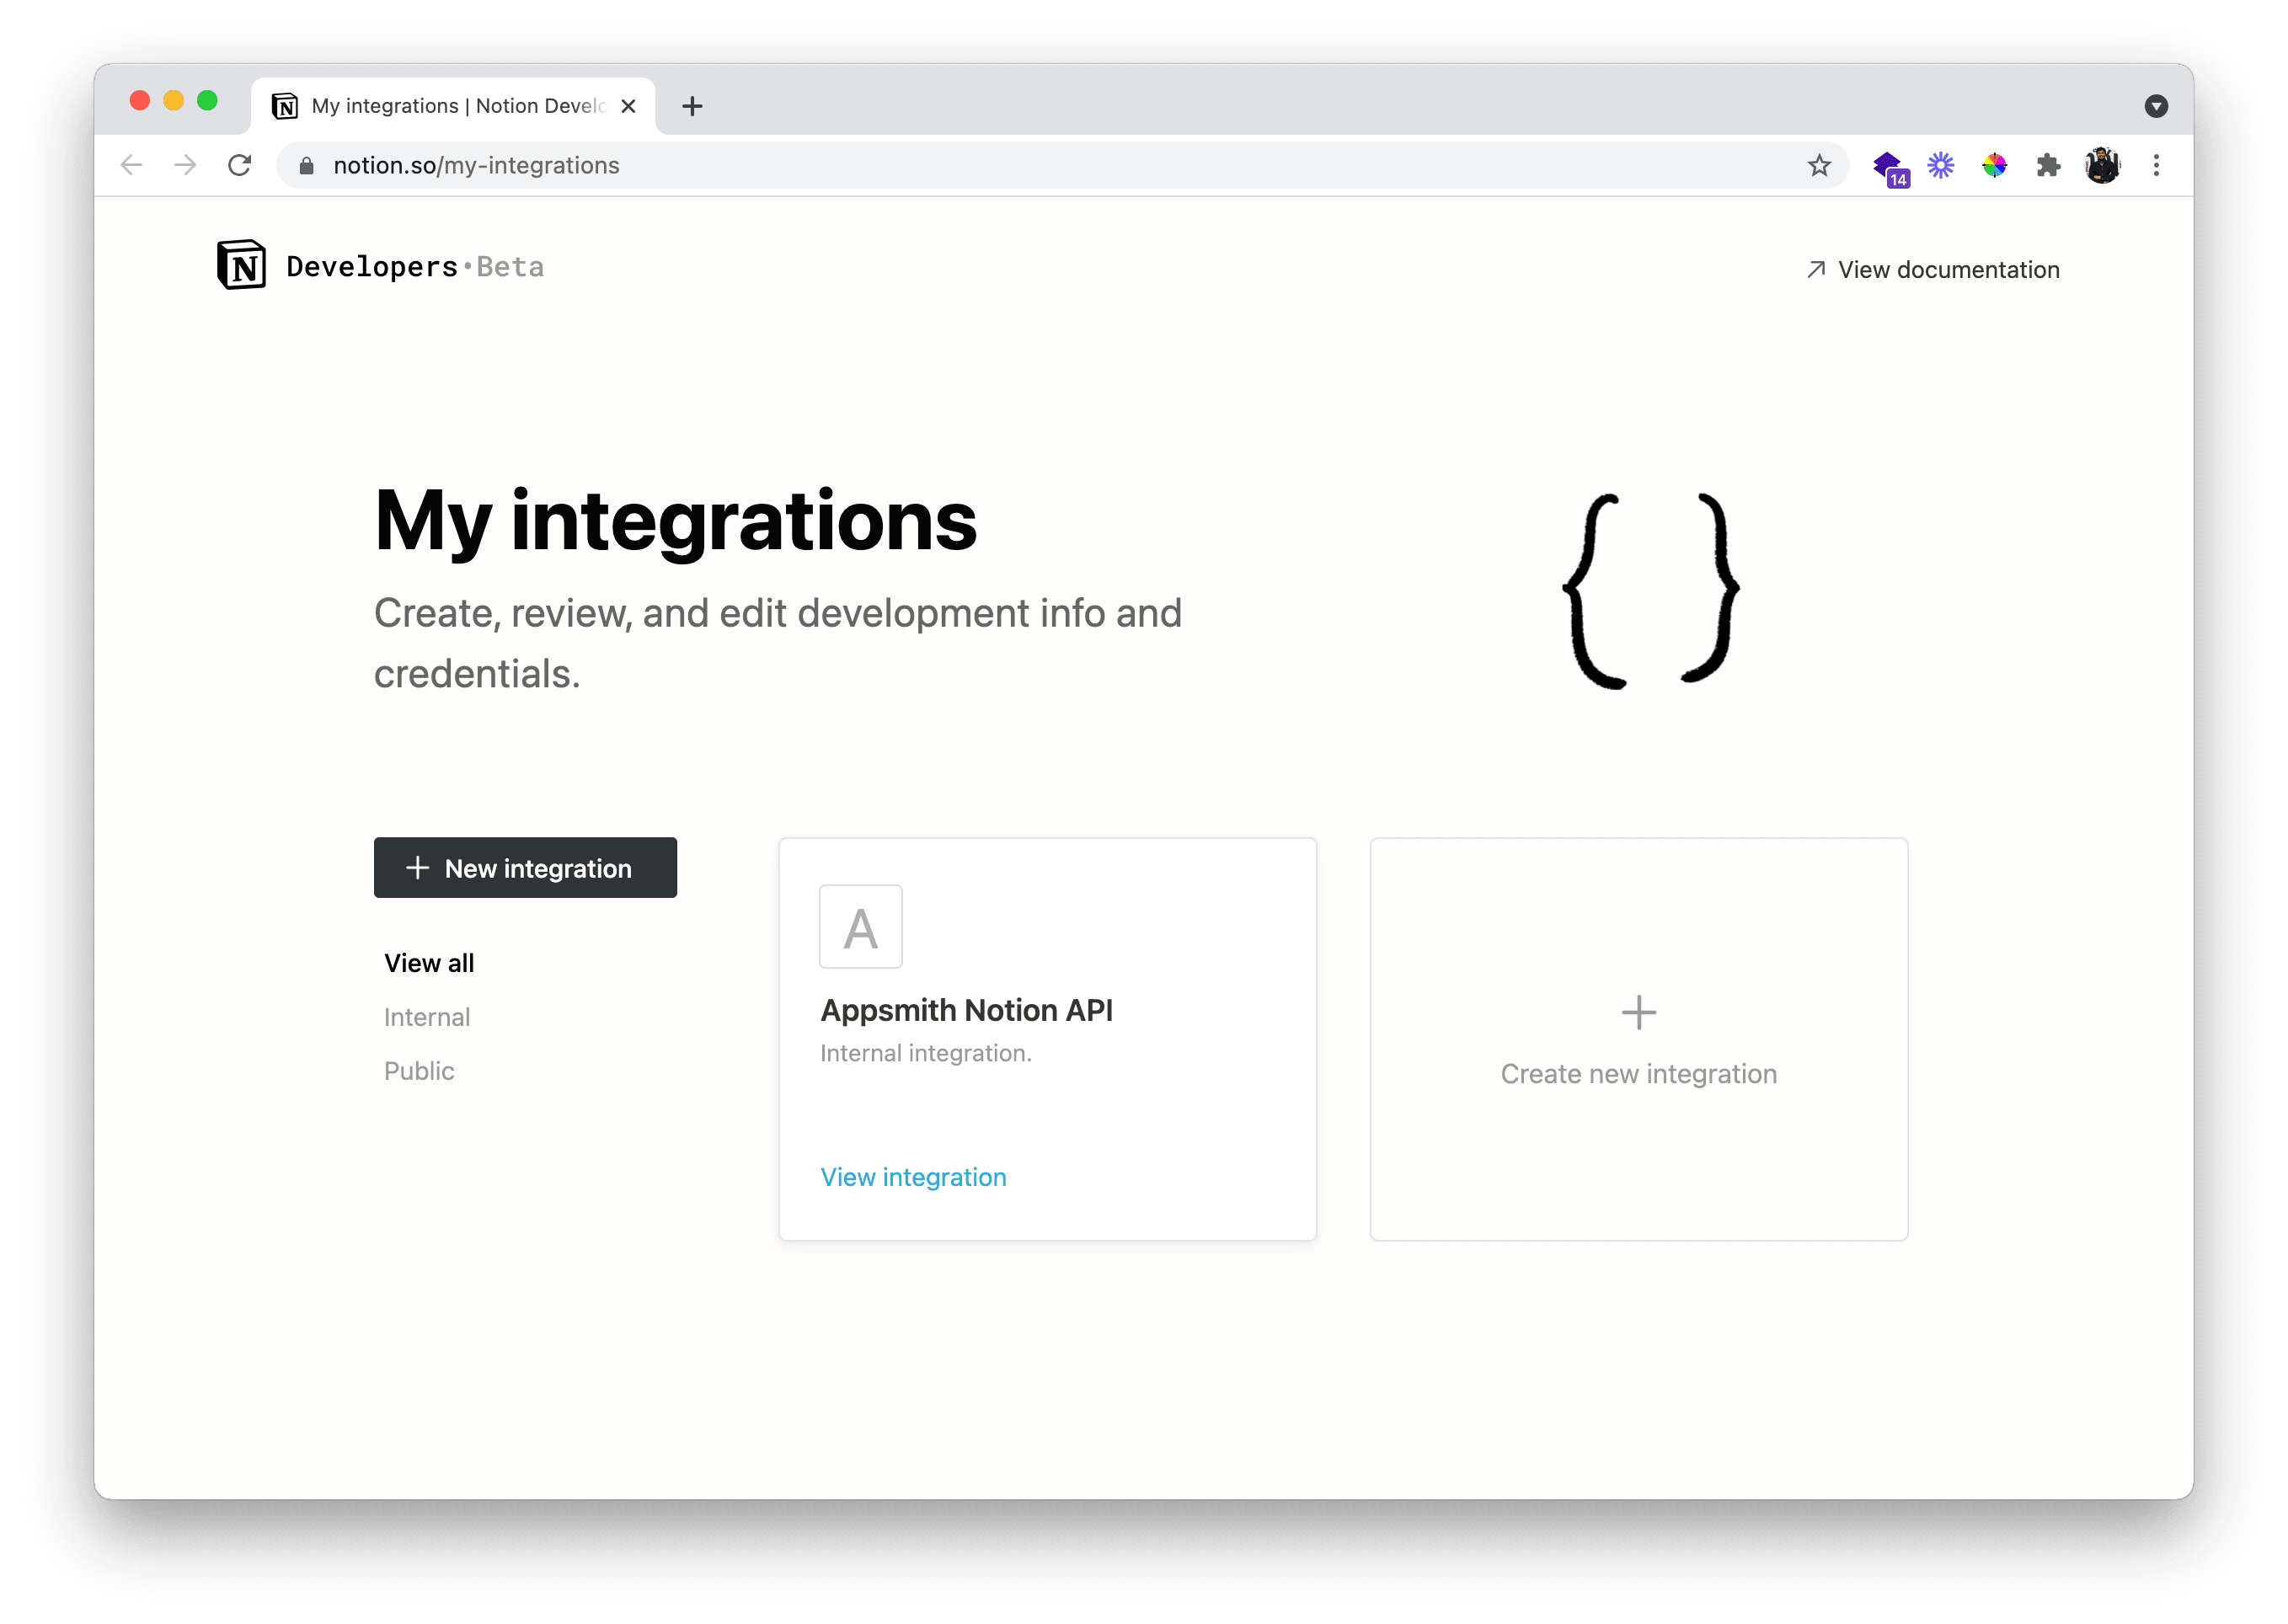
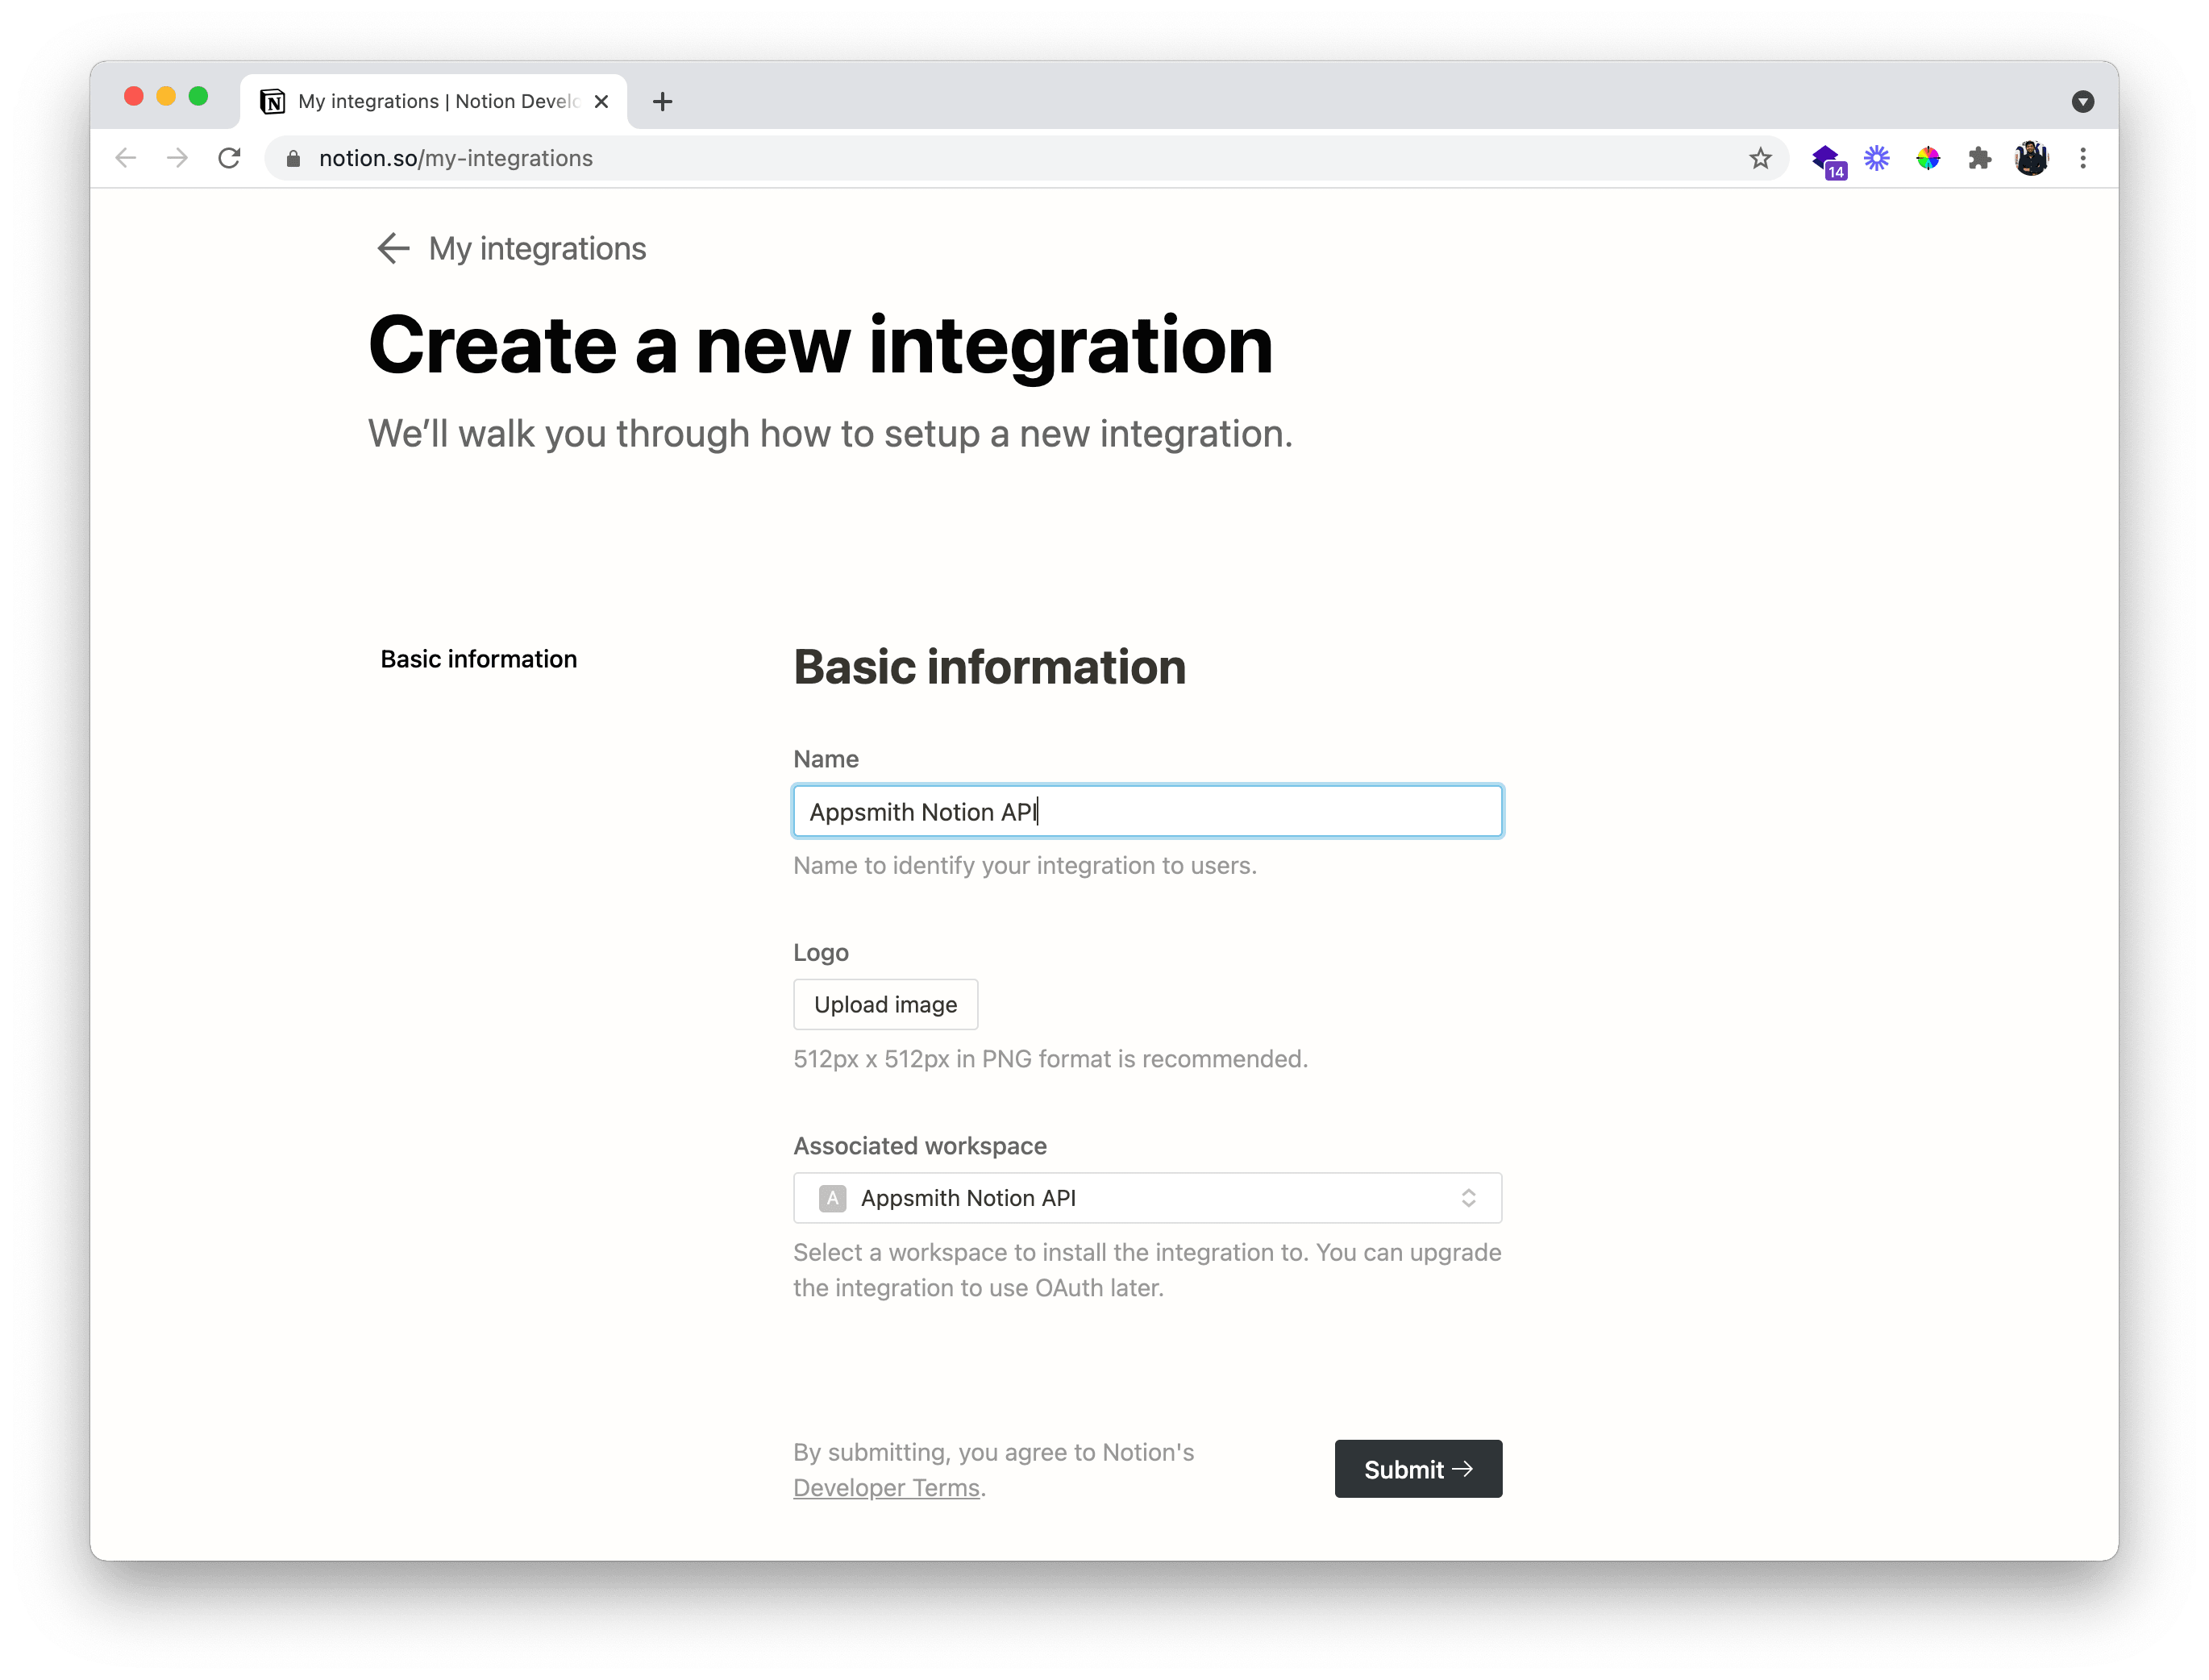
On the integrations page, select the New integration option and add a name and associated workspace you want to work with and hit submit. This will create us a new secret key!
Now head back to our workspace, choose a specific page and click on the share option (we can find this in the top-right corner)
Next, hit the invite button, and a new modal opens, here we can find our created integration. Select the integration and confirm the invite.
With this, we should be able to add an integration to a Notion page; also, make sure to save your integration key; we’ll have to use it for using the Notion API
In Notion, integration has a secret key; when added to a workspace, we could perform all the actions (create, read, update). We'll use the secret key of the integration to connect with third-party applications.
Setting up a Notion Page
To work with the Notion API, firstly, let’s create a database for our content calendar.
On your page, add a new table with the following fields that are required for our content manager:
Title: Text Field
Description: Text Field
Author: Text Field
Category: Text Field
Status: Dropdown Field
Notes: Text Field
Deadline: Date Field
Author Email: Email Field
You can also use this Notion page of ours, which can be used as a mock database. You can click on this link duplicate to one of your workspaces. Also, make sure to add the integration to this page to use the Notion API.
Now that we have our page and integration ready, we’ll start building an App on Appsmith.
Querying Data from Notion API
In this section, we’ll be querying data from Notion API. Follow the below steps:
Firstly, we should have an Appsmith account; if not, sign-up here (it's free)! Next, create a new application under an organization by clicking on the Create New button.
We’ll now find Widgets, APIs, and DB Queries on the left navigation; we can use these features to build our application. We’ll start by creating a Notion API.
Click on the + icon next to the APIs and click on Create new and name the API as query_data_from_database
Now, add the following in the URL for the API:
https://api.notion.com/v1/databases//queryHere, db-id is the database id for a notion page. To find this, we’ll have to open our Notion Table as a page and pick the database id from the URL.
Following is an example URL showing the id of a Notion page.
https://www.notion.so/myworkspace/a8aec43384f447ed84390e8e42c2e089?v=...
                                  |--------- Database ID --------|
Next, add the following keys under the Headers tab.
Authorization:
Notion-Version: 2021-05-13
Content-type: application/json
Below is a screenshot of how the configuration looks like:
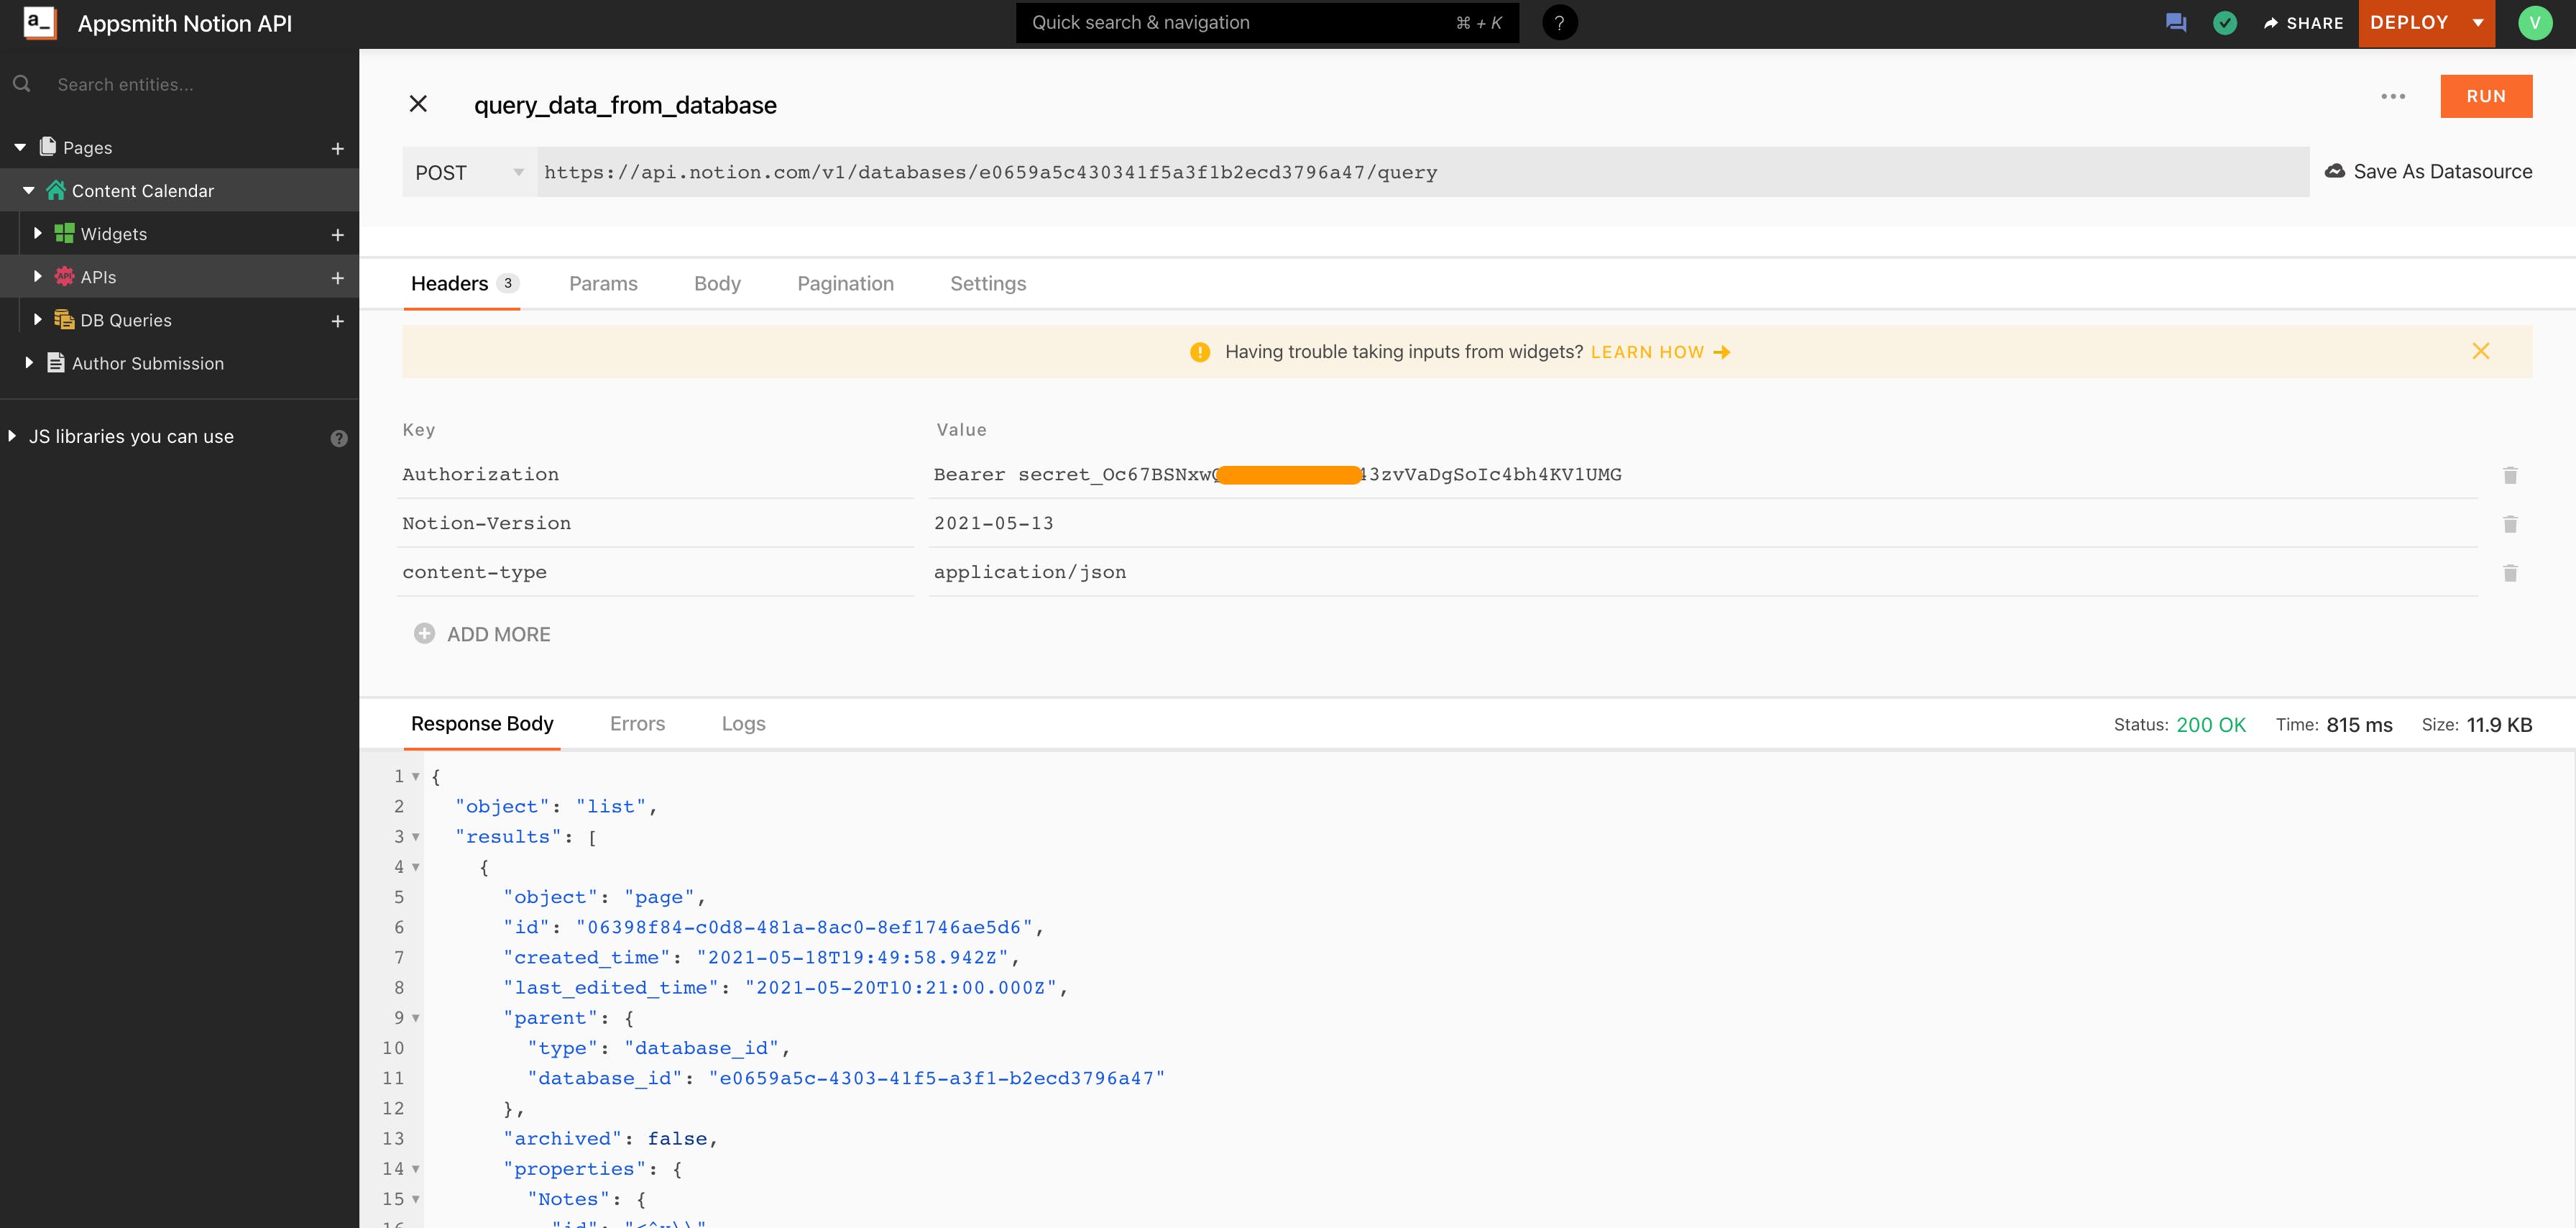
Lastly, hit the RUN button, and we can find all the data from our page in the Response Body pane.
Awesome, we now have the response from the Notion API; let’s bind this onto a List Widget.
Binding Notion APIs onto Appsmith
Now that we have an API containing data from the Notion Table let’s bind this onto a list widget to display all the details. Follow the below steps:
Select Page1 on the left navigation and click on the + icon next to the widgets section. Now we should see different UI widgets that we can use to build UI.
*Based on your preference, you can either choose a table widget or a list widget to bind the data from Notion API. In this example, we’ll be using a List widget.
Now drag and drop the list widget onto the canvas; we should see list items filled with Pokemon information. To inspect these, we can click on the cog icon at the top of the list widget and check out the data in the Items property. You can find more information from the docs here.
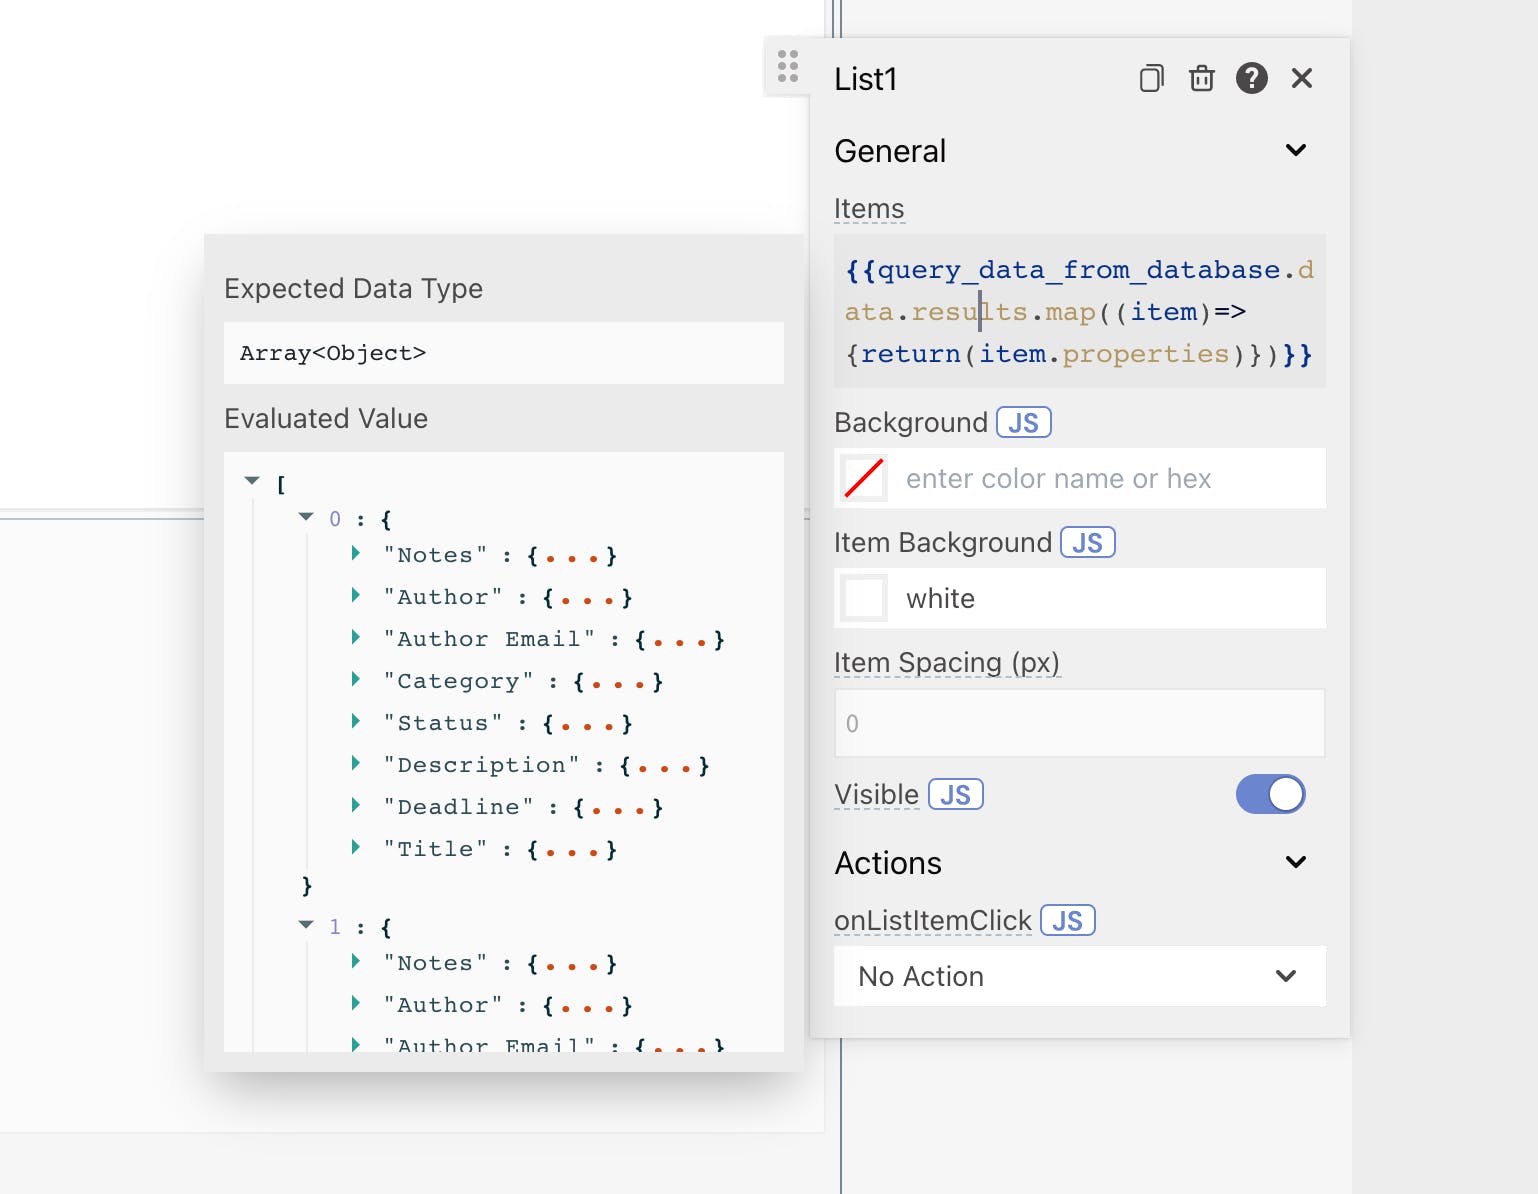
Now, we’ll be using the mustache syntax to write JS in Appsmith, replace the Items property on the list widget with the following code snippet:
In Appsmith, you can access the APIs anywhere inside the mustache syntax using the API name.
{{
	query_data_from_database.data.results.map(
    	(item) => {
        	return (item.properties)
    	})
}}
Here, we’re using the query_data_from_database and mapping it to return item properties. This how the response looks like:
Awesome, now let’s add some widgets to the list widget and show the details from the Notion API. Drag and drop six text widgets and set its Text property to the following:
- Title
- Description
- Status
- Author
- Email
- Deadline
Add six more text widgets next to them, where we’ll be binding their corresponding values from the Notion API. Now in the text widget next to the Title text widget, set the Text property to the following:
{{ currentItem.Title.title[0].text.content }}Here the currentItem corresponds to a unique item in the list widget, and next, we access the Title property from the Items on our list and parse the JSON. Below is the screenshot of how the response looks like:
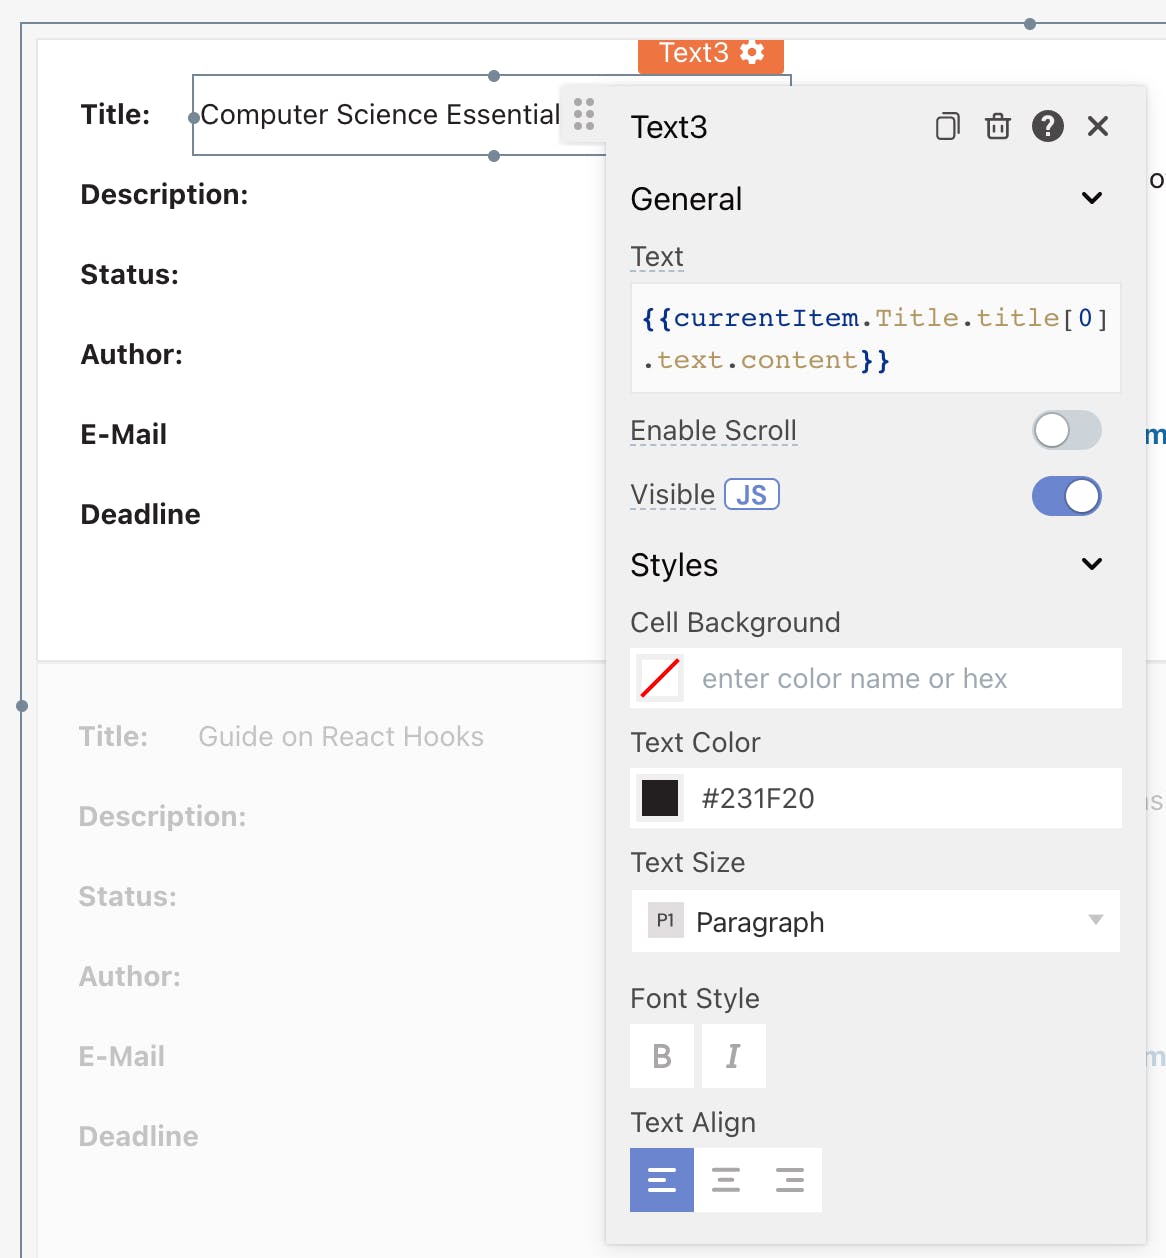
Great, we can now see our Titles from the Notion API on items of our list widget; similarly, let’s set the Text property of other text widgets to show the contents from the API:
Description text widget set the Text property to:
{{ currentItem.Description.rich_text[0].text.content }}Status text widget set the Text property to:
{{ currentItem.Description.rich_text[0].text.content }}Author text widget set the Text property to:
{{ currentItem.Author.rich_text[0].text.content }}Email text widget set, the Text property to:
{{ currentItem["Author Email"].email || "Not Added" }}Deadline text widget set, the Text property to:
{{ currentItem.Category.rich_text.map(row => { return row.plain_text })[0] }}Category text widget set the Text property to:
{{ currentItem.Category.rich_text.map(row => { return row.plain_text })[0] }}The code for parsing through items changes based on the API response from the Notion API.
We’ve added some additional styles and added a button widget at the end so that admins can send Emails to the authors directly from Appsmith. Below is how the App looks like after we parse all the data from the Notion Table onto the Appsmith List widget:
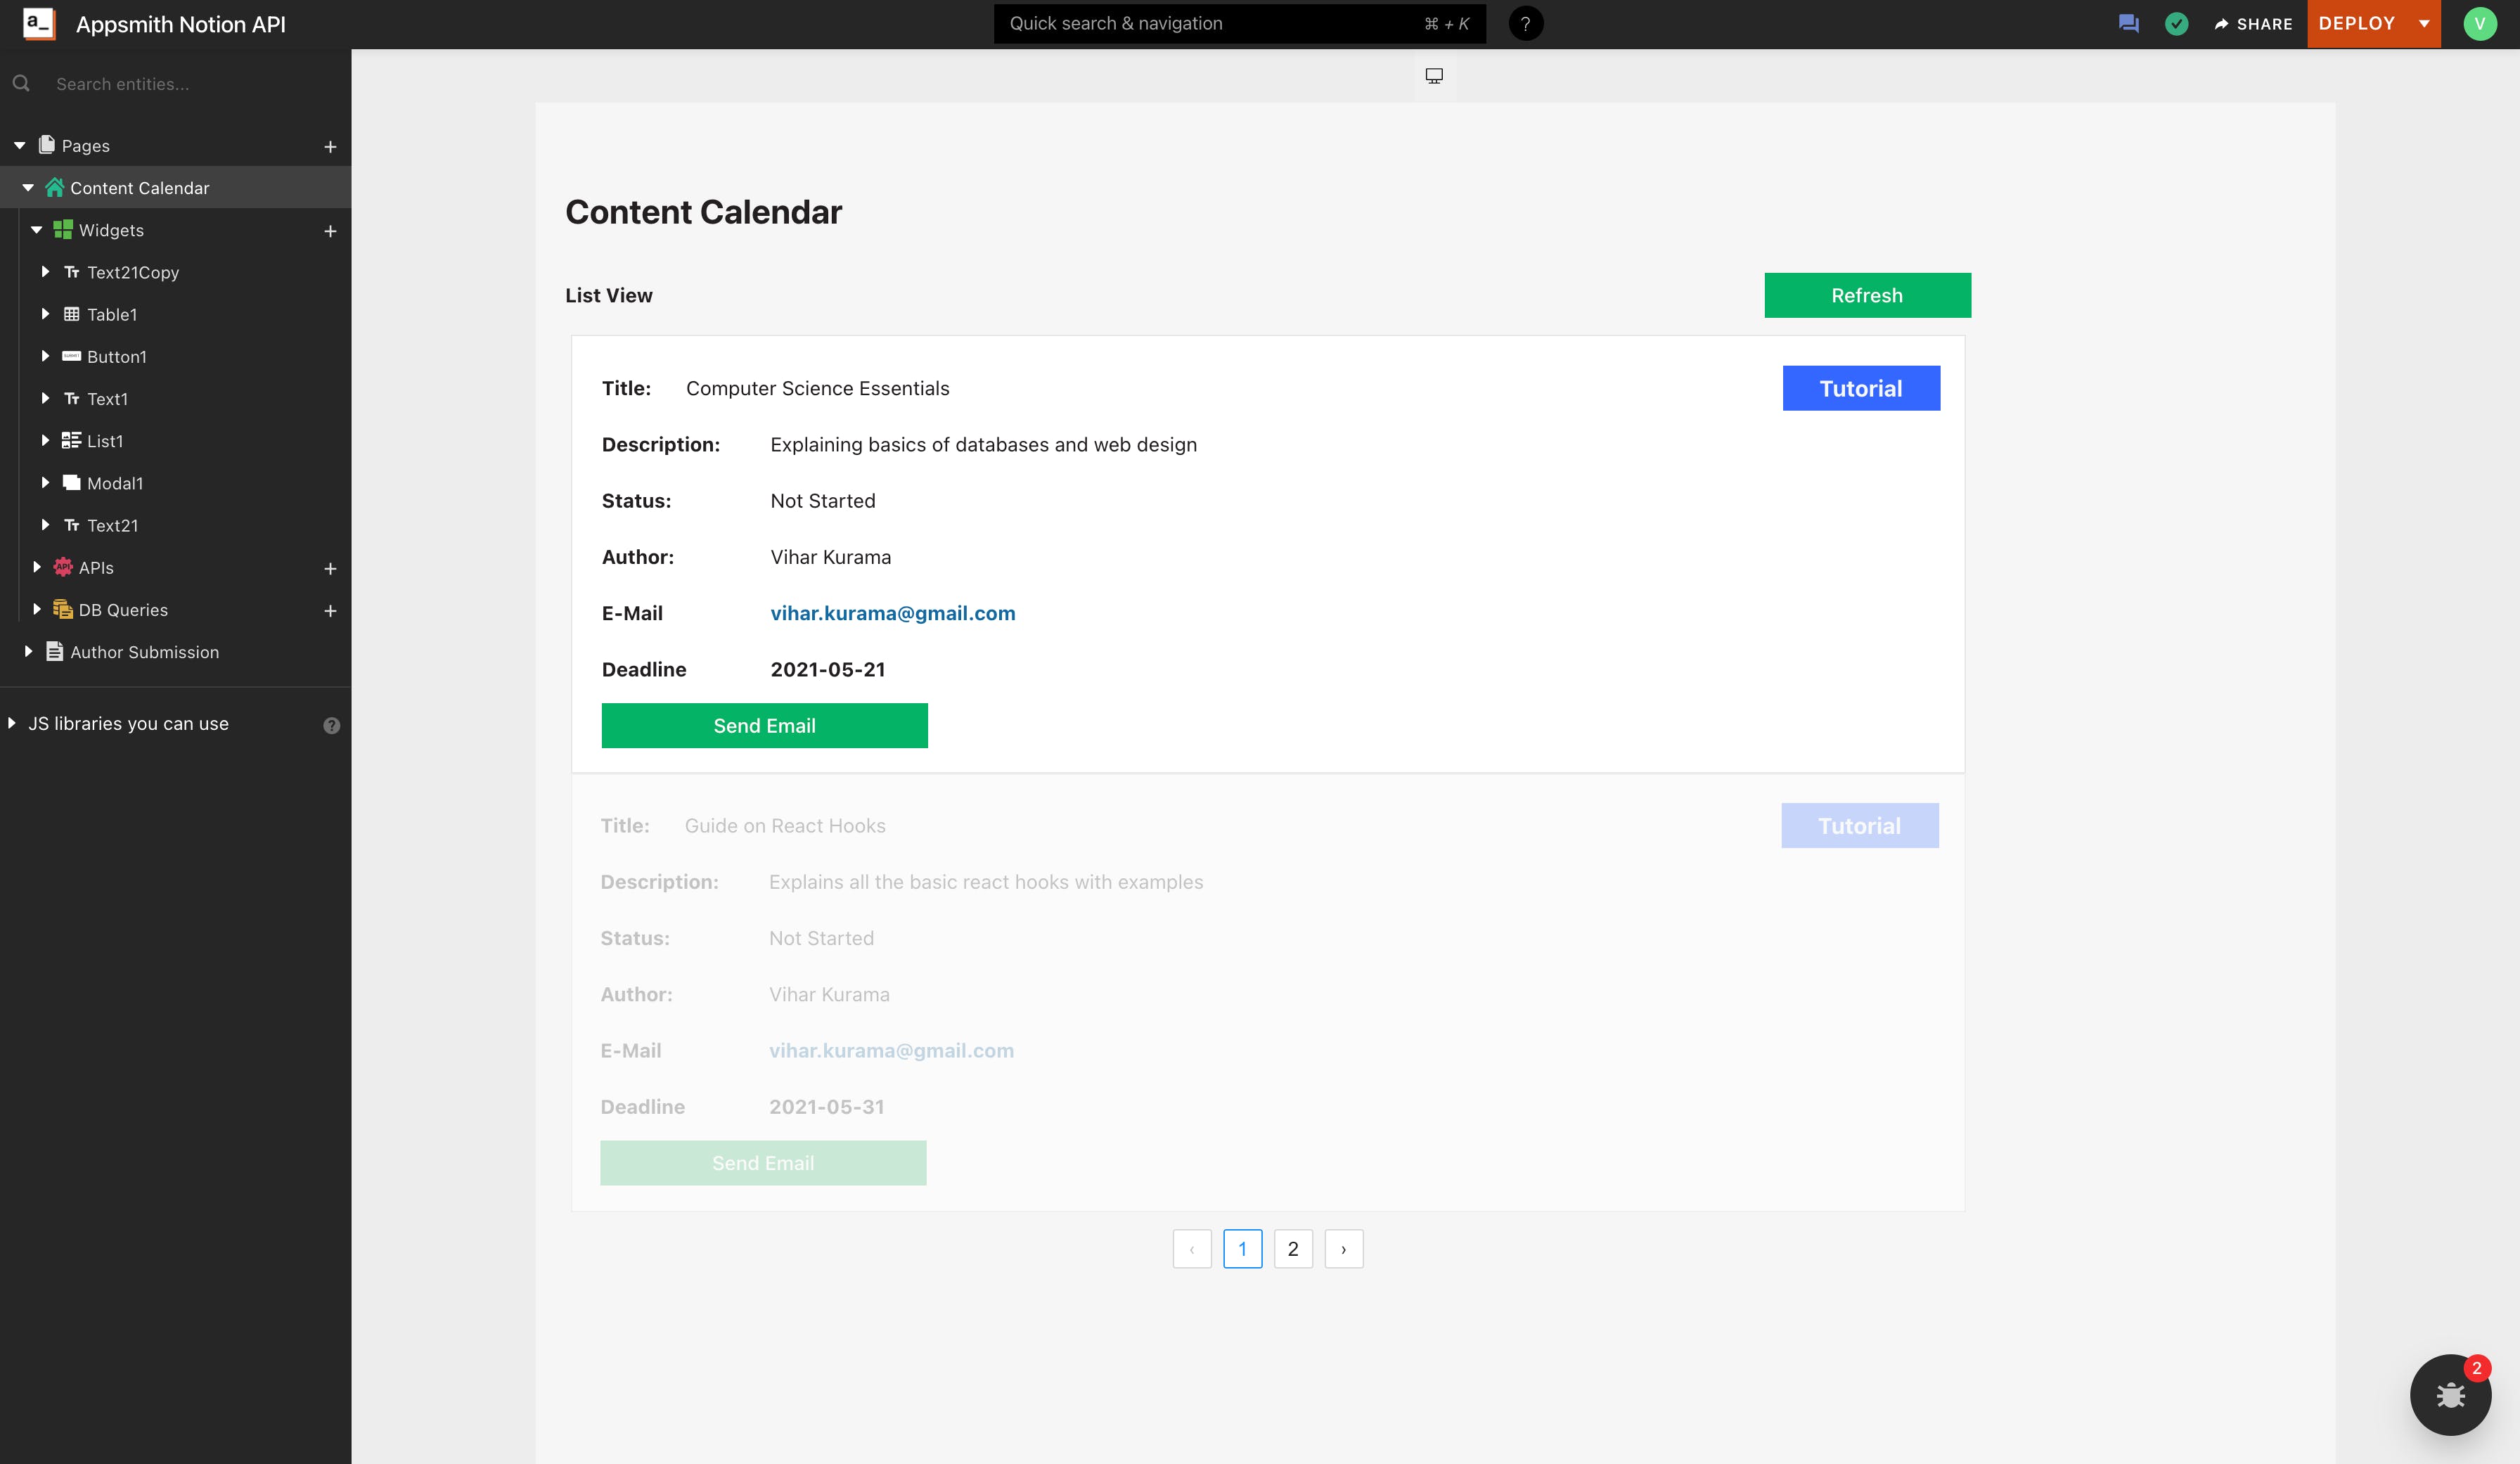
We can also add a refresh button to the query_data_from_database query. For this, drag and drop the Button widget onto the canvas, set the Label property to Refresh. Next, open the onClick property, click the Call an API option, and select the query_data_from_database API. Now, whenever we click the refresh button, we should see all the new data updated on the Notion page.
Adding an Item to the Notion Database
For our content calendar, we can list all the details from the Notion Table. Now let’s add a feature to add new items to the table from Appsmith. Follow the below steps.
First, let’s create a new page named “Author Submission” now drag and drop a form widget onto the canvas.
Inside the Form widget, let’s add some text widgets and input widgets from which the authors should submit their new content ideas.
This is how our form should look like:
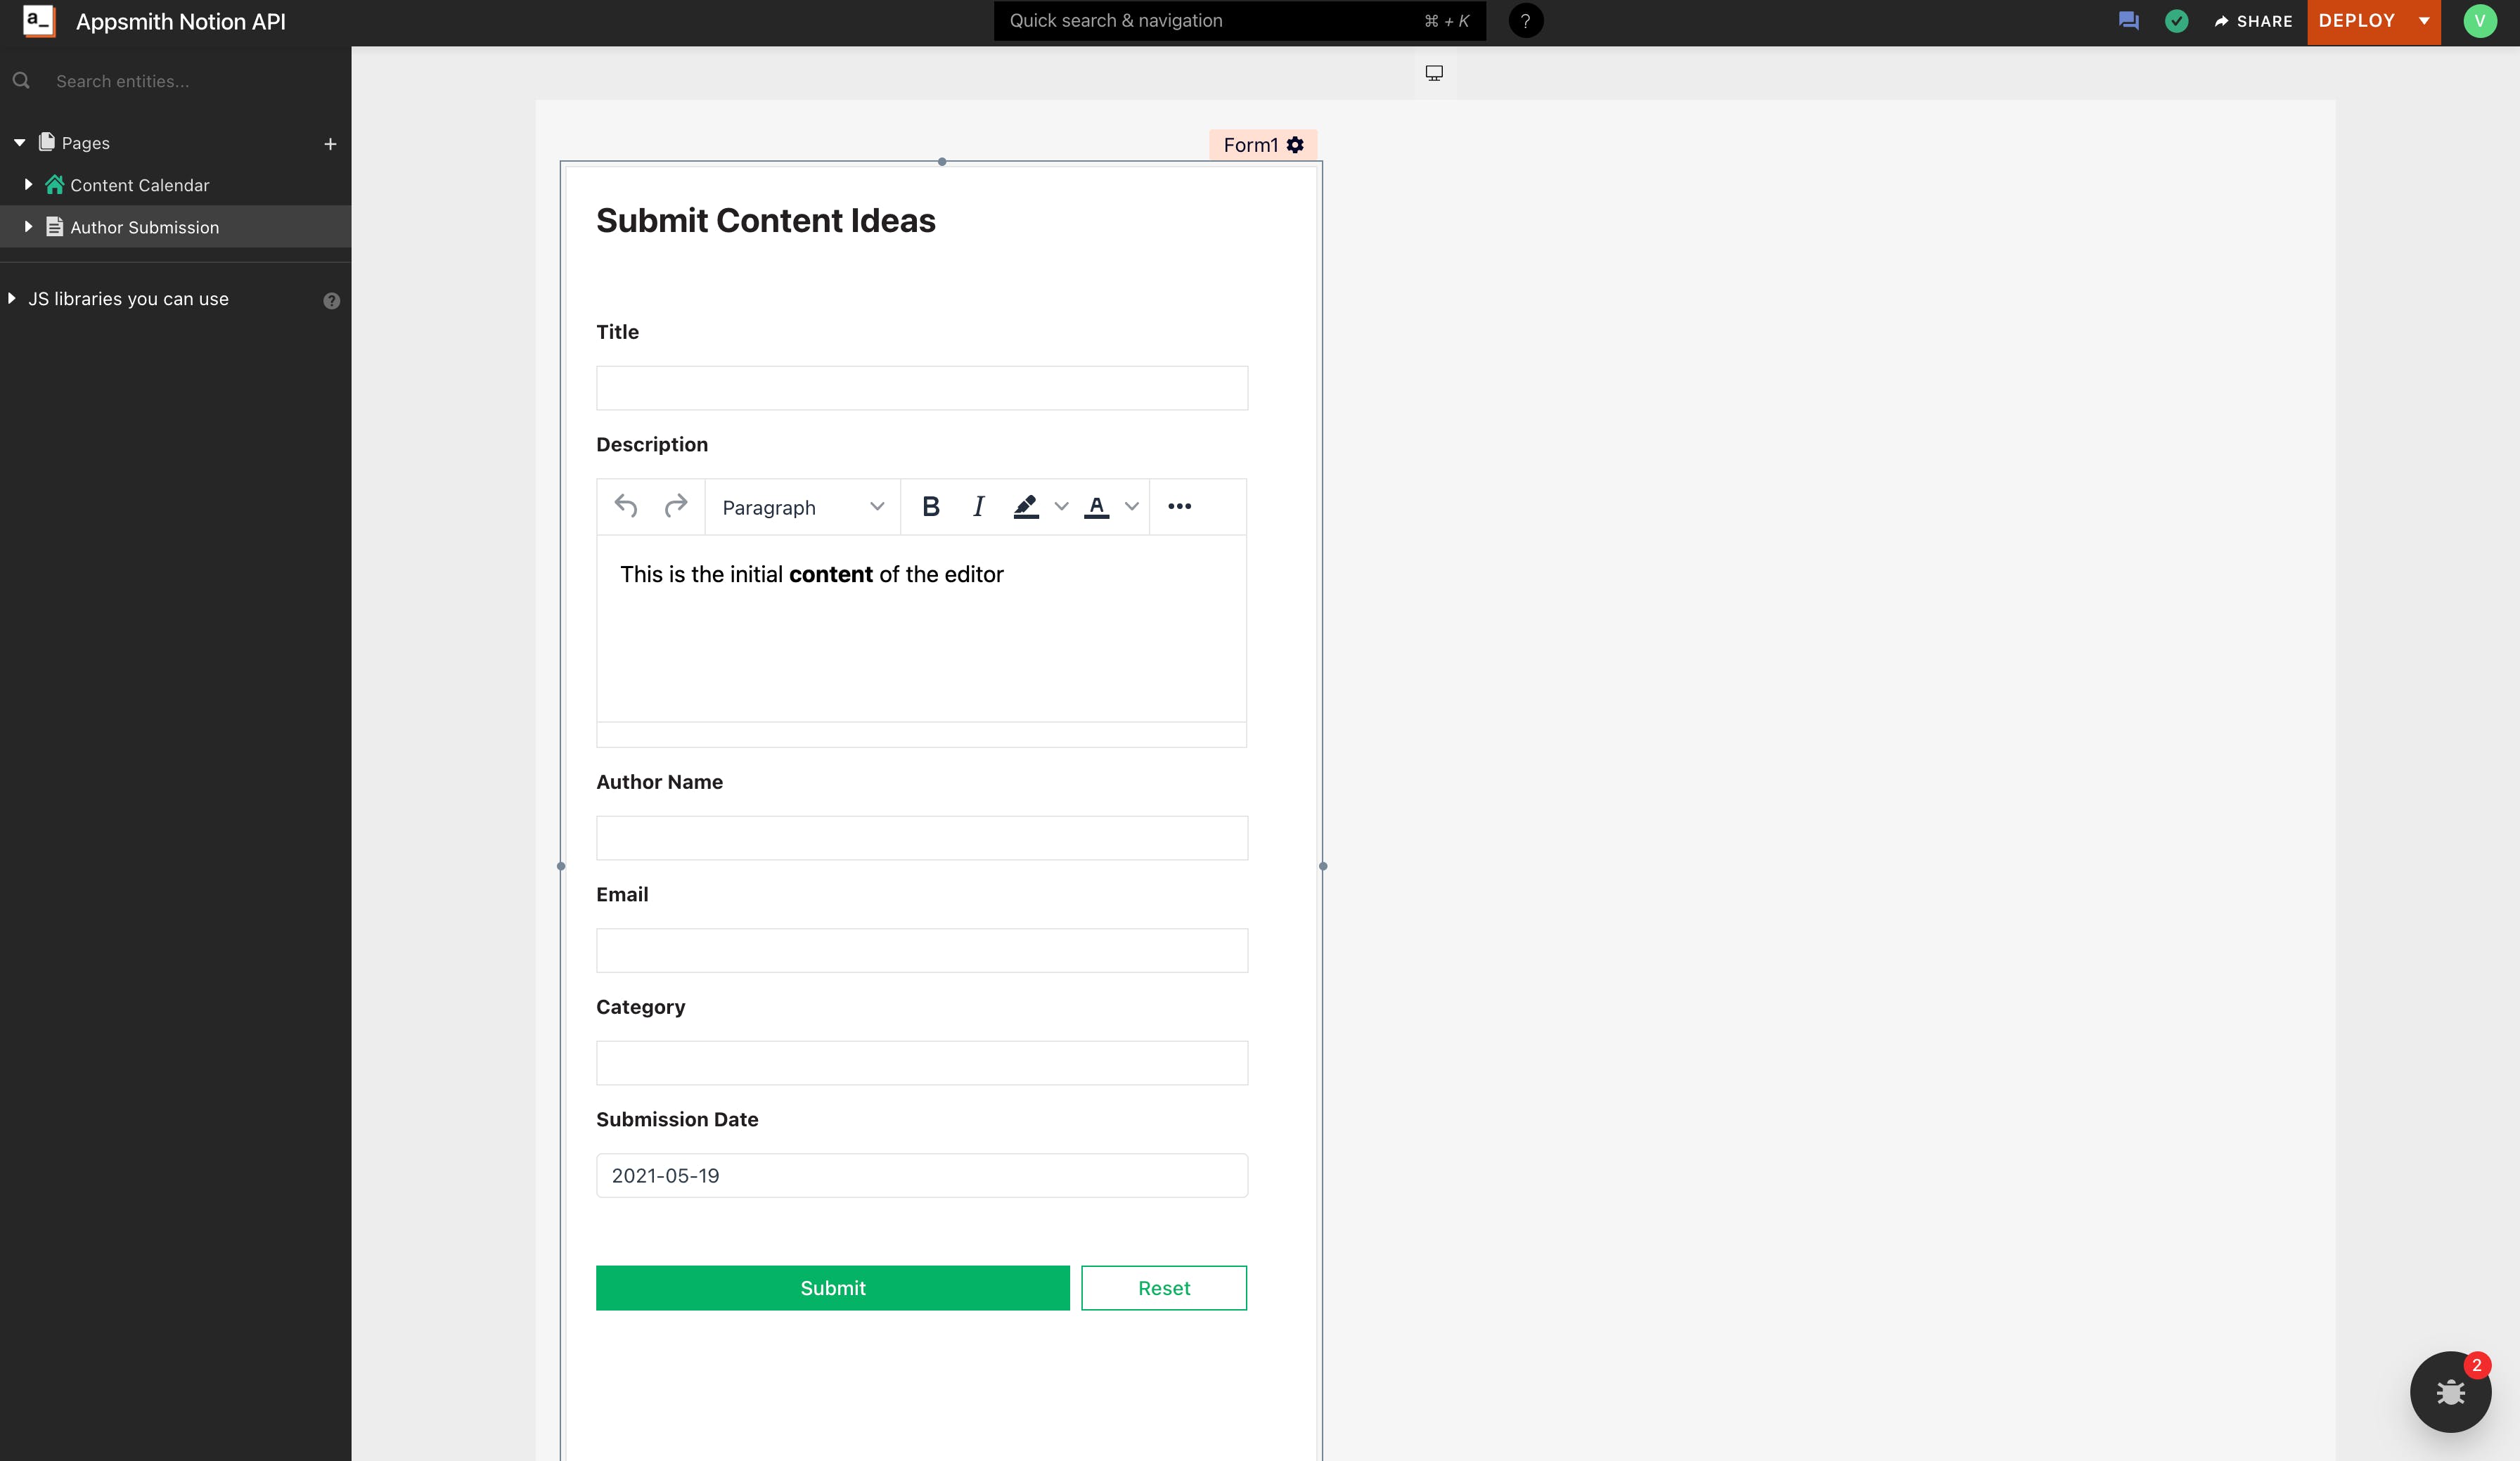
Now, let’s name these widgets (so that we can use them to refer in the POST API method) to the following:
Title - titleInput
Description - descriptionInput
Author Name - authorInput
Email - emailInput
Category - categoryInput
Submission Date - dateInput
Let’s create a new API that’ll add a new value to the Notion page when making submissions from the Appsmith form. Follow the below steps:
First, create a new API under the Author Submission page and name it add_an_item_to_database
Next, add the following keys under the Headers tab.
Authorization:
Notion-Version: 2021-05-13
Content-type: application/json
Now in the body tab, paste the following code:
{
  "parent": {
    "database_id": ""
  },
  "properties": {
    "Author": {
      "type": "rich_text",
      "rich_text": [
        {
          "type": "text",
          "text": {
            "content": "{{authorInput.text}}",
            "link": null
          }
        }
      ]
    },
    "Author Email": {
      "type": "email",
      "email": "{{emailInput.text}}"
    },
    "Category": {
      "type": "rich_text",
      "rich_text": [
        {
          "type": "text",
          "text": {
            "content": "{{categoryInput.text}}",
            "link": null
          }
        }
      ]
    },
    "Status": {
      "type": "select",
      "select": {
        "name": "Not Started",
        "color": "blue"
      }
    },
    "Description": {
      "type": "rich_text",
      "rich_text": [
        {
          "type": "text",
          "text": {
            "content": "{{descriptionInput.text}}",
            "link": null
          }
        }
      ]
    },
    "Deadline": {
      "type": "date",
      "date": {
        "start": "{{dateInput.selectedDate}}",
        "end": null
      }
    },
    "Title": {
      "type": "title",
      "title": [
        {
          "type": "text",
          "text": {
            "content": "{{titleInput.text}}",
            "link": null
          }
        }
      ]
    }
  }
}
This is how Notion API allows us to add new items to a database. Here we'll also have to add the database id in place of
Now open the Submit button’s property pane, update the onClick property to Call an API, and choose add_an_item_to_database API. With this, we should add new data to the Notion table using the Appsmith form!
Send Grid Email Integration
Our content manager now shows all the data and also has a feature to add new content ideas. Now let’s add an email integration to communicate with Authors via Appsmith. We’ll be using Sendgrid to achieve this.
Creating a Modal for sending emails:
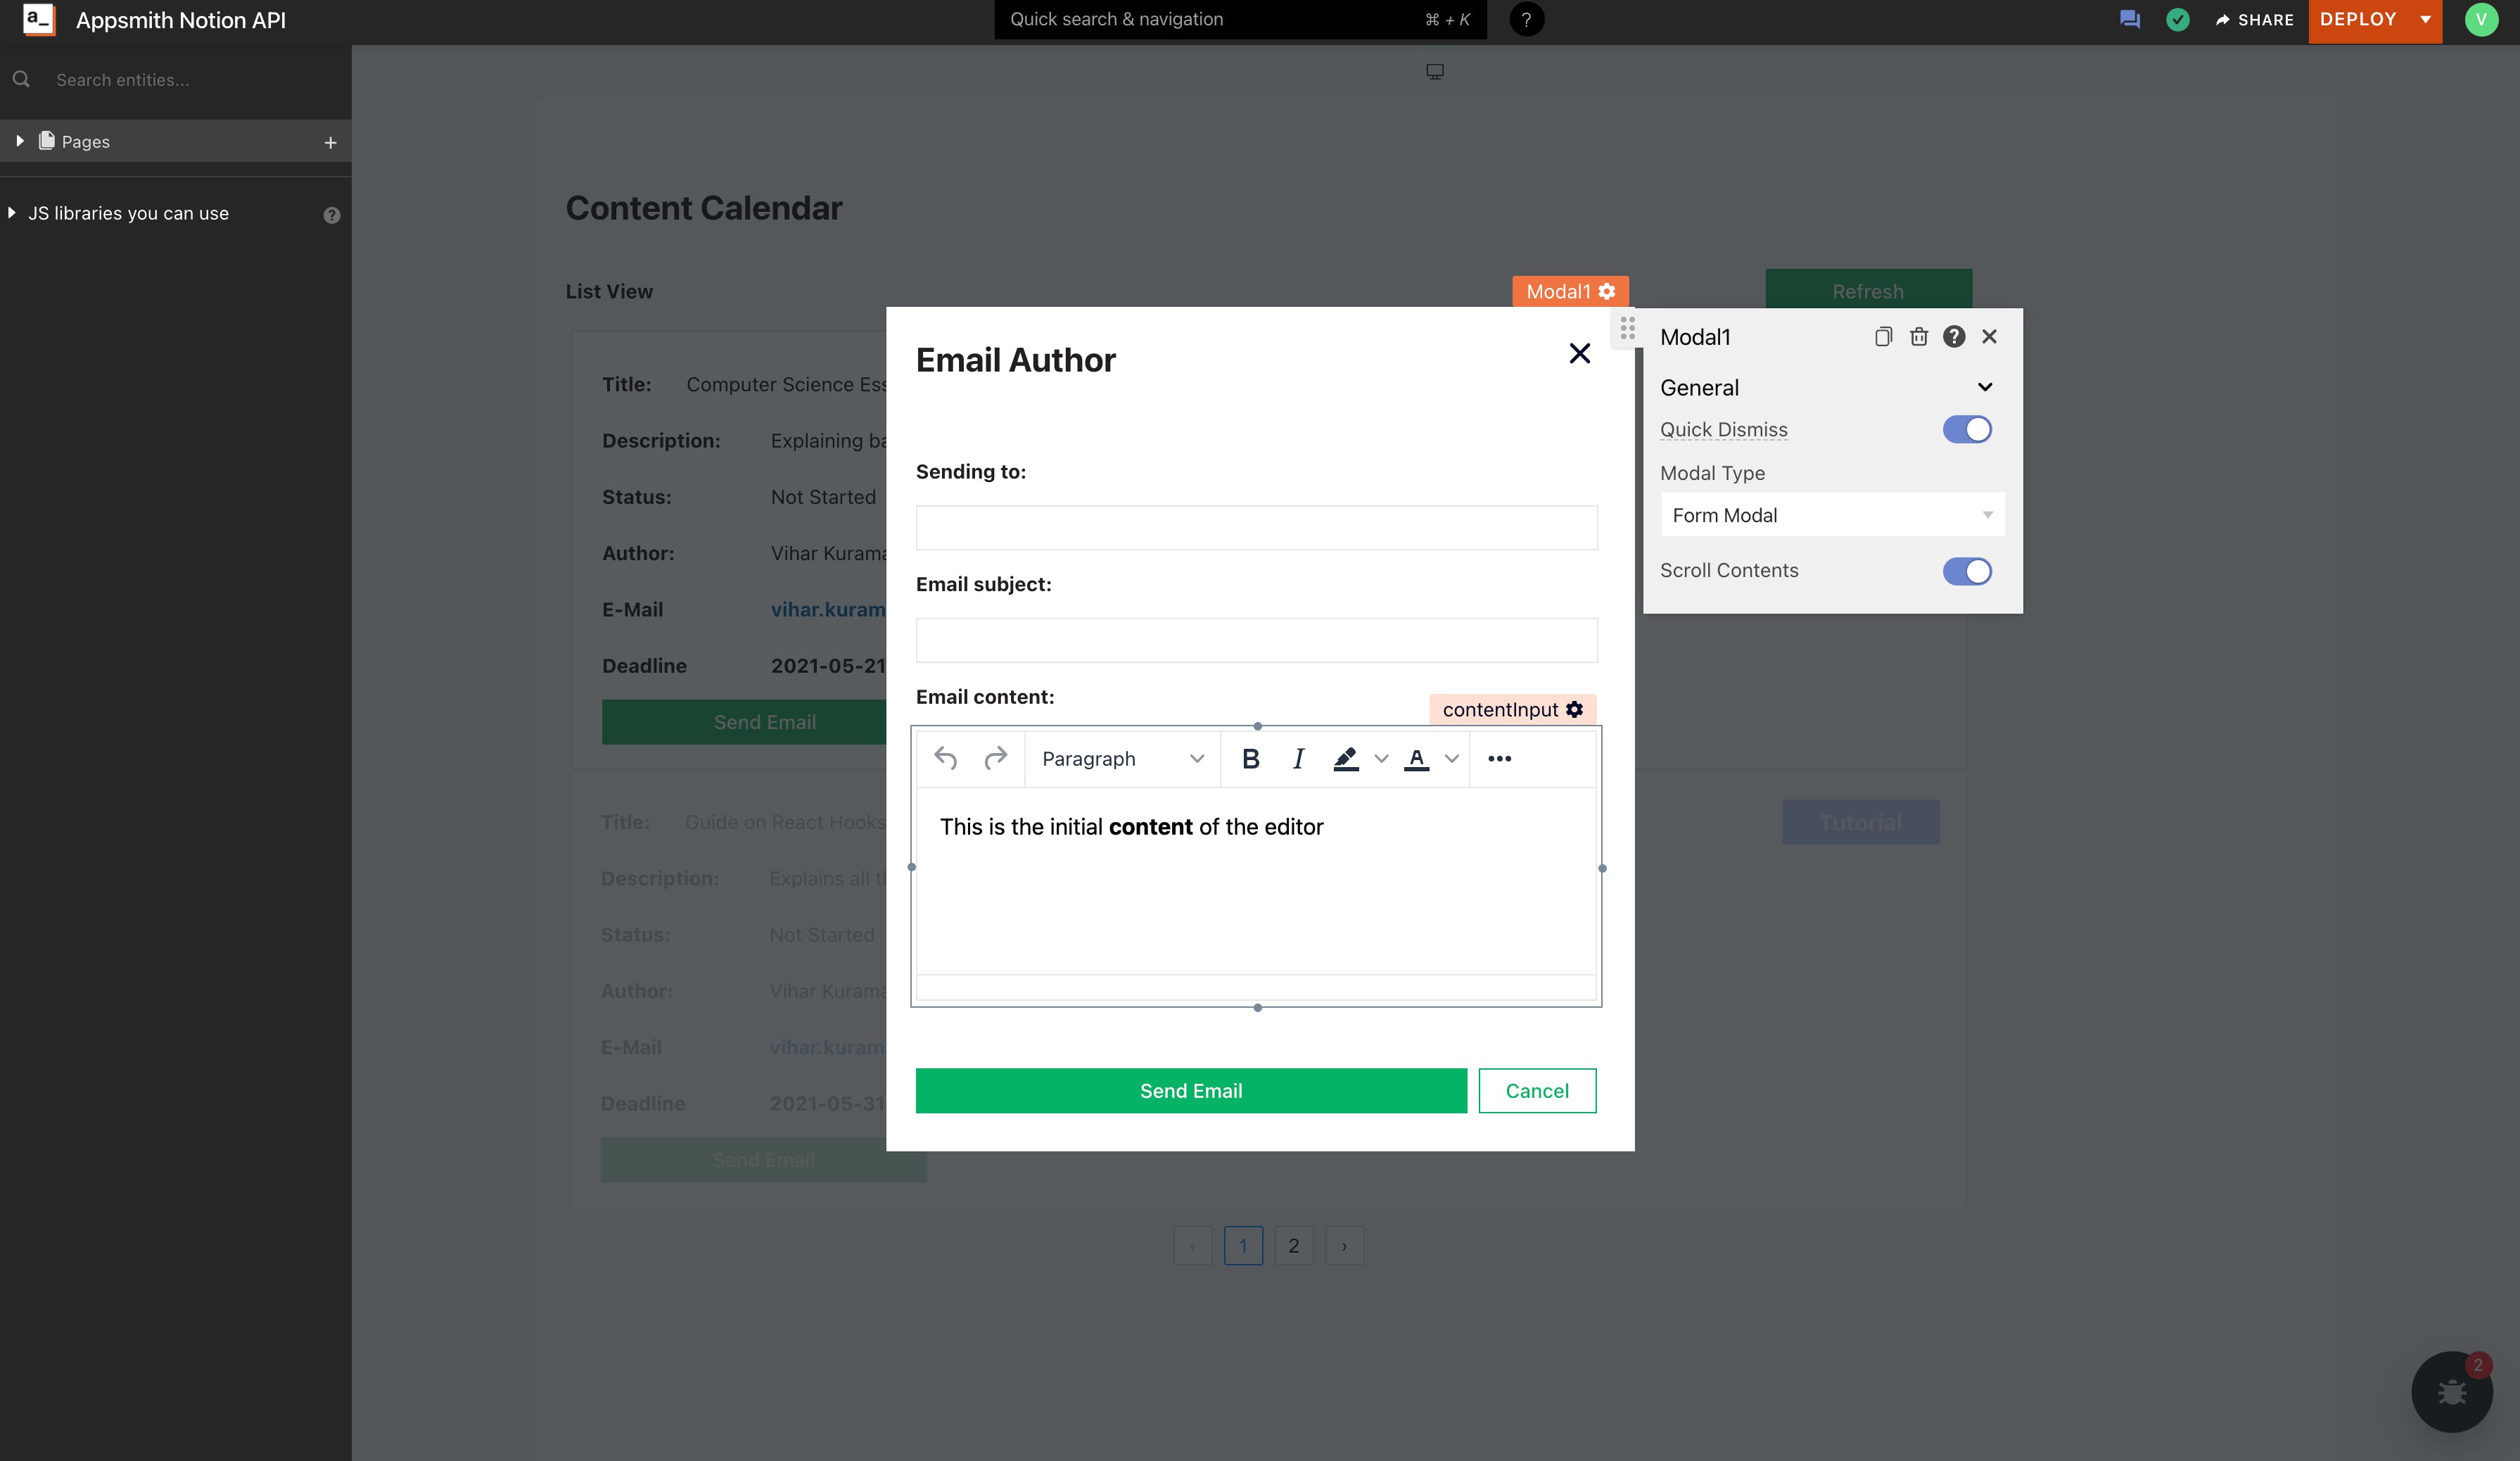
First, create a new modal when the Send Mail button is clicked on the list item. We can do this by setting the onClick property to Open Modal and selecting Create New.
Set the modal type to Form modal by toggling the option in the property pane.
Inside the Modal widget, let’s add some text widgets and input widgets from which we should send Emails.
Following are the fields we’ve created for reference:
Sending To: Input Widget
Email subject: Input Widget
Email content: Rich Text Editor Widget
Now, let’s name these widgets (so that we can use them to refer in the POST API method) to the following:
Sending To: emailInput
Email subject: subjectInput
Email content: contentInput
Below is a screenshot of how the Modal should look like:
Configuring the SendGrid API:
Firstly, we should have a SendGrid account, and if you don’t have one, you can create a free account here.
Next, navigate to the Integration Guide by clicking on the Email API on the left navigation pane.
Choose the Web API and choose the cURL language. Now you’ll be redirected to the verification tab.
On the verification tab, click on the Create API by giving it a name. With this, we should have our SendGrid API key.
Next, open Appsmith and create a new API under Page1, name it send_email. Set the request type to POST and add the following under the URL form:
https://api.sendgrid.com/v3/mail/send
Authorization : Bearer
Content-Type : application/json
Lastly, set the body to the following:
{
  "personalizations": [
    {
      "to": [
        {
          "email": "{{emailInput.text}}"
        }
      ]
    }
  ],
  "from": {
    "email": "test@example.com"
  },
  "subject": "{{subjectInput.text}}",
  "content": [
    {
      "type": "text/plain",
      "value": "{{contentInput.text}}"
    }
  ]
}
This is the default configuration from SendGrid that lets us send Emails, but here we are dynamically passing the to-email, from-email, subject, and content fields from the widgets we’ve created on the Modal. Now, set the onClick property of the form to Call an API and choose the send_email query. With this, we should be able to send Emails from Appsmith successfully!
Conclusion
Deploy your application on the cloud and share it with others, and that's it. We're done! We've seen how easy it is to build an application on Appsmith, specifically a CMS with Notion as a backend. This guide covered how to create a CRM and connect it to a Notion API and how to create and read data. You learned how to build interactive pages, work with widgets, and customize them for your purposes. We have made a slightly more robust application public here; try it out and let us know what you think. You can also check the live demo of our app here.
