How to Automate Refunds with Stripe API and Appsmith Workflows: A Complete Integration Guide

Managing refunds effectively is a common business challenge that requires balancing automation with human oversight. While automation streamlines the process, teams still need the ability to step in when necessary—especially for high-value transactions or cases needing validation.
This article will show you how to build a refund request manager using Stripe and Appsmith Workflows. The system creates an approval layer between refund requests and their execution in Stripe, strengthening control and oversight. We'll use Appsmith's new human-in-the-loop workflows, which can pause processes while waiting for user input.
Our guide will cover:
Creating a basic CRUD application using Stripe's REST API
Implementing an approval workflow where one user requests a refund and another approves it
Using Appsmith Workflows to manage this process without giving everyone direct Stripe access
This two-person verification system enhances security and accountability in financial operations. Before we explore the use case, let's discuss why you might choose to build this system with the Stripe API and Appsmith instead of using Stripe's built-in approval process.
Why build a custom refund manager?
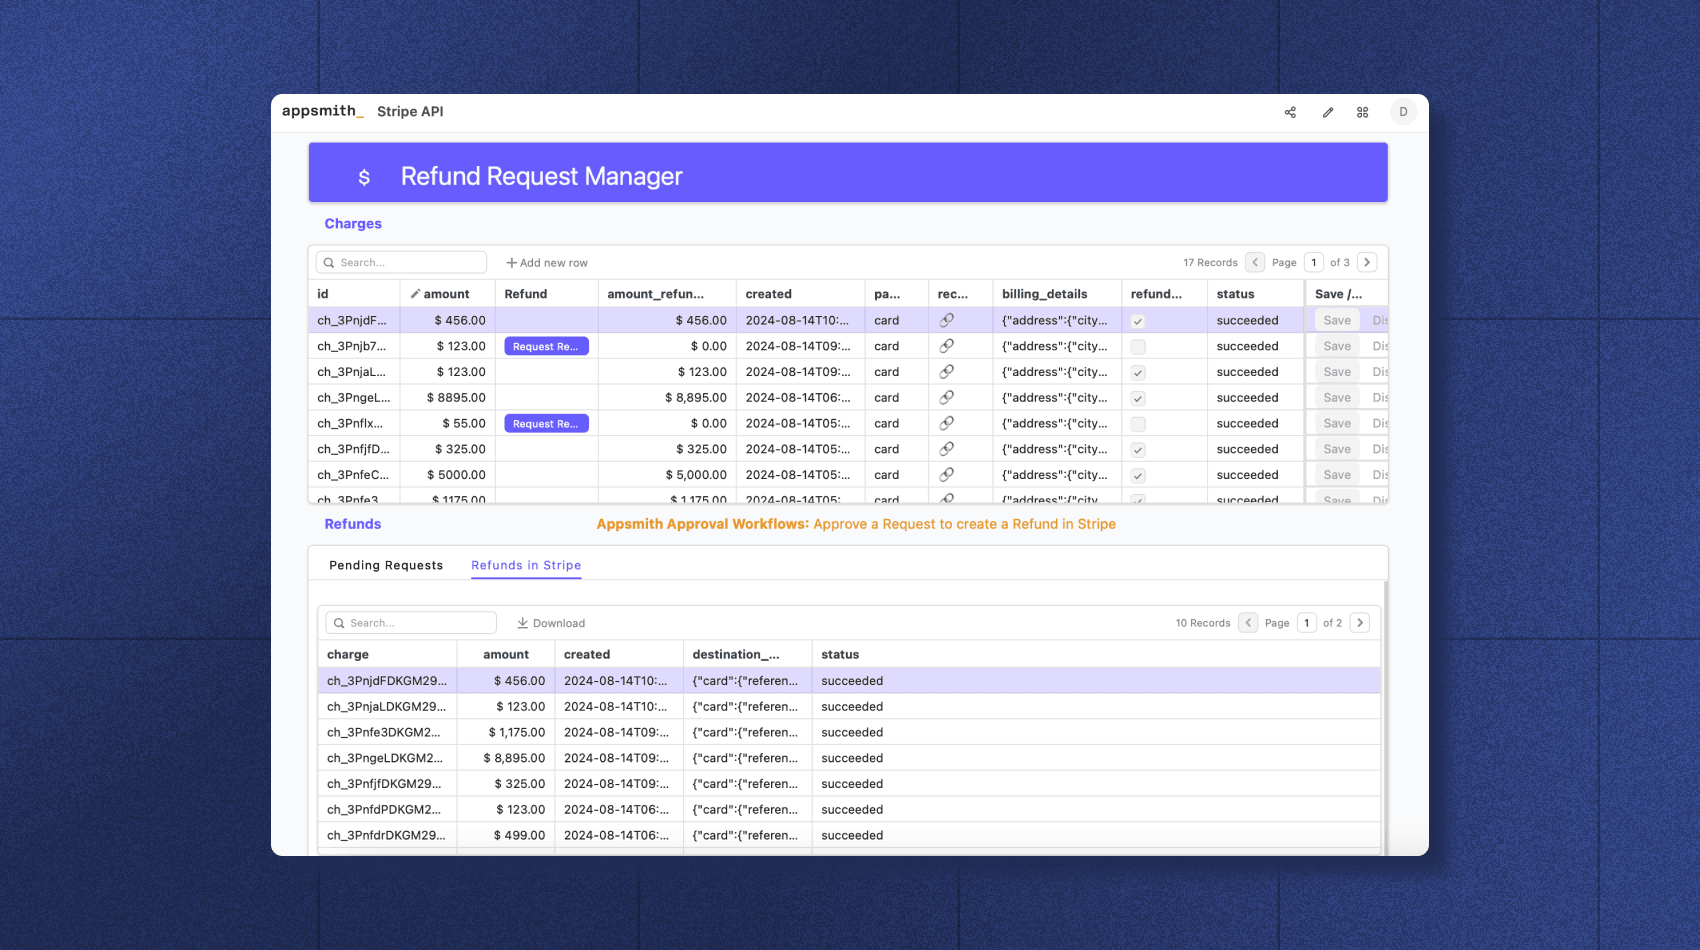
Although Stripe provides its own refund management system, building a custom solution with Appsmith and the Stripe API offers distinct advantages:
Granular Access Control: Create a tailored approval process with multiple team members, using Appsmith's role-based access control to manage who can view, request, and approve refunds.
Integration flexibility: Seamlessly connect the refund process with your existing internal systems and workflows.
Customized user interface: Build an intuitive dashboard that matches your team's specific needs and workflows.
Audit trail: Keep a comprehensive record of all refund activities—requests, approvals, and denials—for complete accountability.
Team access management: Enables team members to manage Stripe data independently without sharing passwords or creating additional user accounts.
Now, let's explore the use case and implementation of our refund management system.
Use case: Automated and manual refund processing
Let's explore a scenario where customers can request refunds through two channels—directly via the app or through customer support. Here's the process flow:
Customer requests refund: Customers initiate refunds through the app or by contacting support.
Through the app: A webhook automatically triggers the refund approval workflow.
Through support: A support representative starts the approval process using an Appsmith-built Support Dashboard.
Refund validity check: The system verifies refund eligibility based on criteria like time window and item status. Customers receive immediate notification if their request is invalid.
Automated low-value refunds: For small refund amounts, the system automatically processes the payment through Stripe and notifies the customer via email or in-app message.
High-value refund approvals: Larger refund requests require finance team review. The team evaluates the customer's reason and decides whether to approve or deny the request.
Final communication: The system emails the customer about their refund status, including the reason if denied.
Let's walk through implementing the refund validity check with Appsmith workflows.
Prerequisites
Before we begin, ensure you have the following:
A trial Appsmith account - Sign up for free to out cloud sandbox https://workflows.app.appsmith.com/
A Stripe account - You'll need this to access the Stripe API. Create one at https://dashboard.stripe.com/register if necessary.
Basic knowledge of JavaScript and REST APIs.
Step-by-step guide to automating refunds with Appsmith workflows
1. Setting Up the Refund Request Manager
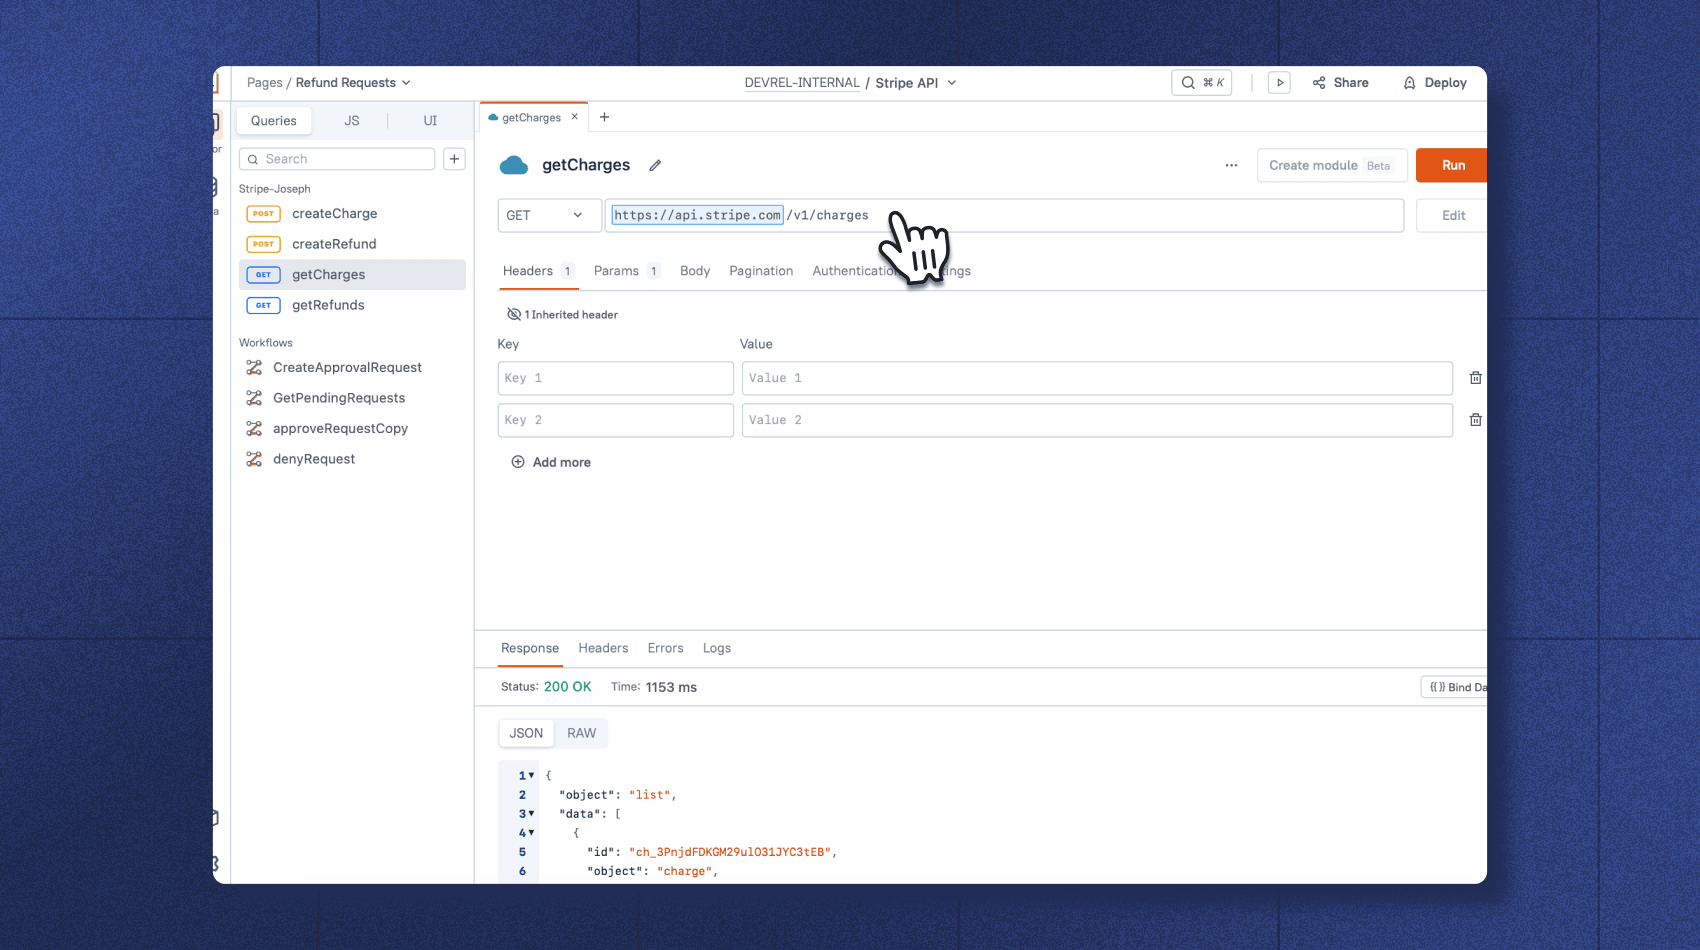
To start, you'll need to create a Support Dashboard app that interacts with Stripe to manage orders and refunds.
Create API Calls for Stripe Charges and Refunds:
Create an Authenticated API Stripe datasource with your API key
Use the
GETmethod to list all charges from Stripe, displaying them in a table.
To understand how to integrate Stripe API with Appsmith, creating APIs to List Charges and Refunds, and refunding payment intents, please refer to this detailed tutorial: Connecting Stripe API with Appsmith.
2. Create a workflow
Now that we have the ability to create refunds, we want to add a layer of control and security between user actions and direct interactions with Stripe. To achieve this, we're implementing a workflow that introduces an approval process before refunds are processed.
The workflow allows for a human-in-the-loop system, where requests can be reviewed and approved before execution.
Follow these steps to create the workflow:
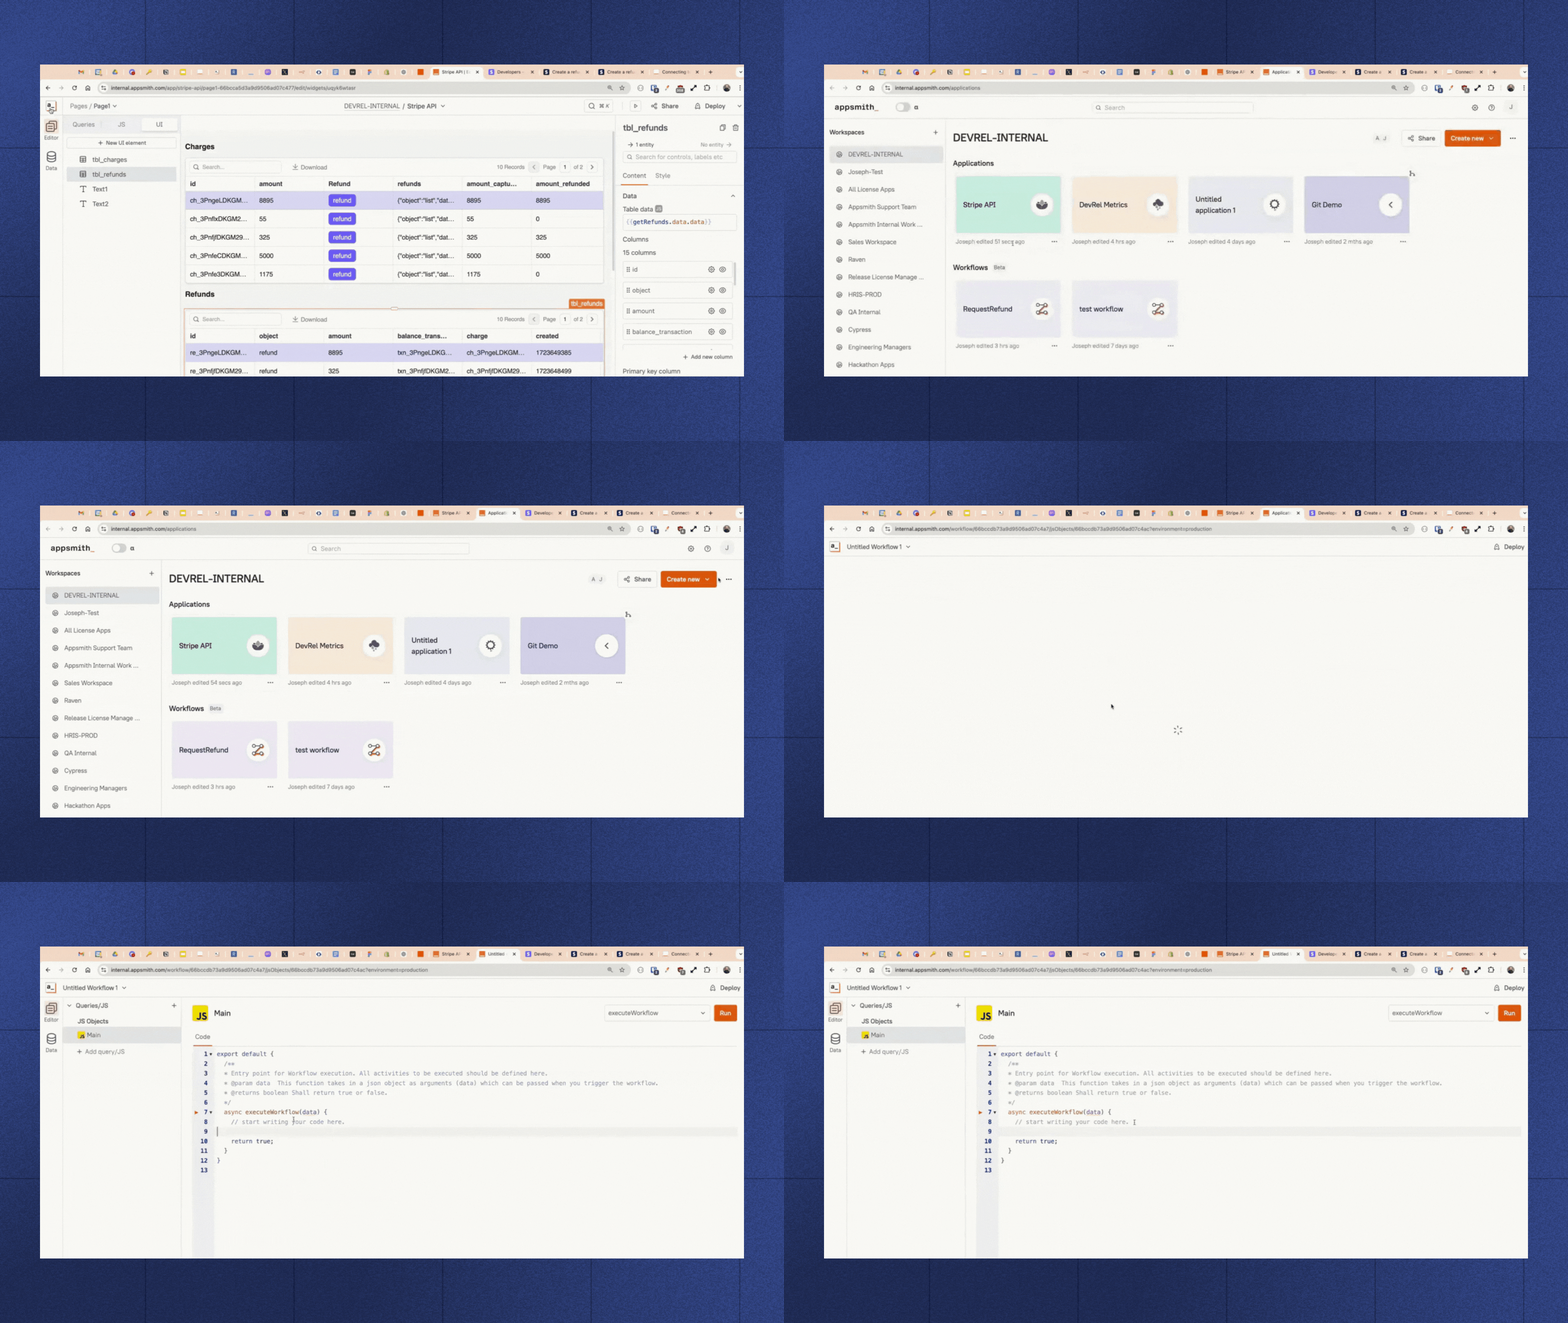
Go back to the Workspace level and create a new workflow.
In your JS Objects, create the assignment with the assignRequest() function. This allows you to create a decision point in a workflow that requires user intervention.
Then add the following to your workflow code:
await appsmith.workflows.assignRequest({
      requestName: "Approval",
      resolutions: ["Approved", "Rejected"],
      requestToUsers: ["tim@example.com", "tom@example.com"]
    });
At this point, you need to specify the name of the request, the possible resolutions, and at least one user or group to assign it to. Let's break down these parameters:
requestName: This is a unique identifier for the approval request. Choose a descriptive name that reflects the purpose of the approval, such as "RefundApproval" or "HighValueRefundRequest". It's crucial to be consistent and deliberate with these names, as they're all stored in the same table. The name is used to filter and queue up specific approval workflows, so a well-chosen name allows you to manage multiple workflow types effectively.
resolutions: These are the possible outcomes of the approval process. In our case, we've used "Approved" and "Rejected", but you could add more nuanced options if needed, like "PartialRefund" or "NeedMoreInfo".
requestToUsers: This array specifies which users or groups should receive the approval request. Replace "
tim@example.com " and "tom@example.com" with actual user email addresses of team members responsible for approving refunds. You can also assign a user group.
You can customize these parameters to fit your specific workflow needs. For this demonstration, we've configured the workflow to trigger the pending request as follows:
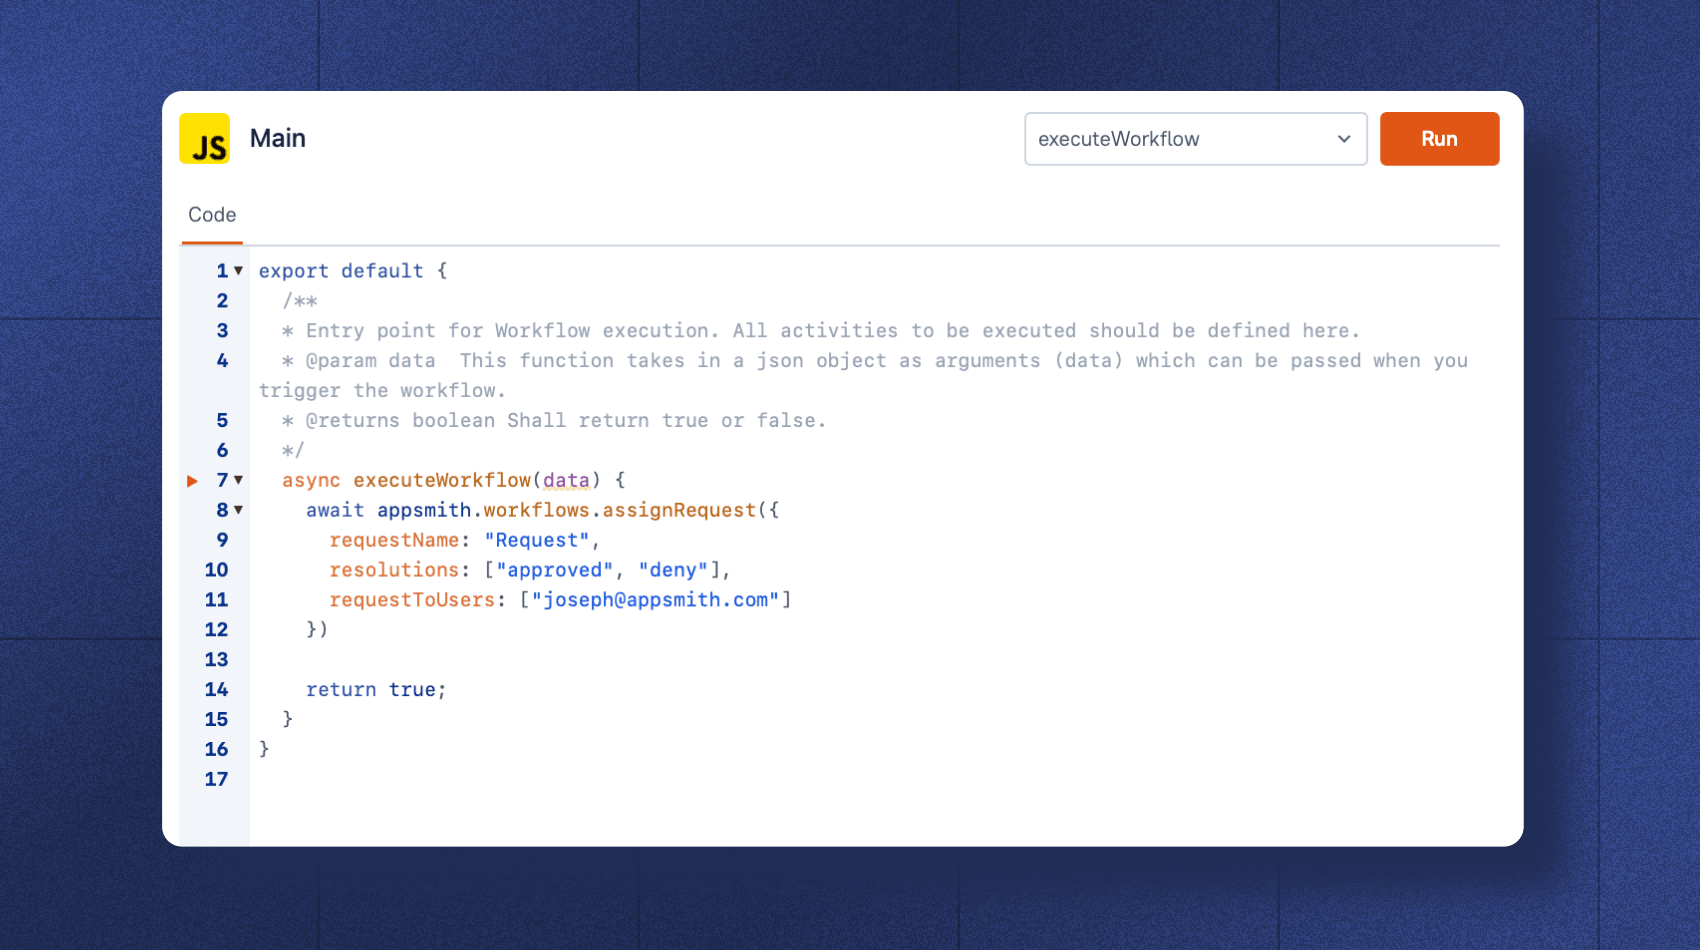
Once you have defined the parameters, you need to name the workflow and deploy it separately from your main app. This is because workflows in Appsmith are their own entities, distinct from regular apps. Each workflow needs to be deployed individually.
3. Add and run the workflow in your Stripe application
Now, return to your Stripe refunds application and add the workflow you've created. To do this, navigate to the Queries section, create a workflow query, select the workflow previously created, and choose "Trigger Workflow" as the request type.
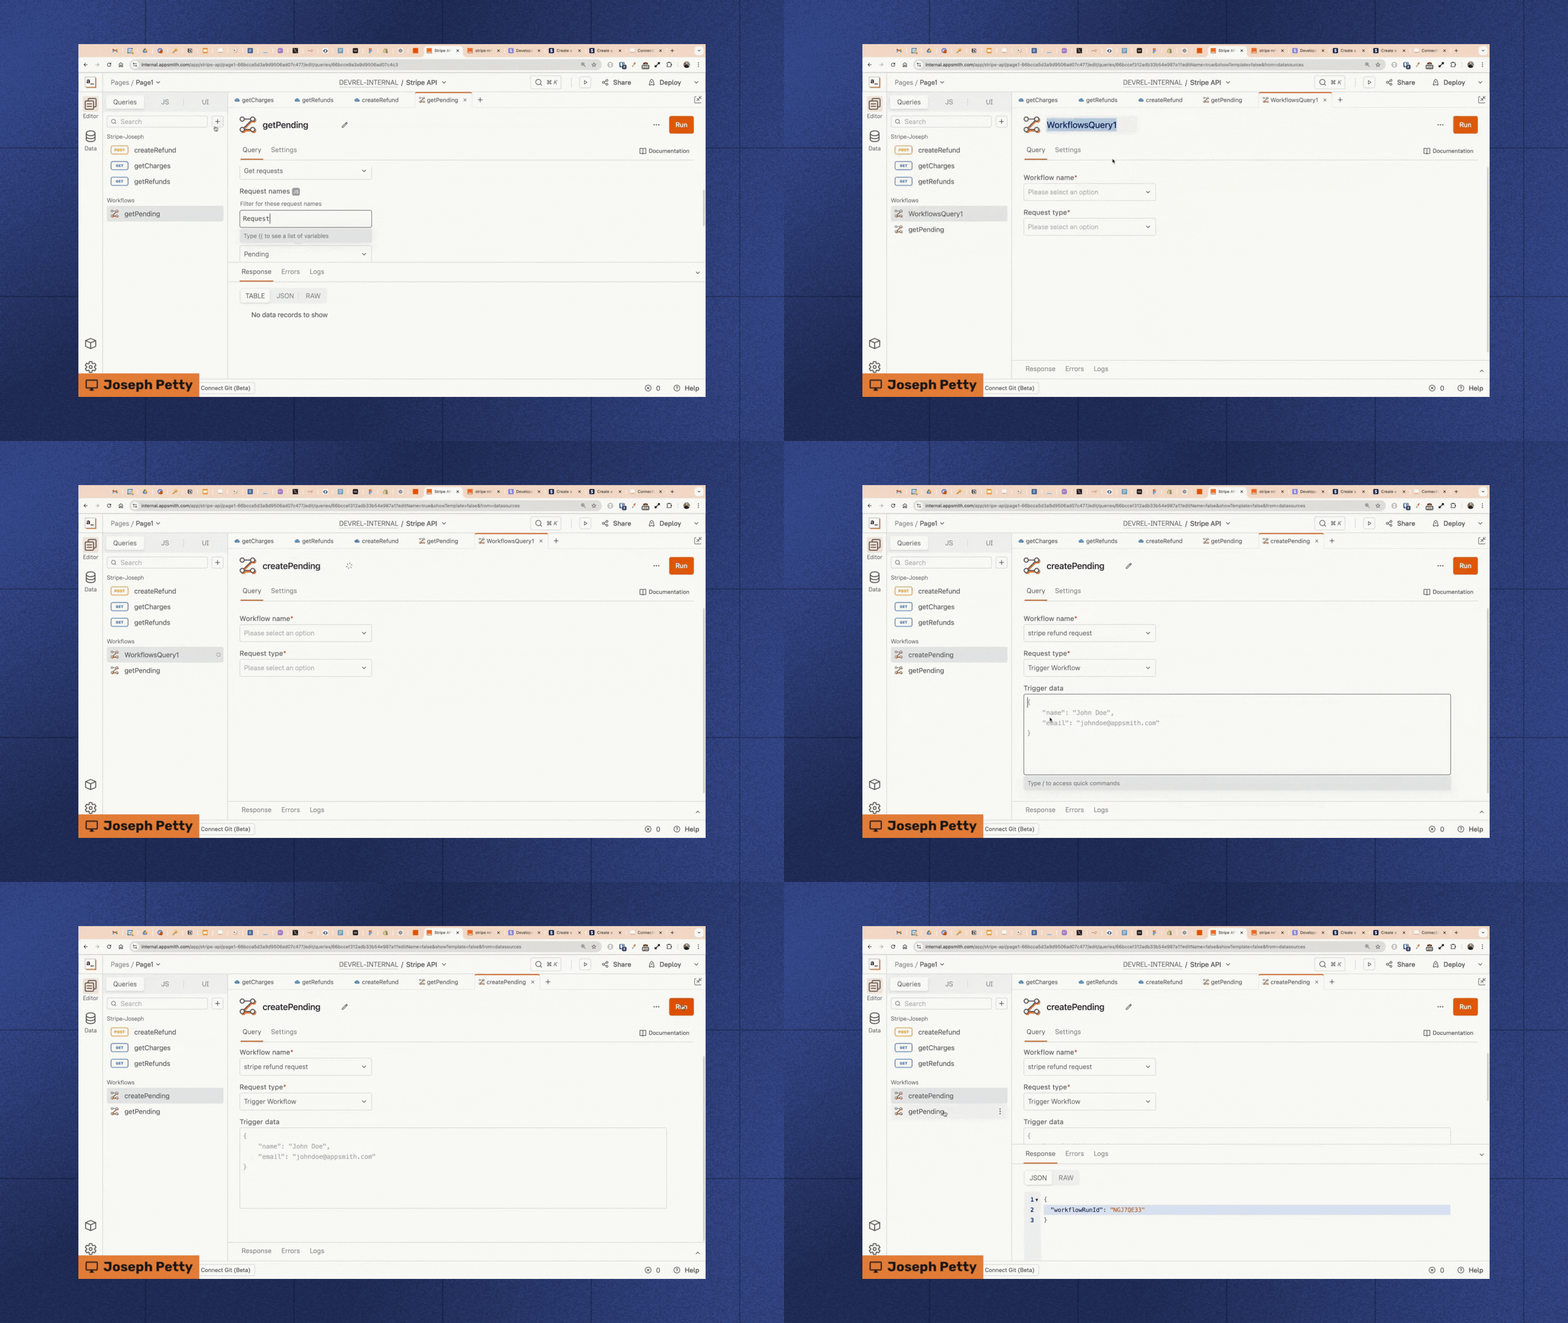
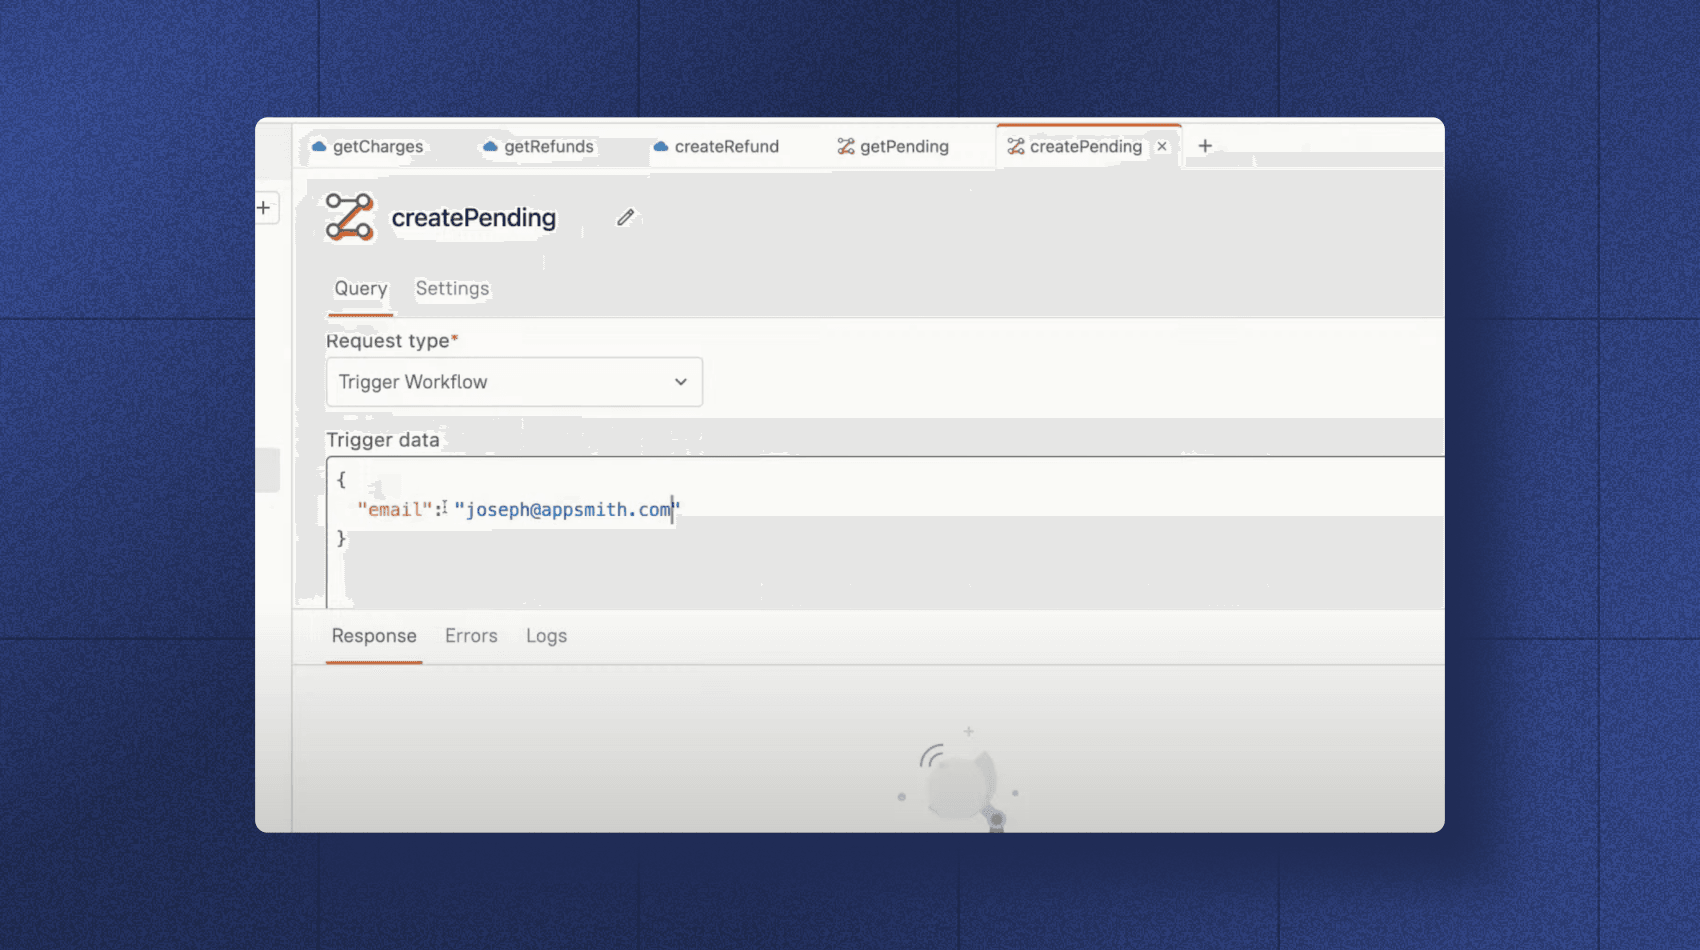
Make sure to add the email in “Trigger data” in the createPending workflow.
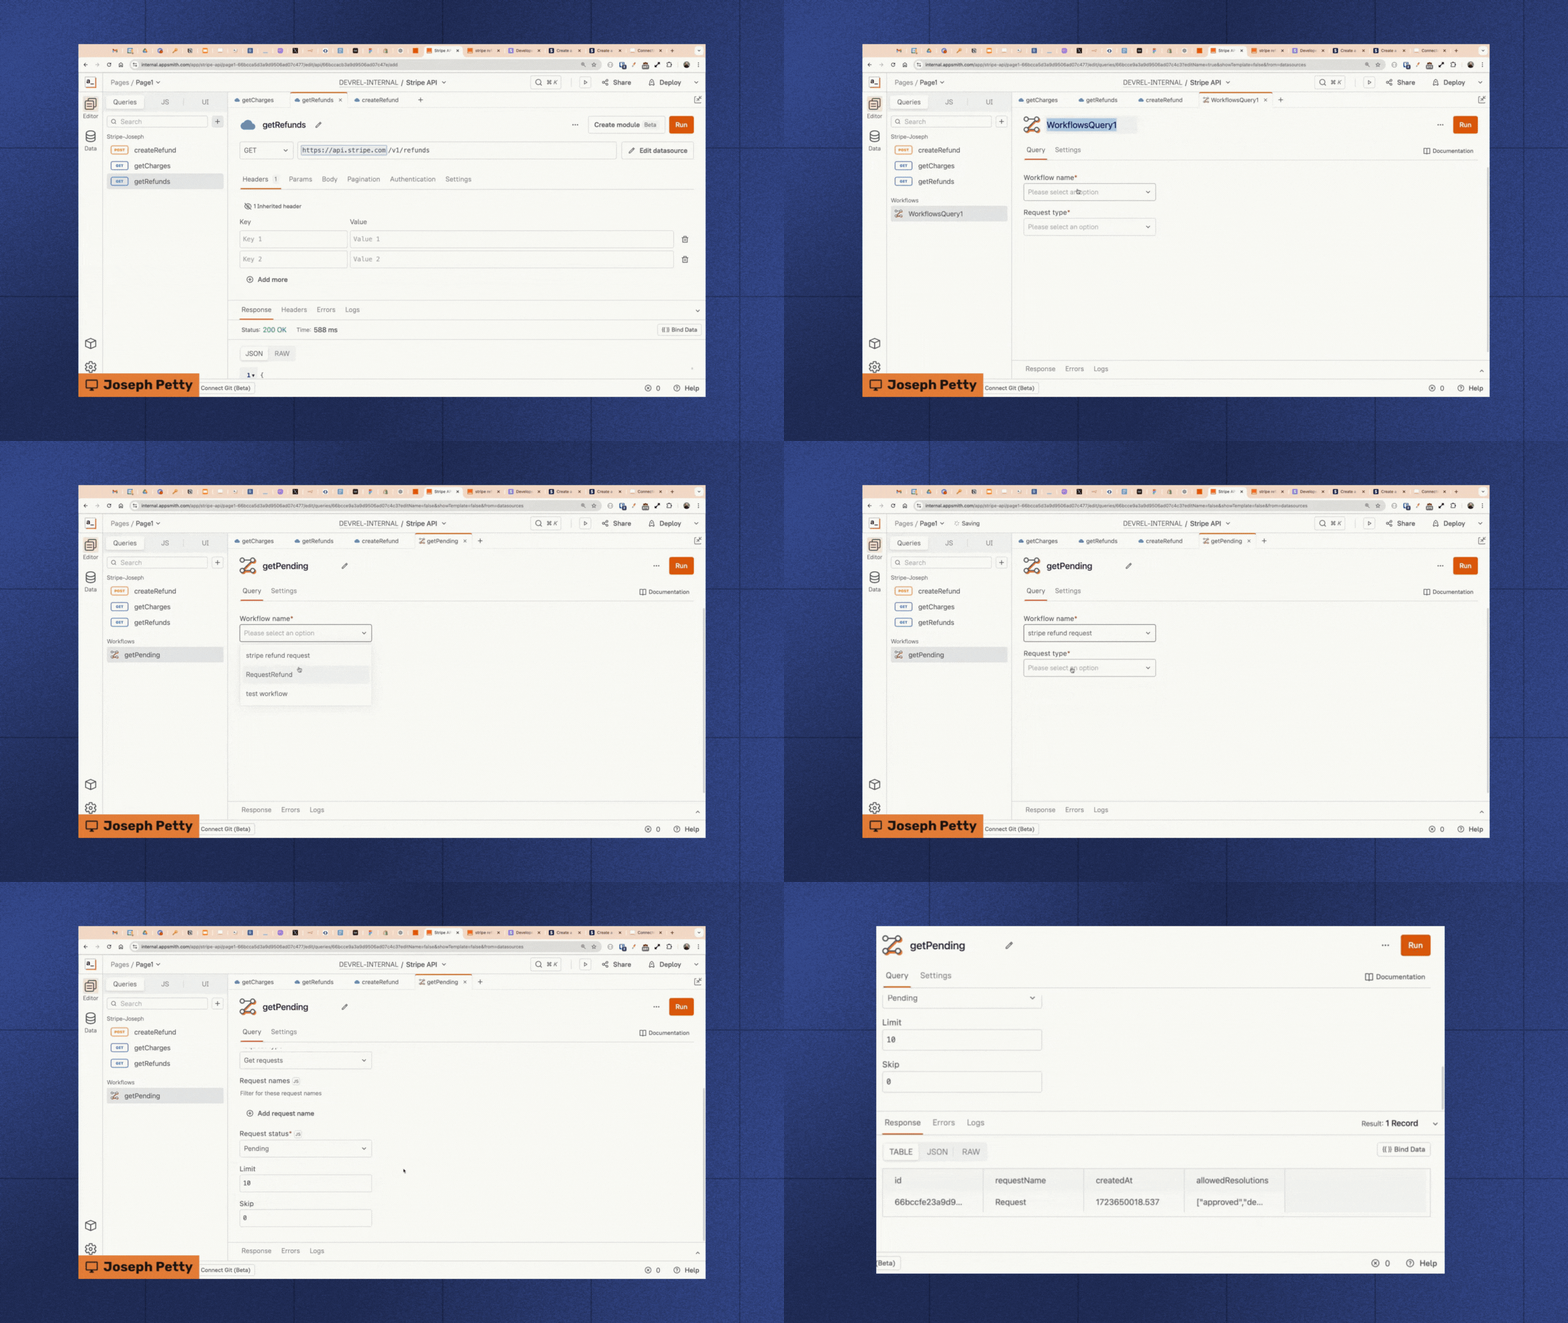
After triggering the workflow, we can add a new workflow query in the dropdown of queries. This query will be used to retrieve pending requests. Here's how to set it up:
Select the workflow we initially created.
Choose "Get Requests" as the request type.
Set the request status to "Pending" and run it.
This setup allows us to group all related requests together, as they are stored in the same table. By using consistent naming and filtering, we can efficiently manage and track specific approval workflows within our system.
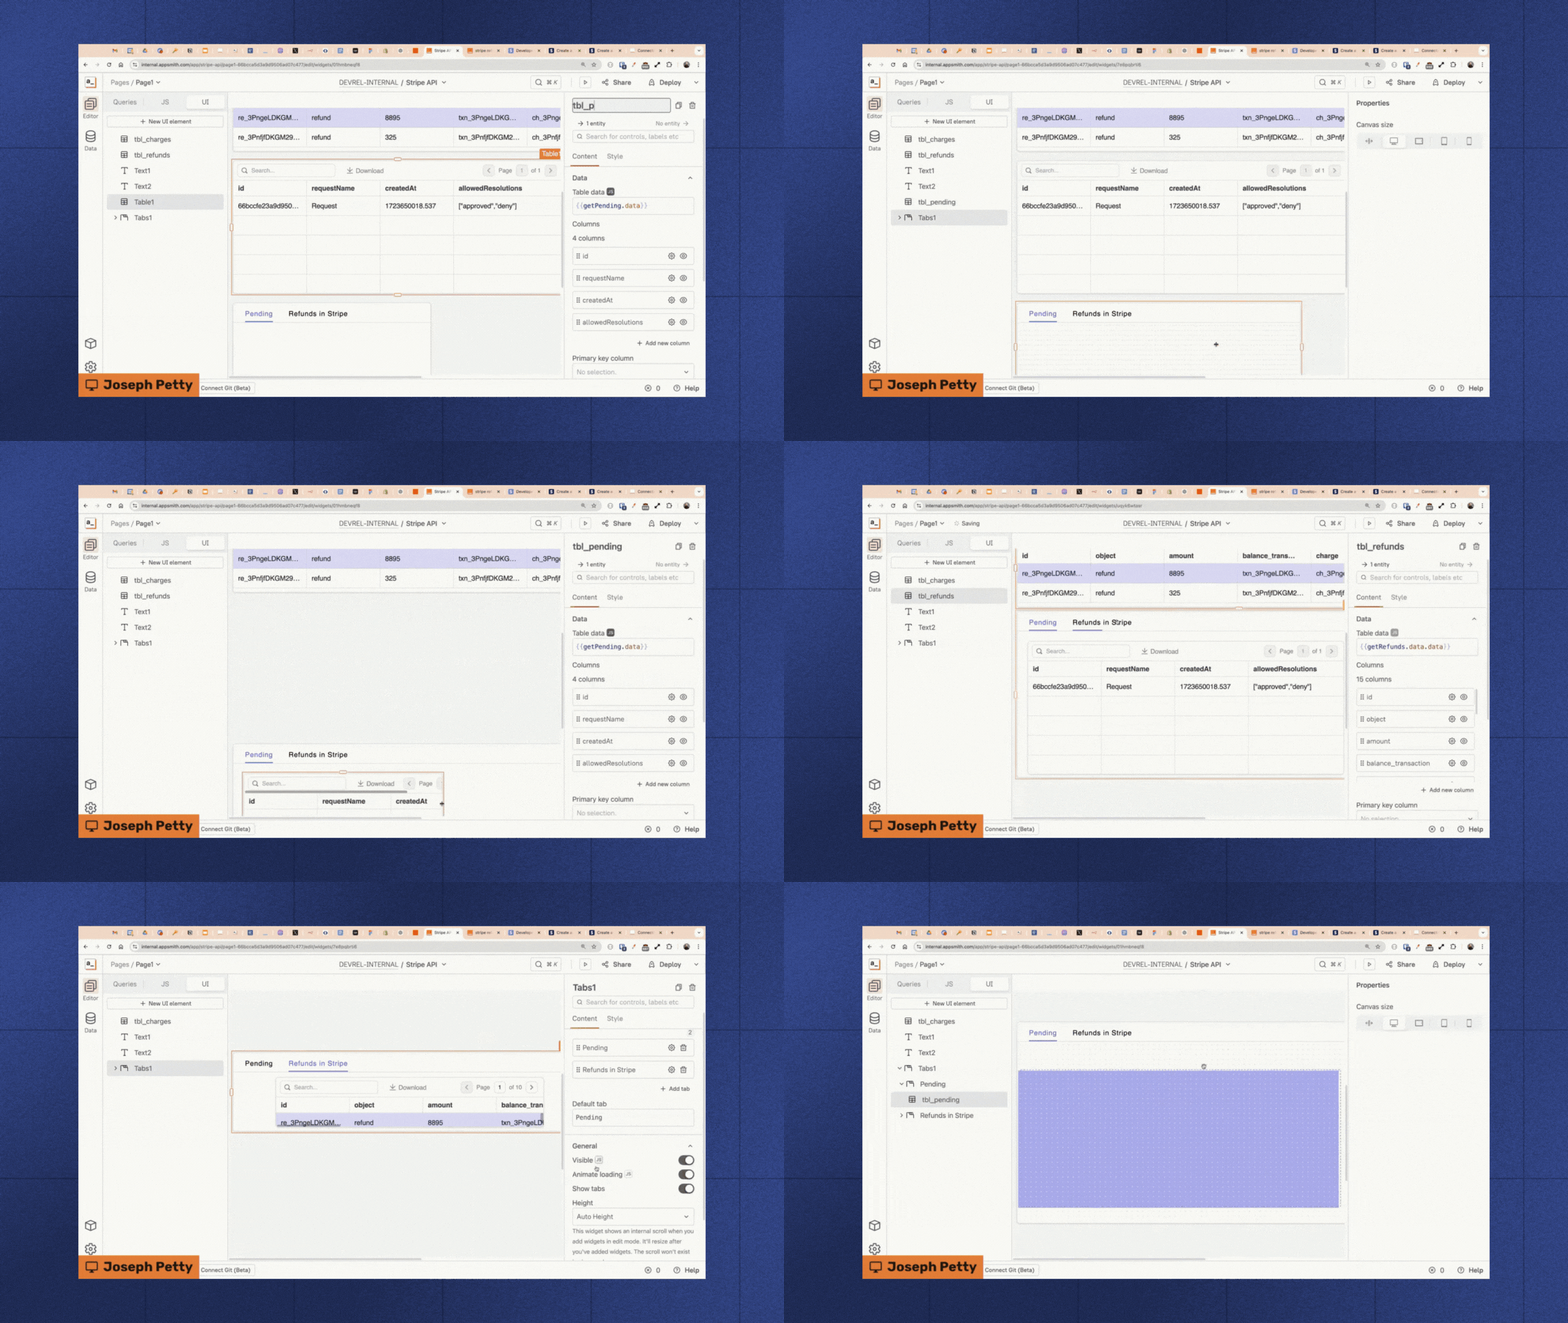
After you run your workflows, go to UI, click on “+New UI element” and create a new table widget. The connect the table with the getPending workflow. In this table you will be able to see the requests done. We’ll name the table tbl_pending .
Now, use the “Tab” widget to create organise your data. We’ll name the first tab “Pending” and the second one “Refunds in Stripe”. Then we’ll choose the “Pending” tab as the default one. After drag and drop the tbl_pending into the pending tab and the refunds table into the refunds in Stripe tab.
4. Setting up the UI and configuring the refund button
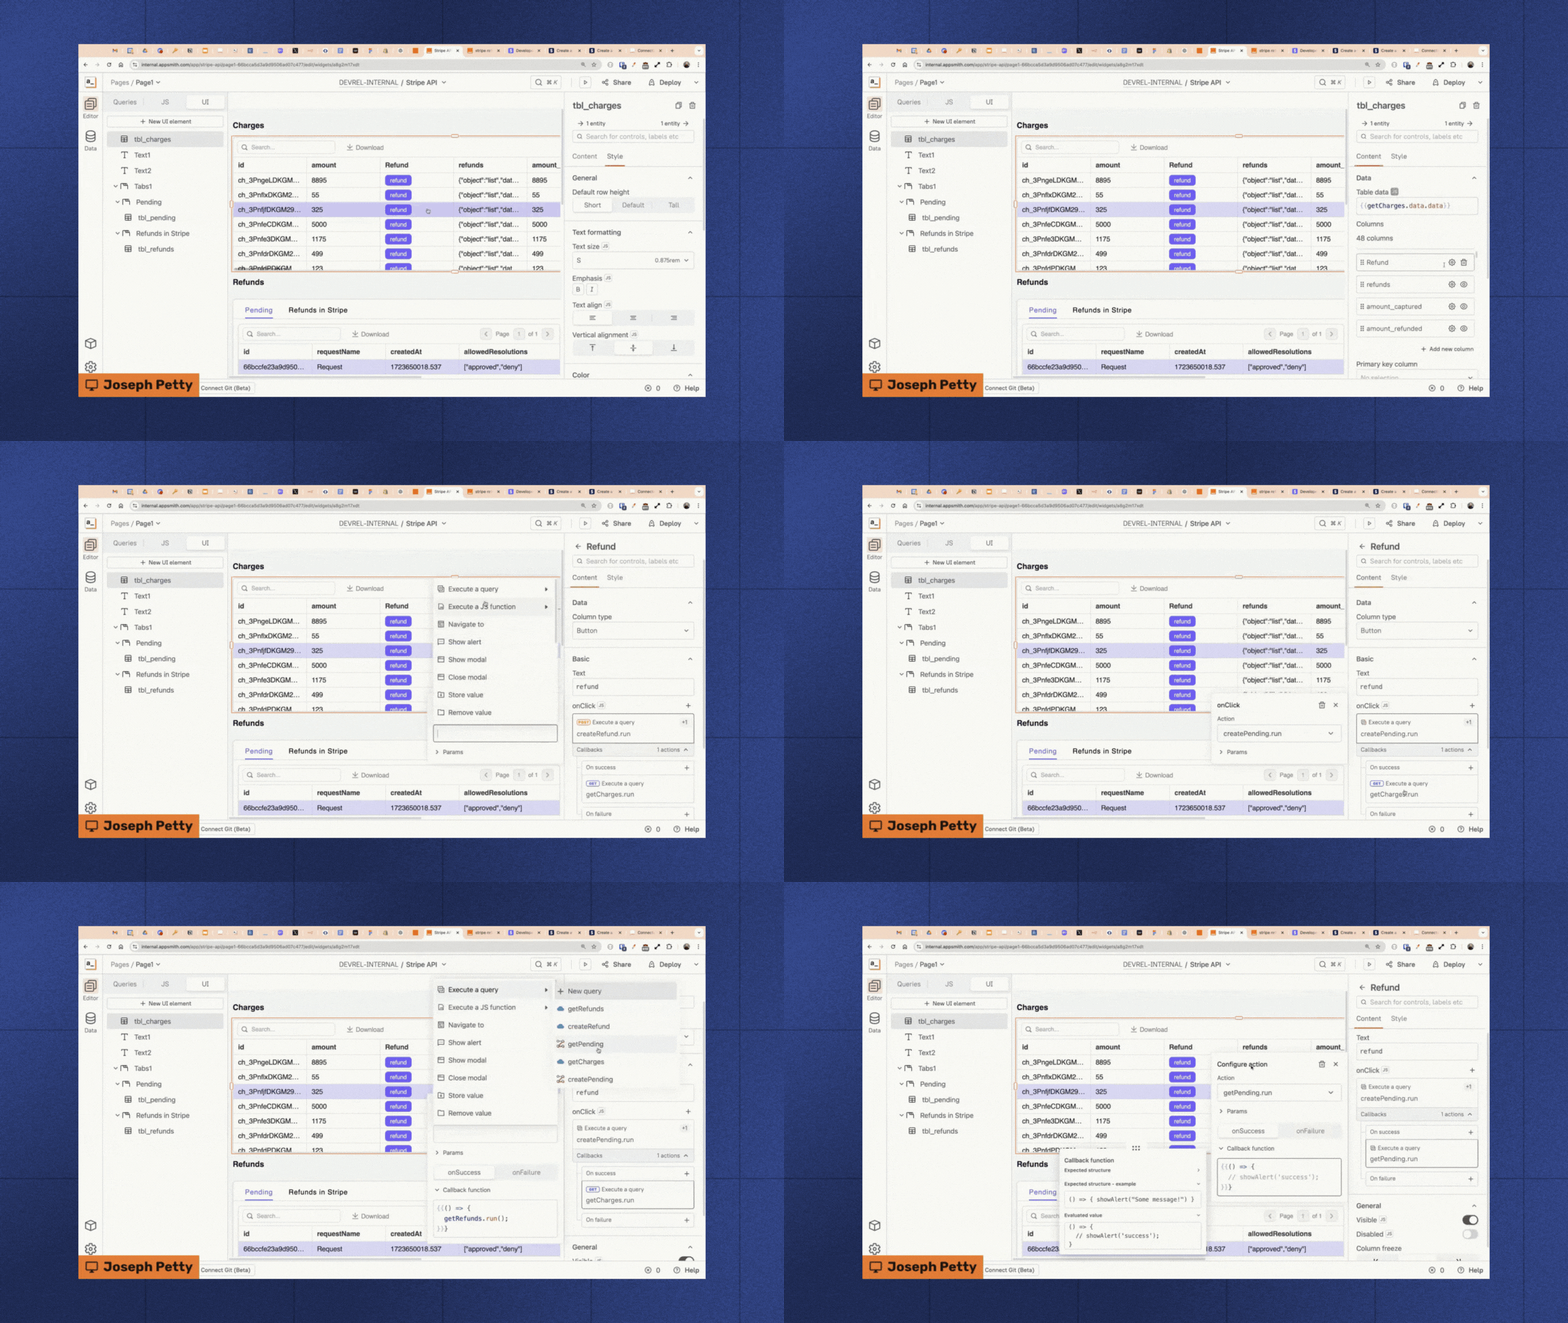
Now that we have set up our workflow queries, let's modify the "Refund" button functionality in our charges table. Instead of directly creating a refund through the Stripe API, we'll trigger our approval workflow:
Click on the "Refund" button and navigate to its onClick event handler
Select "Execute a query" and choose the
createPendingworkflow queryIn the success handler of this action, add another "Execute a query" step and select
getPending
This configuration ensures that when someone clicks the Refund button, it creates a pending approval request and immediately refreshes the pending requests table to show the new entry. This implements our desired approval workflow instead of processing refunds directly.
5. Adding approval/denial functionality to pending requests
After setting up the initial workflow, we need to implement the ability to approve or deny pending refund requests. This requires adding interactive elements to our pending requests table and creating the necessary workflow queries to handle these actions.
Adding the Menu Button
First, we'll add a Menu Button to the pending table that provides options to approve or deny requests:
In the pending table configuration, add a new column with the type "Menu Button"
Configure the menu to show two options: "Approve" and "Deny"
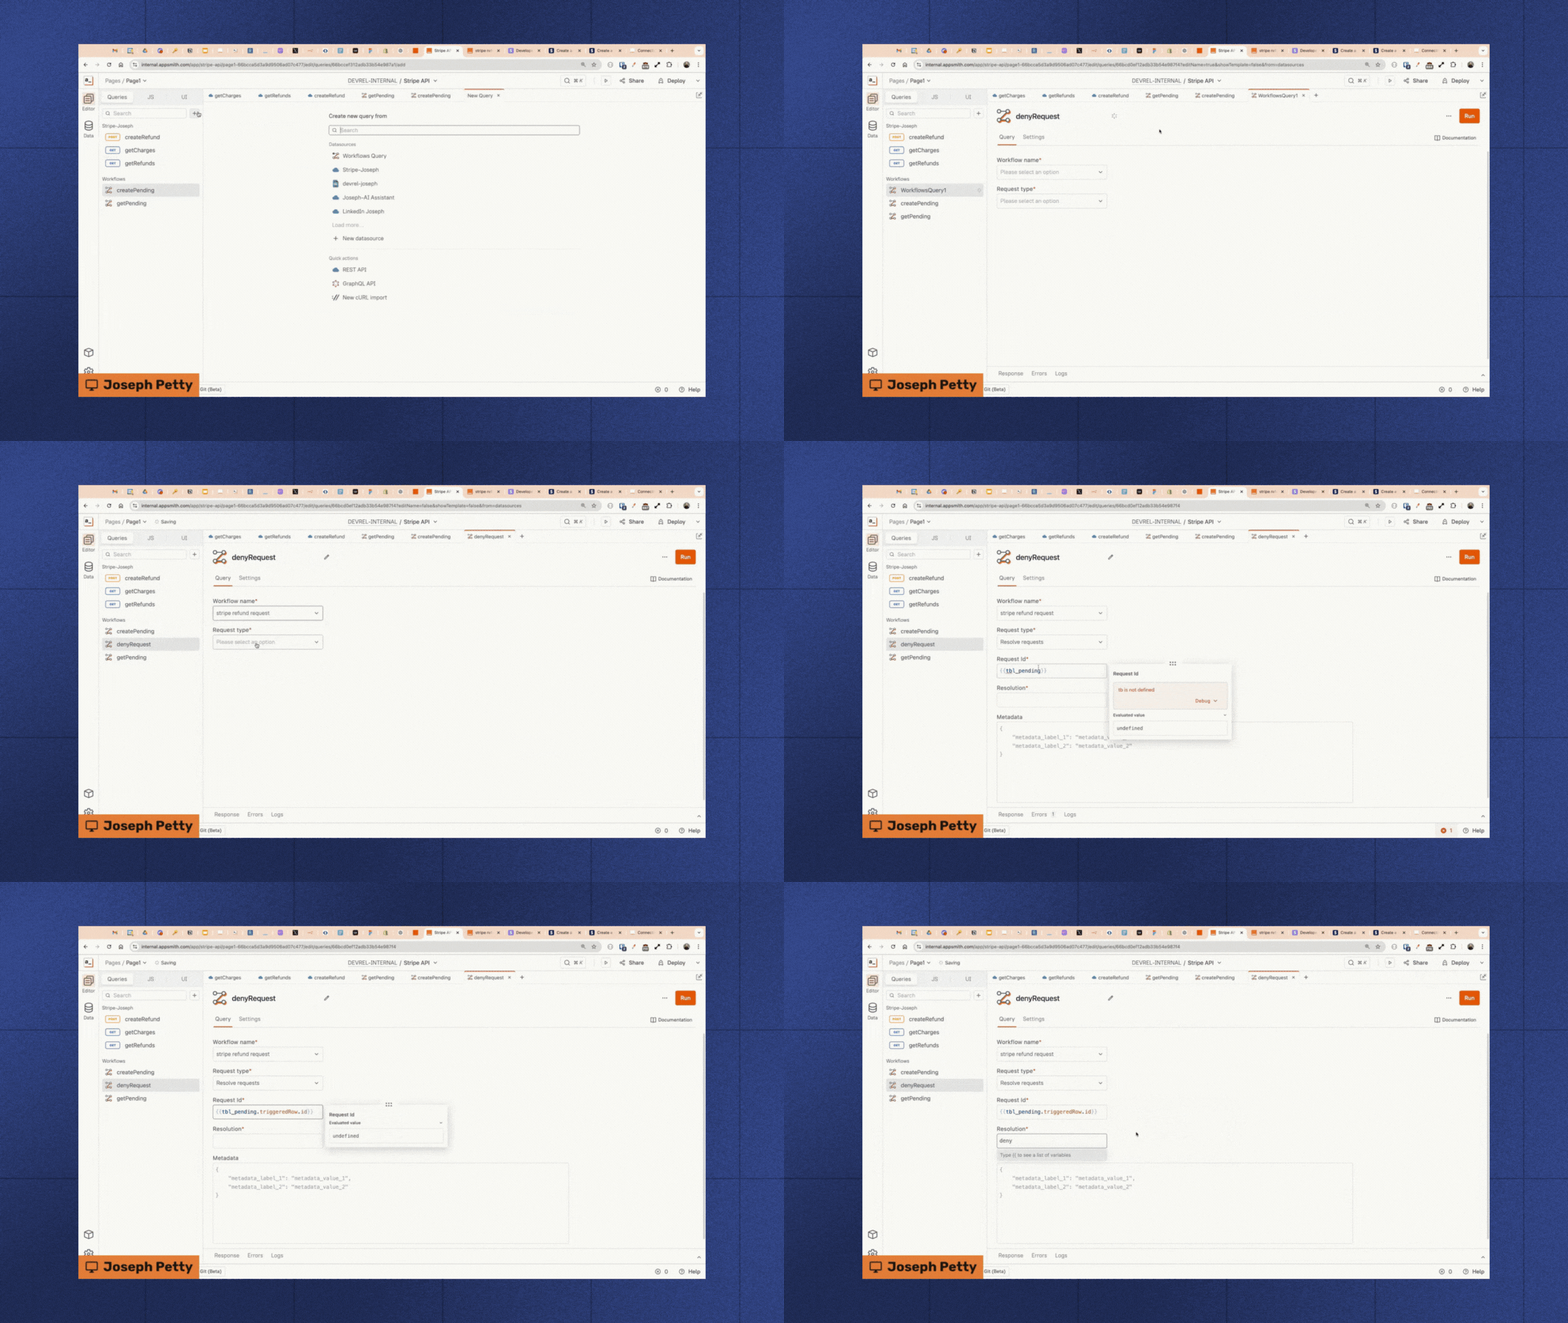
Creating the deny request workflow
Let's start by implementing the simpler denial workflow:
Create a new workflow query named
denyRequestSelect the "Stripe refund request" workflow
Set the request type to "resolve requests"
Configure the request ID to pull from the pending table using:
{{tbl_pending.triggeredRow.ID}}Set the resolution to "deny"
Note: The request ID used here refers to the workflow request identifier, not the order ID. This is sufficient for denying requests, but for approvals, we'll need additional order metadata to process the refund through Stripe.
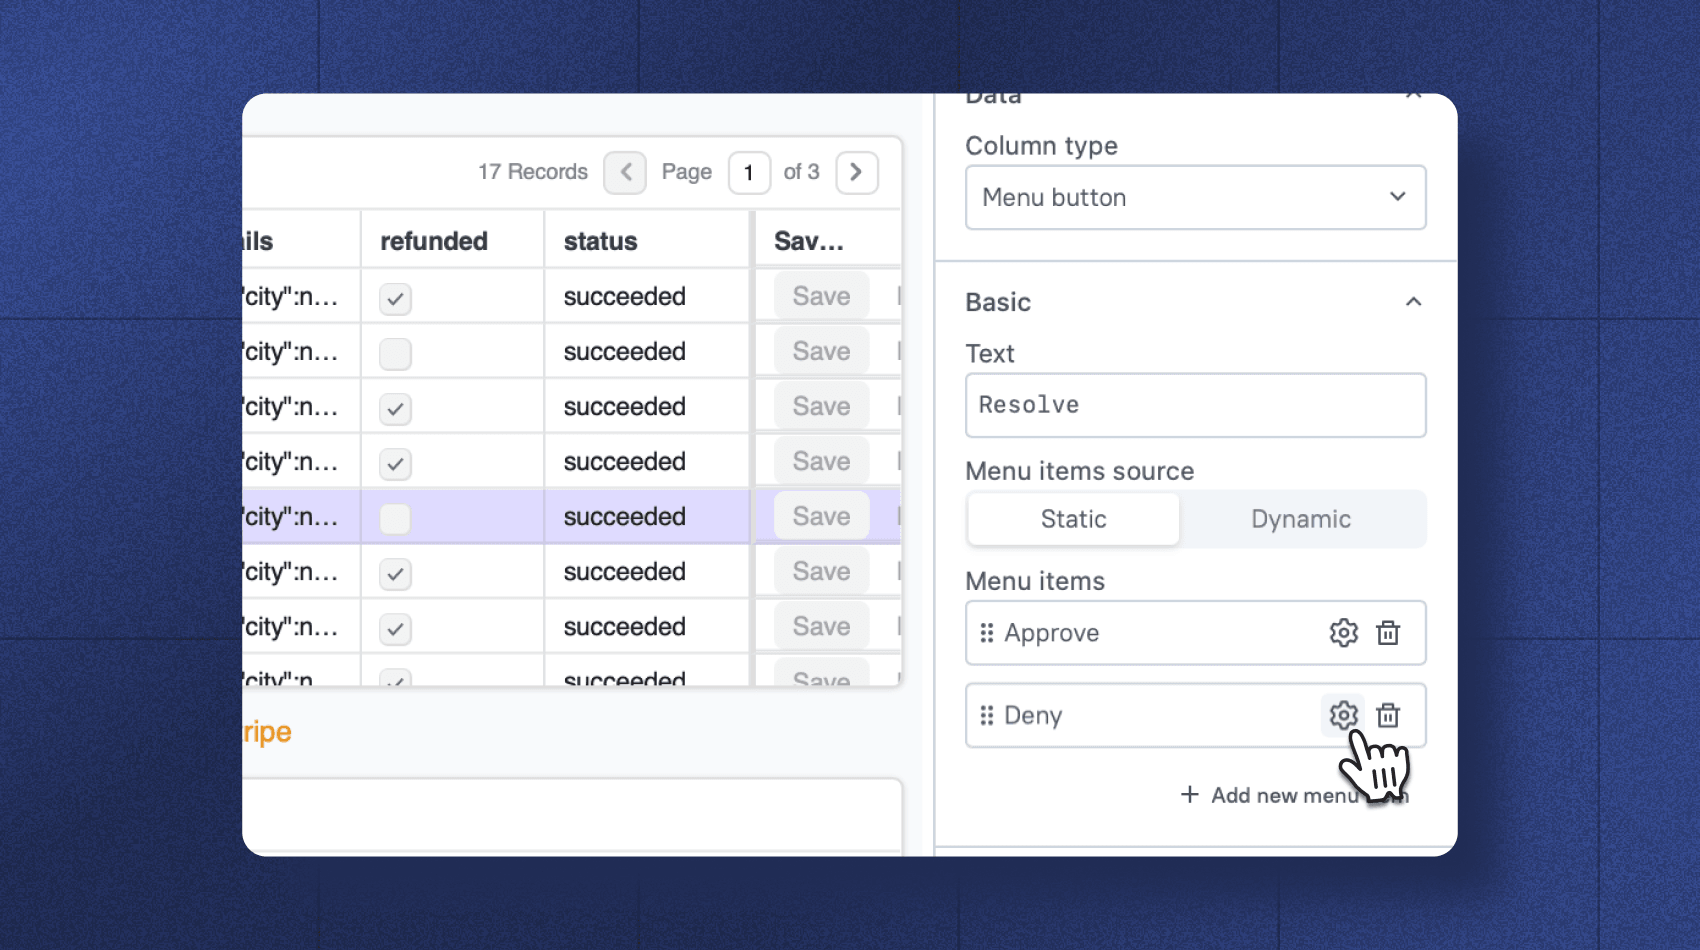
Now let's connect the denyRequest workflow to the deny button in our pending table UI:
Click on the "Menu button" in the pending table configuration
In the menu items section, click on settings
Add an "Execute query" action to the onClick JavaScript event
Select
denyRequestas the query to executeIn the "On Success" handler, select
getPendingto refresh the pending requests table
This setup ensures that when a user clicks the deny button, it will execute the denial workflow and then refresh the table to show the updated status of pending requests.
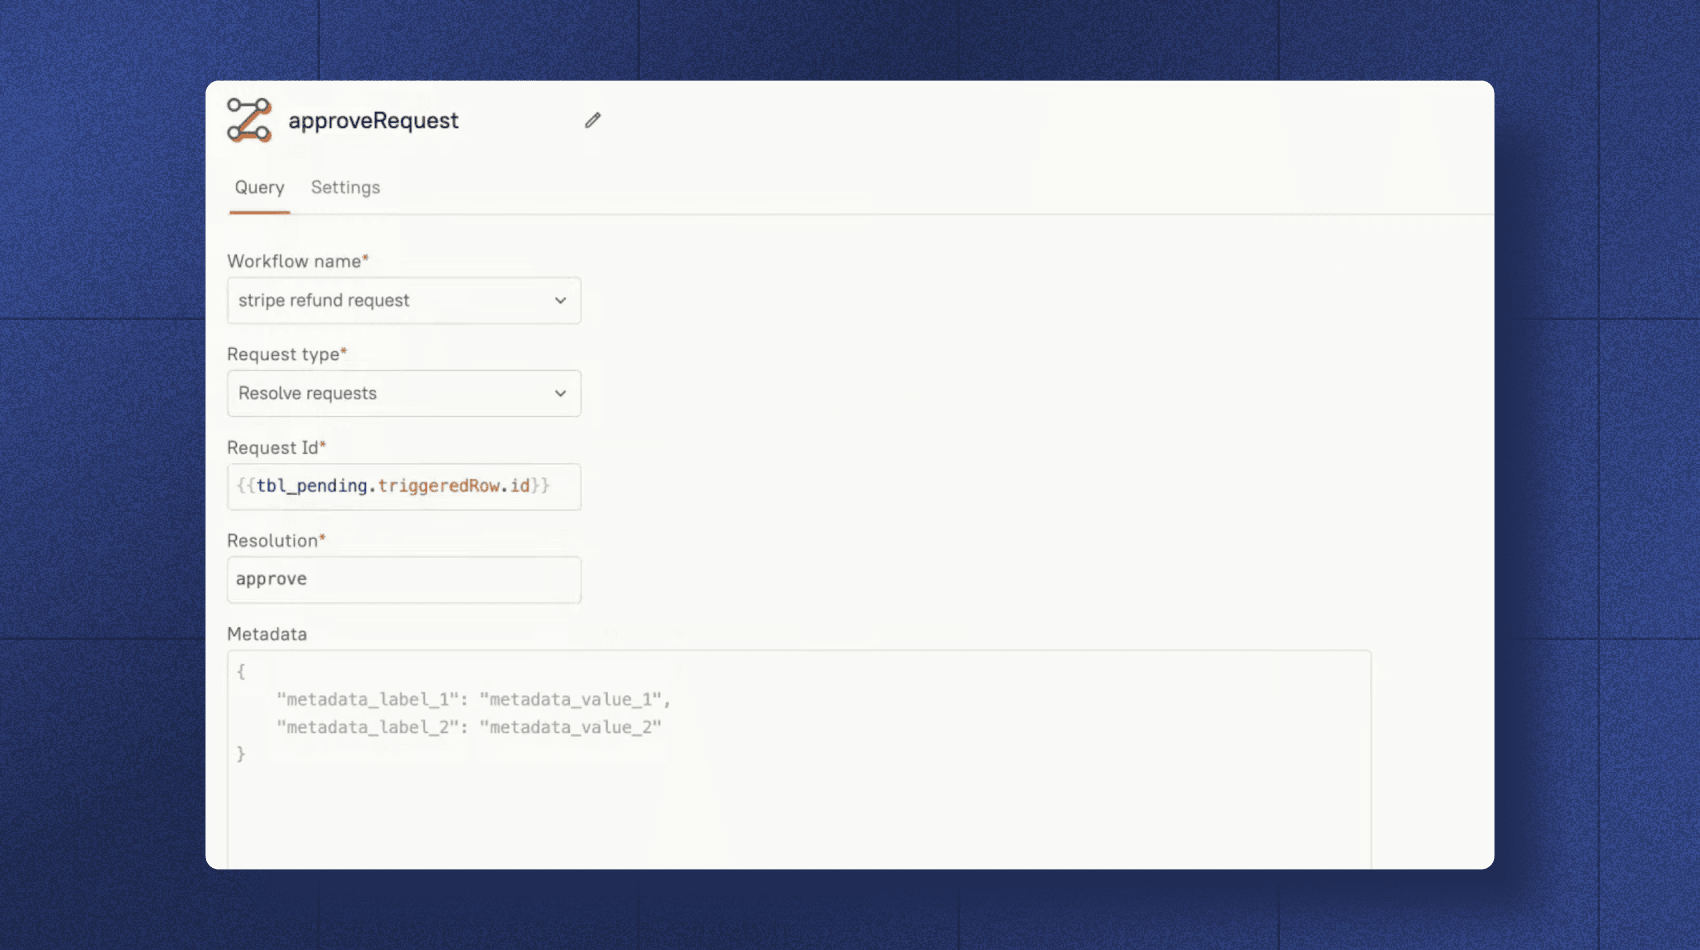
To implement the approval functionality, we'll first create a JavaScript object to handle the approval logic. However, before that, let's set up the necessary workflow query.
Create a new workflow query called approveRequest. Configure it to use the same workflow, set the request type as "resolve request" with the resolution as "approve", and set the request ID to {{tbl_pending.triggeredRow.id}}.
Next, we need to ensure the pending table displays the charge ID for reference. To accomplish this, modify the trigger data in the pending creation query to include the charge information:"charge": "{{tbl_charges.triggeredRow.id}}"
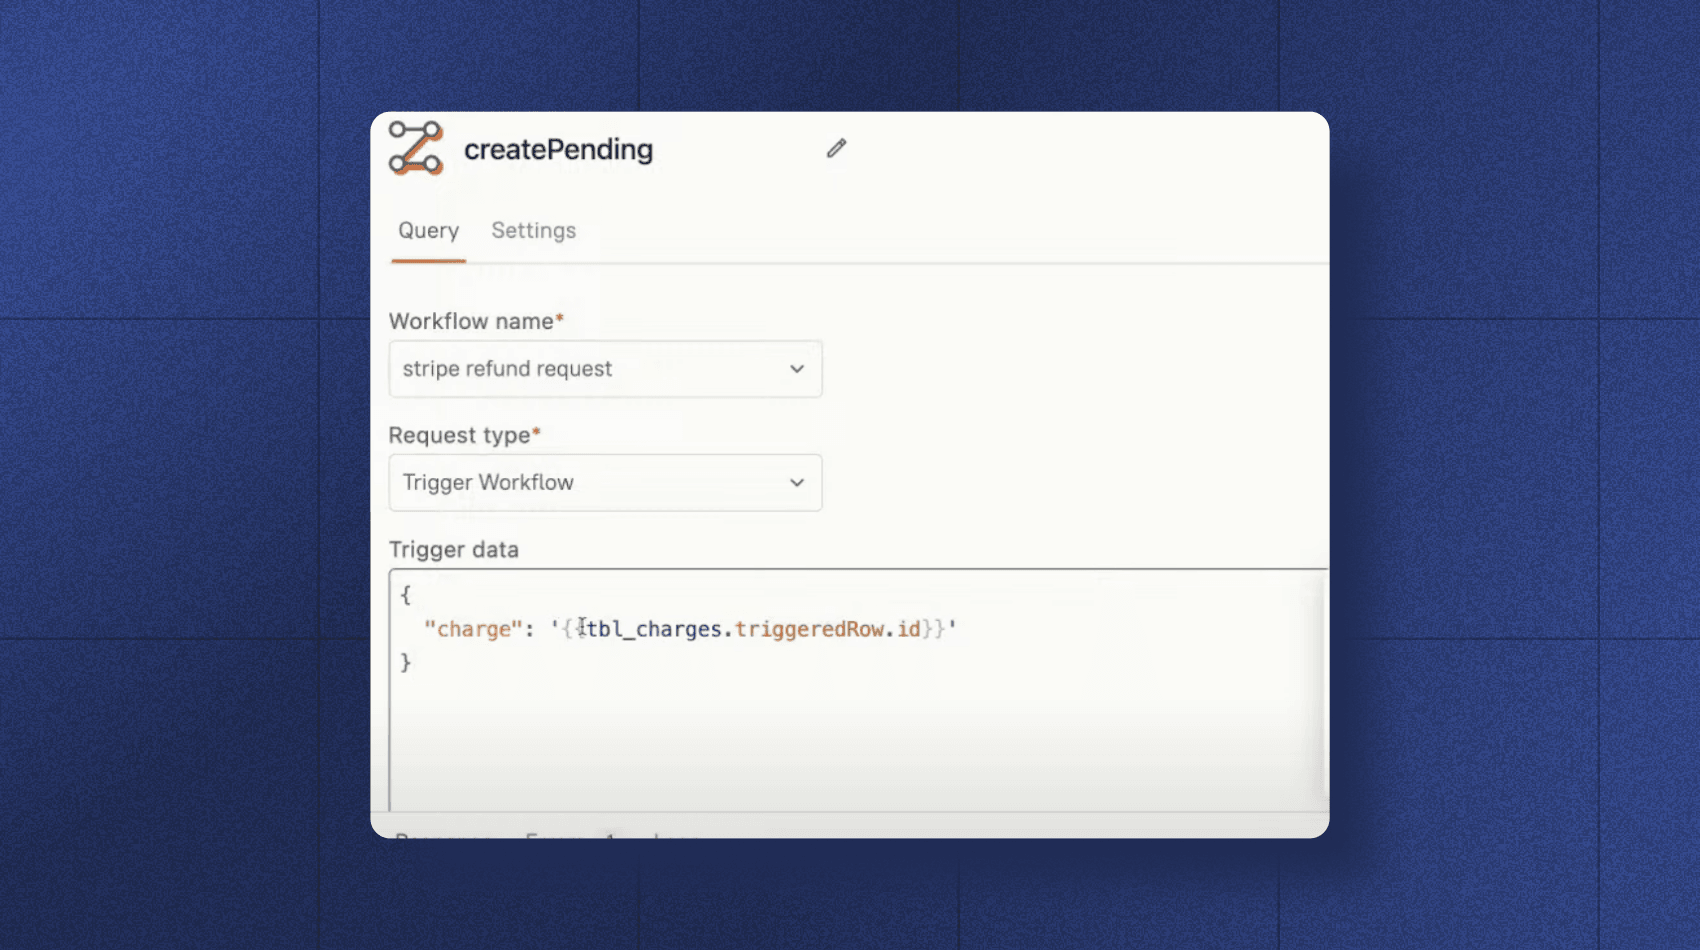
In the workflow configuration, save this information as metadata by adding metadata: data to the workflow parameters.
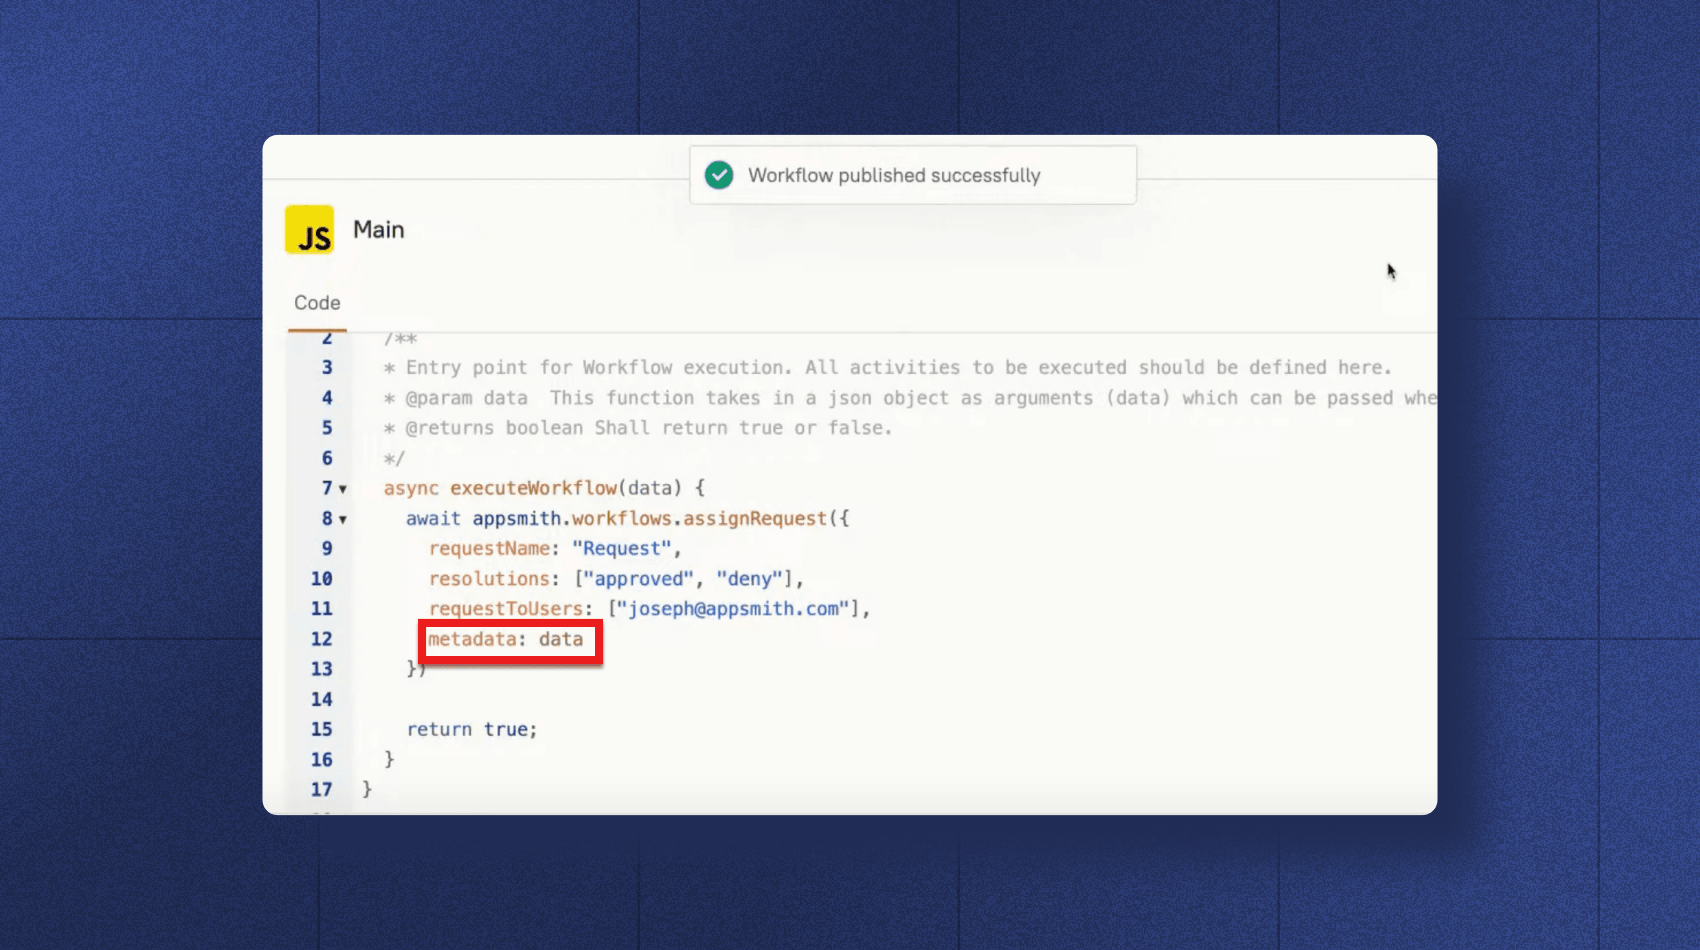
Now create a JavaScript object with the following approval logic:
export default {
async approveRequest () {
    await createRefund.run();
    await getCharges.run()
    await getRefunds.run();
    await approveRequest.run();
}
}
Enable the confirmation dialog for the createRefund query by turning on "Request confirmation before running API". This adds an extra safety check before processing refunds.
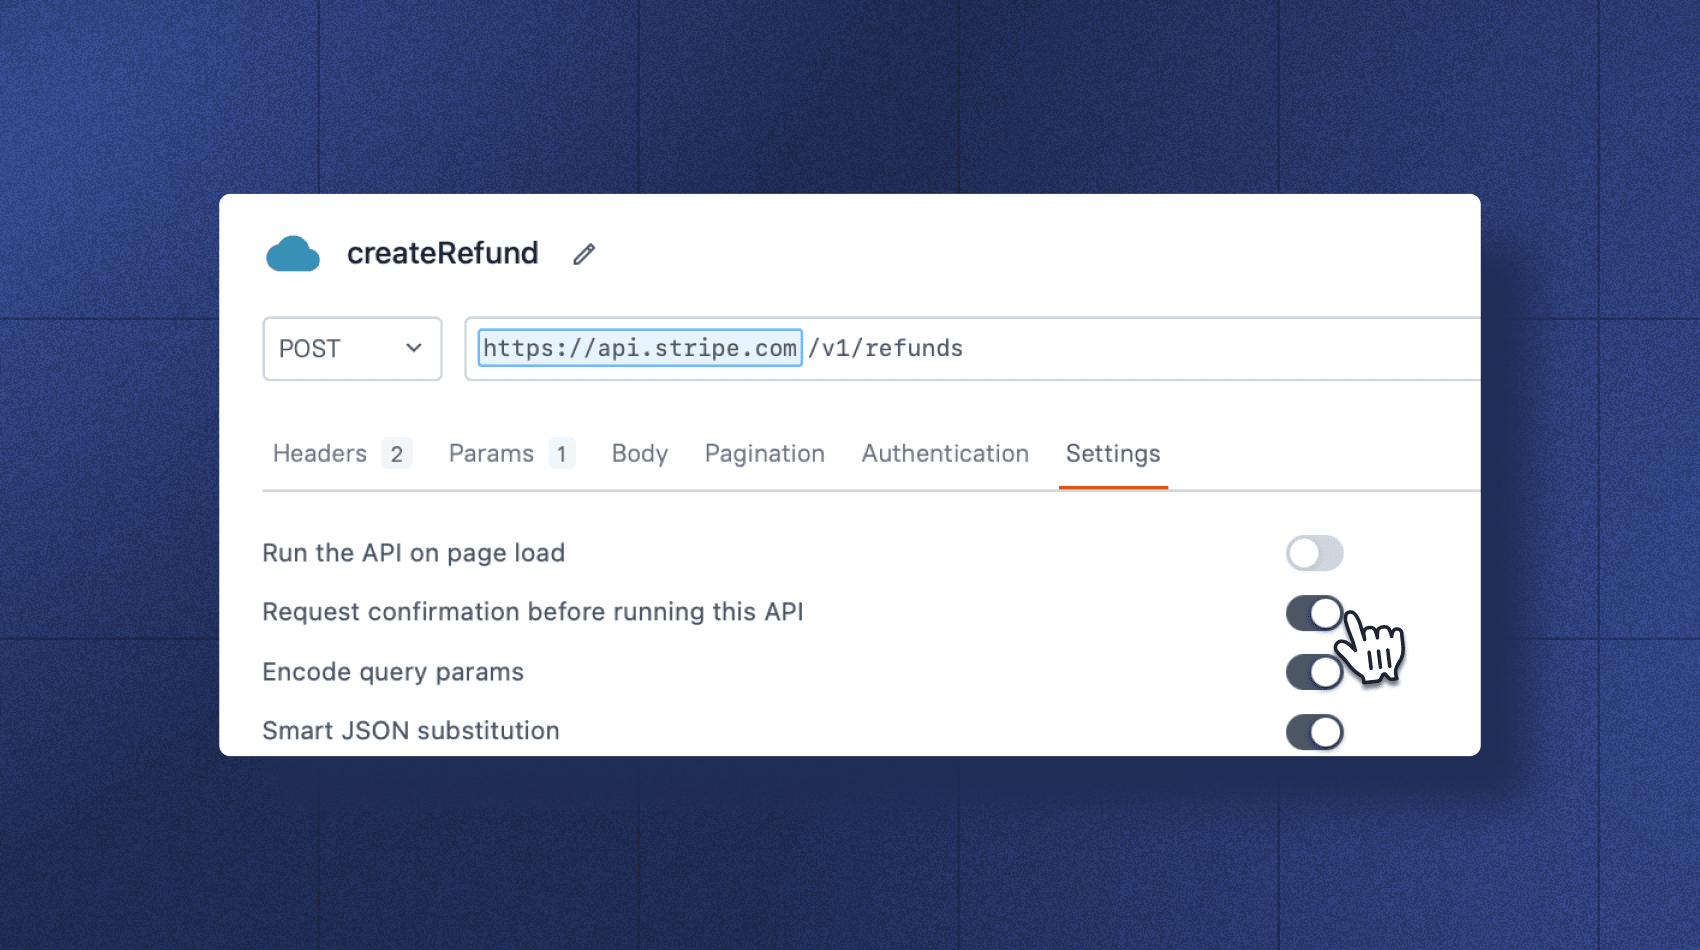
Finally, connect this logic to the UI by configuring the "resolve" option in the pending table's menu items. Set the onClick event to execute the JavaScript function we just created.
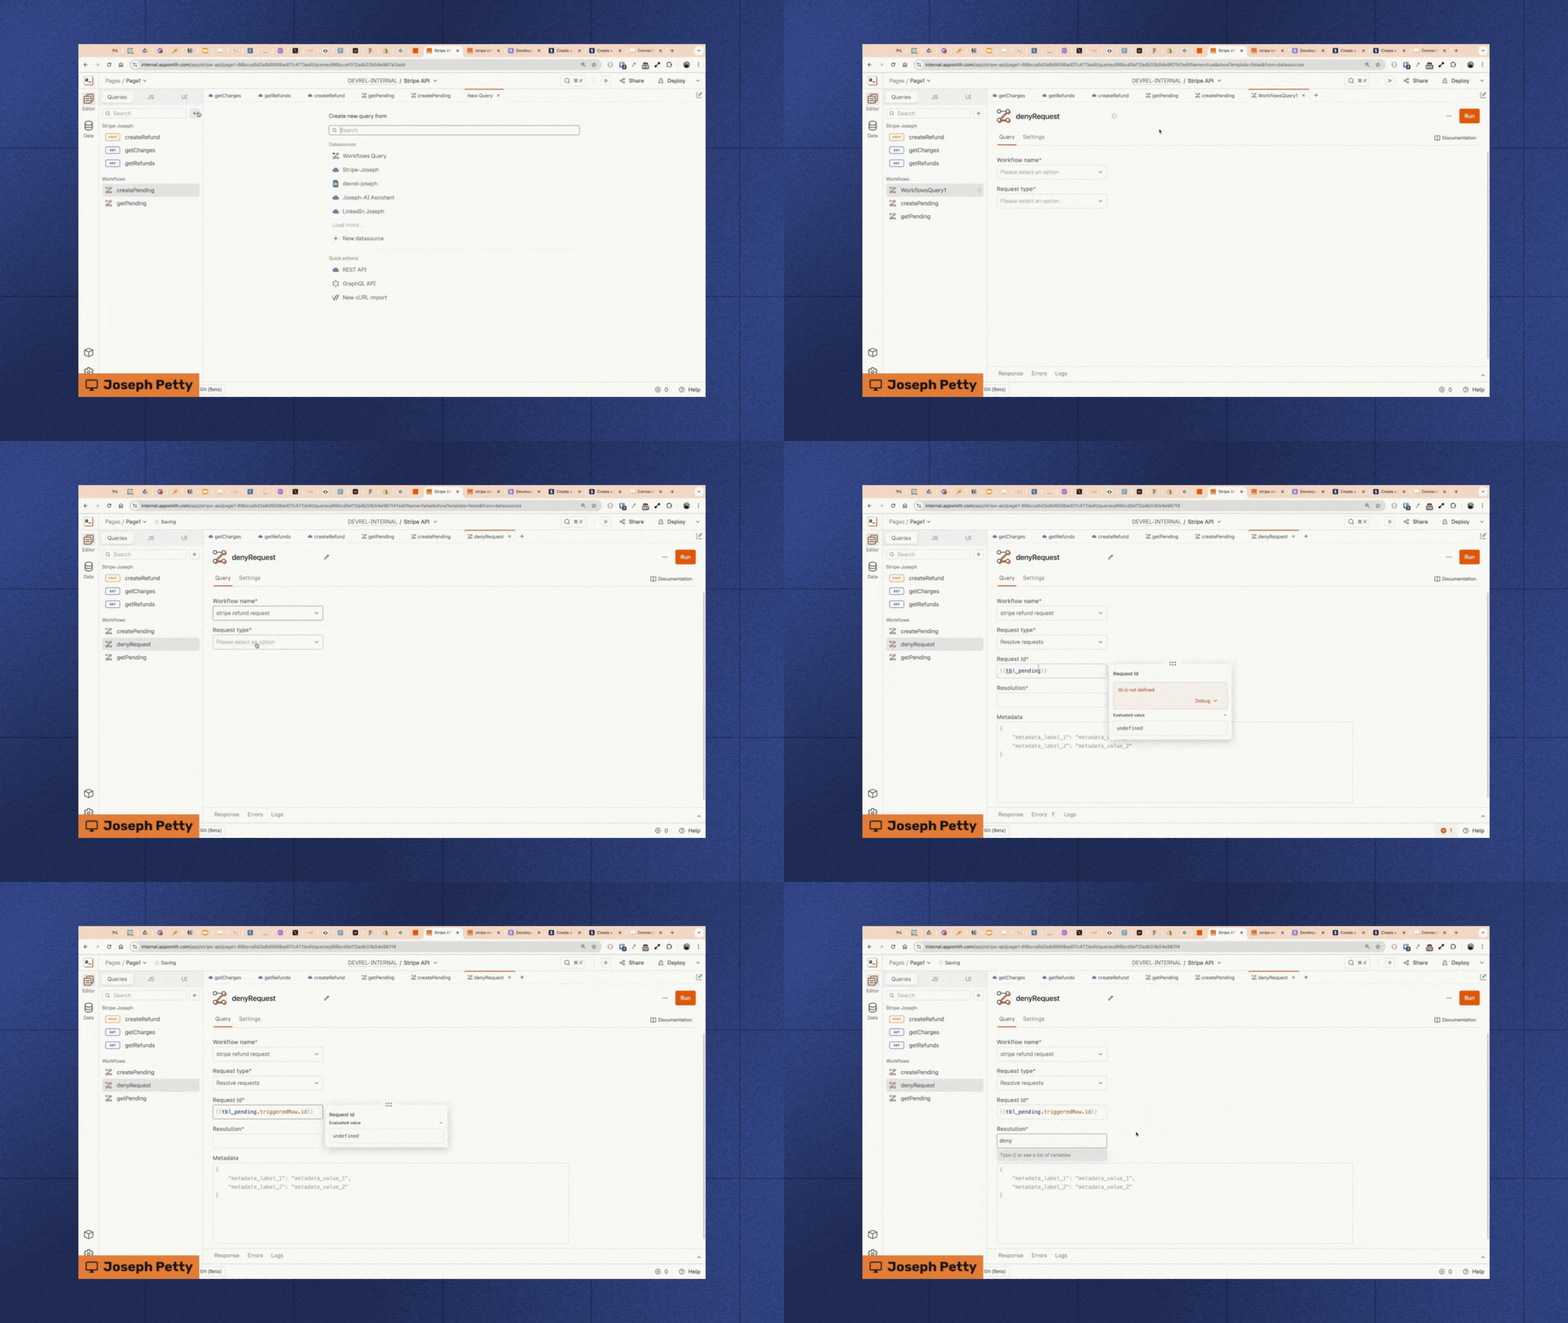
Test the implementation by attempting to approve a refund request. The system should prompt for confirmation before processing the refund and update both the charges and pending tables accordingly.
For better tracking and accountability, consider adding additional metadata to the pending table, such as refund amount, requester information, and other relevant details.

Get started with Appsmith workflows to automate your business refund approvals
Appsmith's workflow automation capabilities offer a powerful and flexible solution for businesses. By combining Stripe's robust API with Appsmith's intuitive workflow management, you can build sophisticated approval systems that enhance compliance, minimize manual work, and boost customer satisfaction.
This guide showcases just one of many possible applications of Appsmith workflows. Start exploring Appsmith Workflows in our cloud sandbox or sign up for the beta to self-host your application and begin implementing automated workflows in your organization today.


