Building a Discount Management Dashboard With Postgres

https://youtu.be/k_KXax_DlC4
Businesses love loyalty programs. Loyalty programs are a proven and effective way to keep customers coming back to your business. The most simple loyalty program is offering discounts to your top quartile customers, so they keep coming back and get the best prices. But if you're a small yet digitally savvy business, how do you set up and manage such a program to drive customer loyalty? In this article, we will be building an admin dashboard to manage giving out discounts to loyal customers. Discounts will be assigned to customers based on their purchase history and will be available for use on their next purchase.
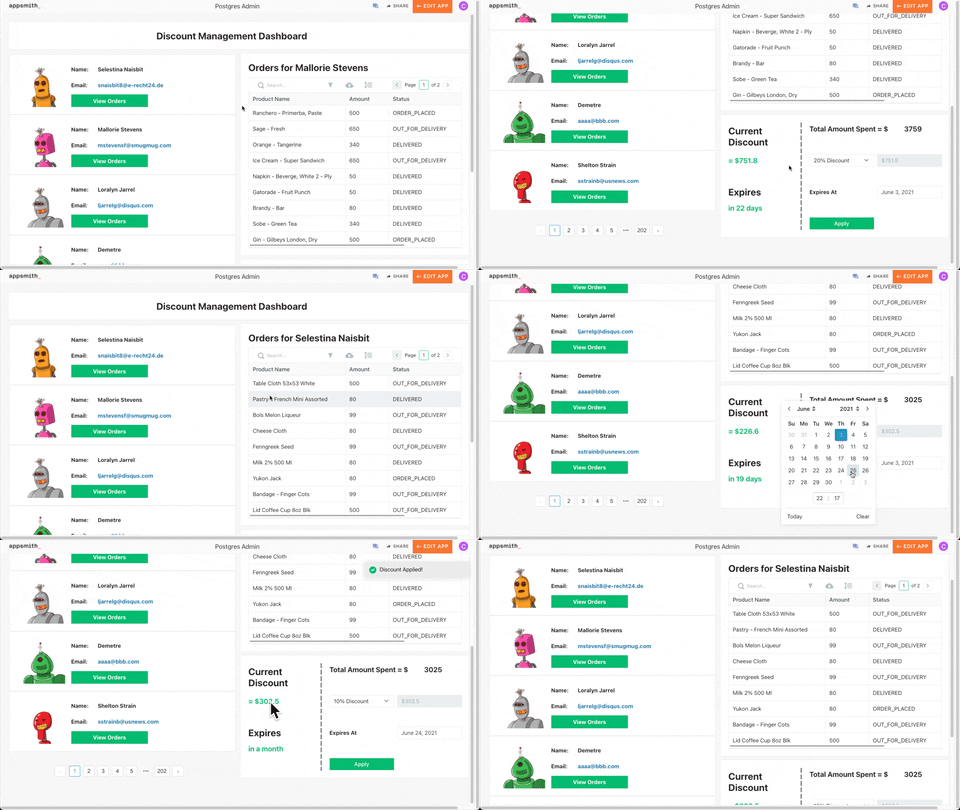
In this dashboard, we'll have a list of customers from where we can choose a customer we want to give a discount. On selecting a customer from the list, we can see all orders that have been made by that customer. We would also have a form that would allow us to give a percentage discount to the customer based on the total amount spent in the store by the user and set an expiration date for the discount. You can check out the completed dashboard here 👈. By the end of this article, you’d have learned how to build a Postgres admin panel using Appsmith. We’re going to cover core concepts such as
Connecting to the Postgres DB
Writing queries to perform CRUD operations on the database
Binding query data to widgets
Writing Javascript in Appsmith
Sharing your application and managing permissions
Now you’ve got a good overview of what we’re going to be building, so let’s get started! Creating the Application As I mentioned earlier, we’re going to be building the discount management dashboard using Appsmith. Appsmith is an open-source platform that lets you create powerful apps/dashboards/tools quickly using a simple drag and drop interface. Head over to appsmith.com and sign in. We’re going to be creating a new application, so click on the create new button. Please do well to give this app a creative name. The best I could come up with is Discount Dashboard. Connecting to Postgres The bread and butter of Appsmith is that we can connect to various sources of data by using APIs or talking directly to the database. We’re going to be connecting the application directly to our Postgres database, eliminating the need for a middle-man API. To connect to the database, click on the + icon to the right of DB Queries then + New Datasource and select PostgreSQL. On the next page give the datasource a name and fill in the connection details.
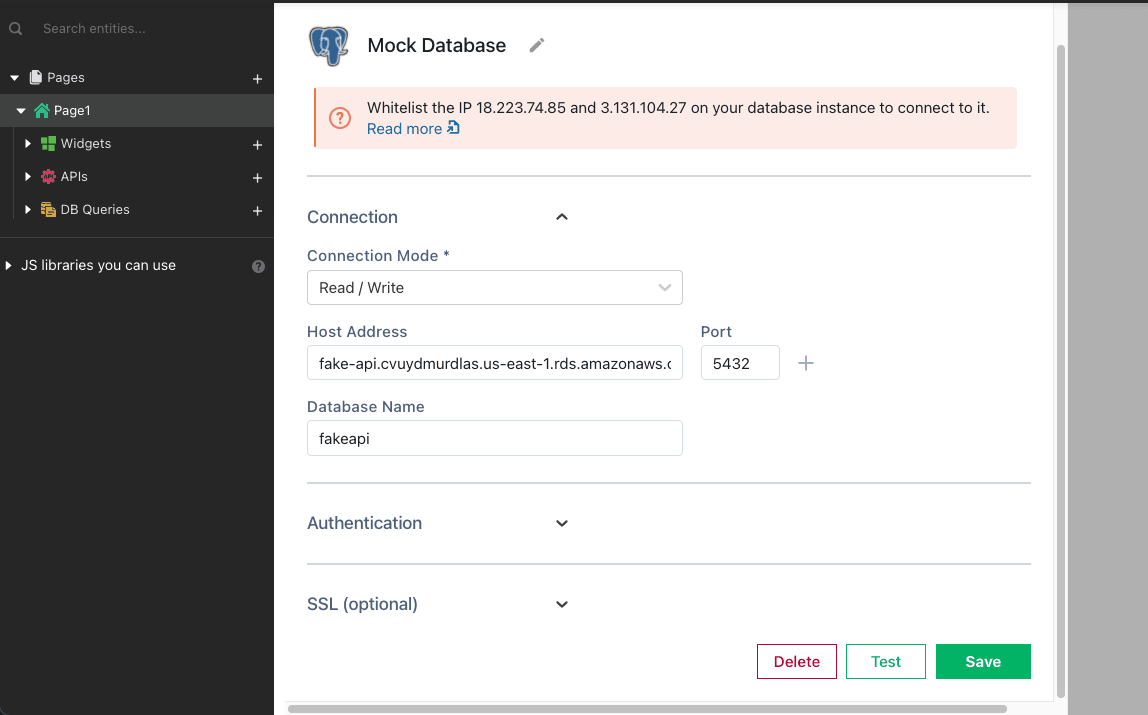
A little side note here: This application was built using the mock Postgres DB connected to every application by default. Please feel free to use this if you do not have a database of your own Querying the Database Since the application has been connected to the database, we can write queries to fetch data. The first query we’ll be writing would be to fetch users from the database. Click on the + New Query button close to the datasource card to create a new query. Go ahead and give this query a name, let’s call it get_customers and it should be a select query:
SELECT * FROM public."users";Clicking on the Run button will fetch us a table containing all customers we have on our database. Now we build a list from which we can choose a customer using the data returned from this query. Binding data to widgets We need to create a list of customers. Each item on the list will display relevant information about the customer such as the customers’ name, email, and picture. We’ll be using the brand new List widget to make this happen. Head over to the widgets section, click on the + icon, and drag a list widget into the canvas. In the property pane of the list widget, rename the widget from List1 to customers_list. In the items section, delete the dummy data that was prefilled and bind in data from the get_customers query by referencing it using mustache template syntax shown below:
{{get_customers.data}}Now we’ve connected the data from the customers’ query into the List widget. All we need to do is to use that data. To do so, we can reference the currentItem object within other widgets in the list item and use its data to build up the list item. Here’s a gif illustrating how to do it.
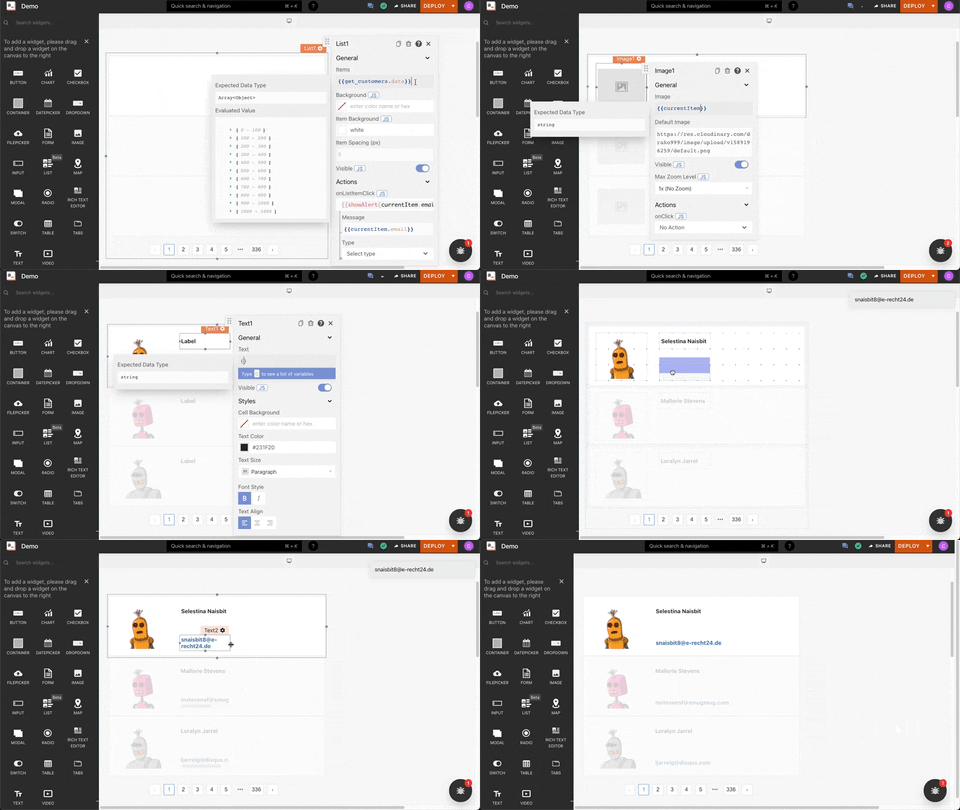
Awesome! We now have a list showing all customers. Triggering Actions Continuing with the requirement for the application, we’ll want to see a list of orders for the customer clicked on from the list. To do this we’ll need to run an action whenever an item is clicked on the list. Under the actions section of the List widgets’ property pane, let’s go and add an action for the onListItemClick event. From the dropdown list, select Execute a DB Query and click on + Create Query. The new query we’ll be creating will be fetching all orders made by the customer. So call this query get_orders and set the query to:
SELECT * FROM public."orders"WHERE"userId" = {{customers_list.selectedItem.id}};Or we can write a slightly more complicated query that gets the product name for each order from the products table using the orderProductMap table:
SELECT o.*, p.* FROM public."orders" o
    leftjoin"orderProductMap" op on o.id = op."orderId"leftjoin products p on op."productId" = p.id
WHERE o."userId" = {{customers_list.selectedItem.id}};

SELECT o.*, p.* FROM public."orders" o
    leftjoin"orderProductMap" op on o.id = op."orderId"leftjoin products p on op."productId" = p.id
WHERE o."userId" = {{customers_list.selectedItem.id}};
Clicking on the run button will get the orders for the customer selected from the List widget. Now going back to the onListItemClick event, when the get_orders query is successful, we want to execute another database query to get discounts that have been given to the customer. Go ahead and set up the query to get the customers’ discount. Your query should look like this:
SELECT * FROM public."discounts"WHERE"userId" = {{customers_list.selectedItem.id}};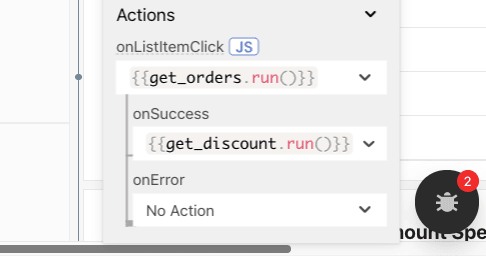
Visualizing Data At this point, we have a list of all customers, and clicking on a customer gets all orders made by that customer as well as the customers’ discount. It will be nice if we can neatly display the orders made by the customer. We can neatly display the orders using a Table widget. Like we did with the List widget, go on and drag a Table widget into the canvas. You’ll also need to bind the data from the get_orders query into it and give it a nice name i.e orders_table. Your binding should look like this:
{{get_orders.data}}Also, you can hide some columns from the Table widget so that we only have the relevant ones showing.
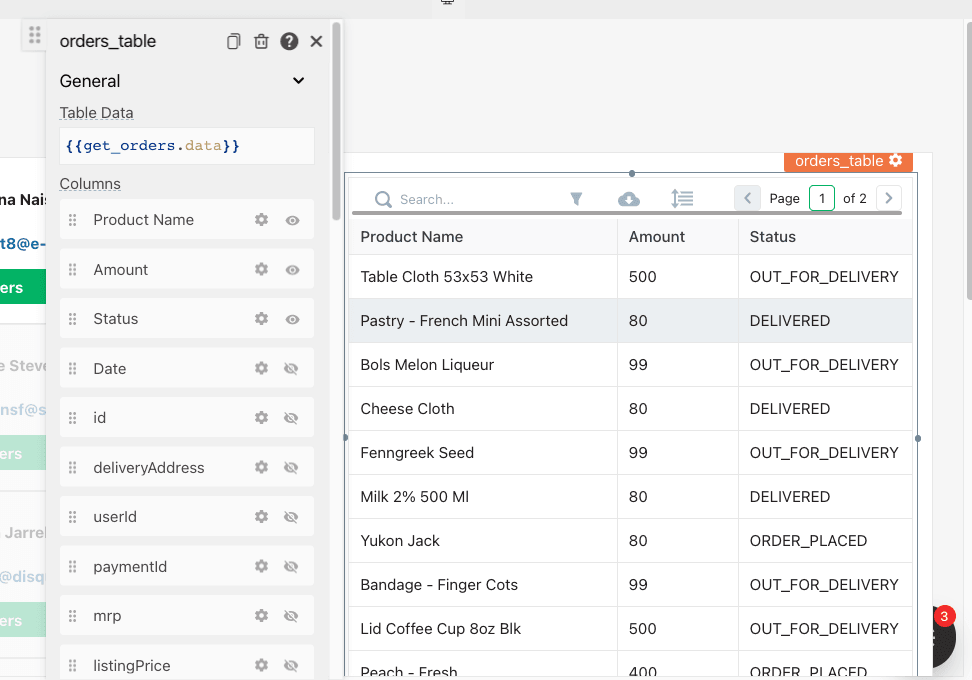
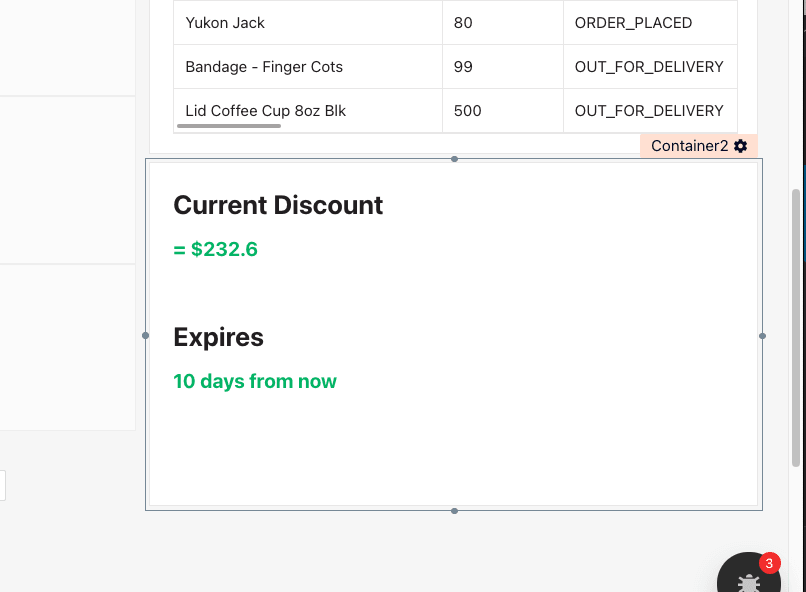
We also need to display the discount amount and expiration time from the get_discount query. A couple of Text widgets will be sufficient for this. I’ll leave you to figure it out but here’s my solution:
Writing JavaScript in Appsmith
Finishing up with the dashboards’ requirement, we’ll need a form that will allow us to give a percentage discount to a customer based on the total amount they’ve spent on the store. We will also be able to set an expiration date for this discount. To build this form, we’ll need a few new widgets. We will be making use of a Dropdown, Input, and Datepicker widget. We’ll also need a Button widget to submit the form and a Text widget to label the Datepicker widget. I have mine arranged as shown below.
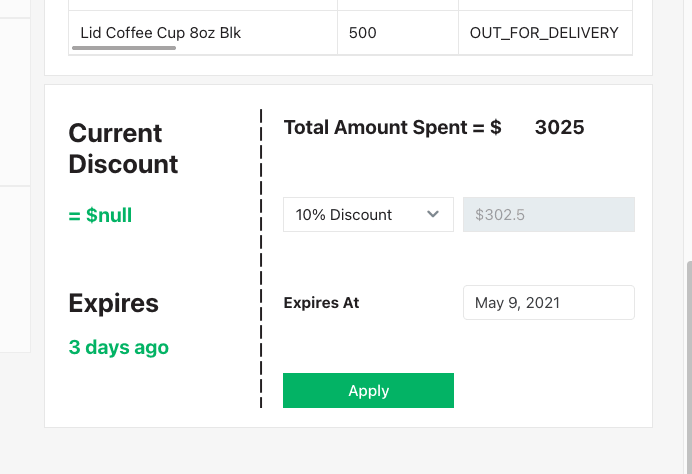
Alright, let’s move on to configuring the form. To configure the Dropdown widget, give it a new i.e discount_dd and supply the JSON array shown below as its Options:
[
  {
    "label": "Clear Discount",
    "value": "0"
  },
  {
    "label": "10% Discount",
    "value": "10"
  },
  {
    "label": "20% Discount",
    "value": "20"
  },
  {
    "label": "30% Discount",
    "value": "30"
  },
  {
    "label": "40% Discount",
    "value": "40"
  },
  {
    "label": "50% Discount",
    "value": "50"
  }
]
The Input widget is where the magic happens. In this widget, we’ll need to sum all the amounts from the get_orders query and apply a discount based on the percentage selected in the Dropdown widget. To do this we need to write multiline Js and this can be done with an IIFY(Immediately Invoked Function Expression). Set the Default Text of the input widget to:
{
{
  function(){
    const totalAmount = get_orders.data.reduce((acc, order) => (acc + order.orderAmount),0);
    return totalAmount * discount_dd.selectedOptionValue/100;
  }();
}
}
Thus, the value of this widget will be the calculated discount. It’s a good idea to make the Input widget disabled to prevent manually updating its value. Give this widget a name i.e calc_discount. Also, the Datepicker widget should be named expire_dp. All we have to do now is to write a query that will save the discount when the Button widget is clicked on. To do this create a new query called save_discount having the below body:
INSERTINTO public."discounts" ("userId", "amount", "expiresAt")
VALUES ({{customers_list.selectedItem.id}}, {{calc_discount.text}}, '{{expire_dp.selectedDate}}')
ON CONFLICT ("userId")
DOUPDATESET"amount" = {{calc_discount.text}}, "expiresAt" = '{{expire_dp.selectedDate}}'
The above query will insert or update the discount of the selected customer. Lastly, we’ll need to run this query when the Button widget is clicked on. We’ll also need to re-fetch the get_discount query and show a message on the UI to let the admin know that the discount has been successfully applied. To do this enable JavaScript on the onClick action of the Button widget by clicking on the JS button close to it. Then set its content to the code below:
{
{
  save_discount.run(() => {
    get_discount.run();
    showAlert('Discount Applied!','success');
  })
}
}
That’s it! We have a fully working discount management dashboard!
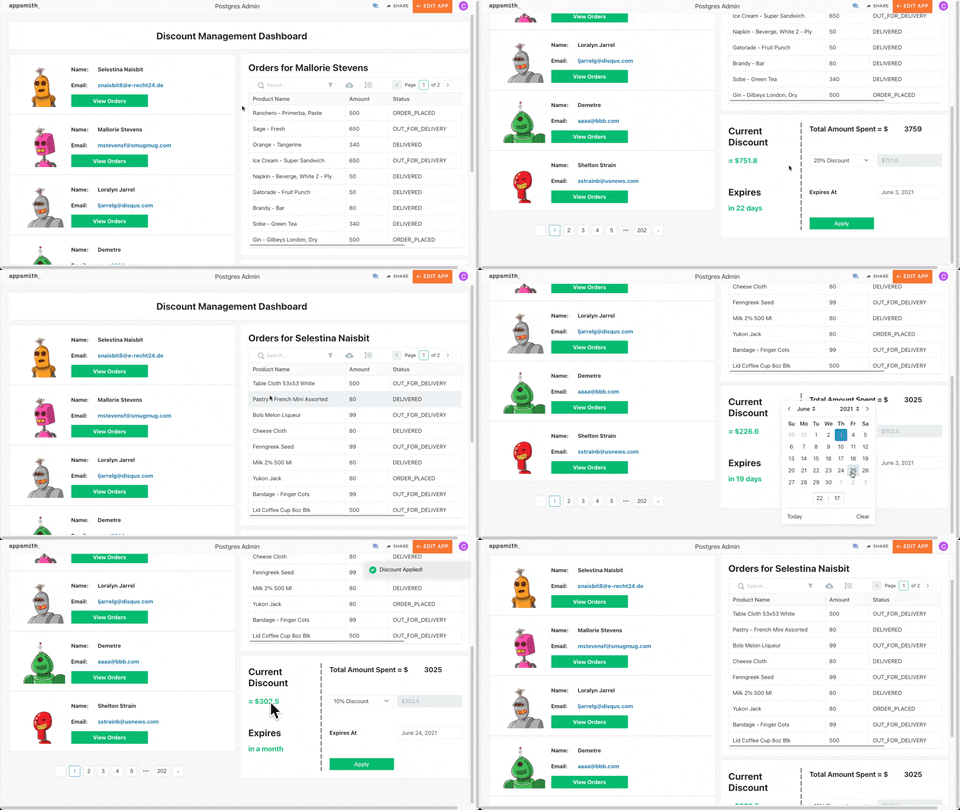
Sharing the application
Sharing the dashboard we just built is an easy thing to do on Appsmith. You can easily hand off the application to the management team or invite developers to work with you by using the share feature. Click on the SHARE button at the top right of the page and you’ll be presented with a dialog to invite users to the app and set their roles or permissions.
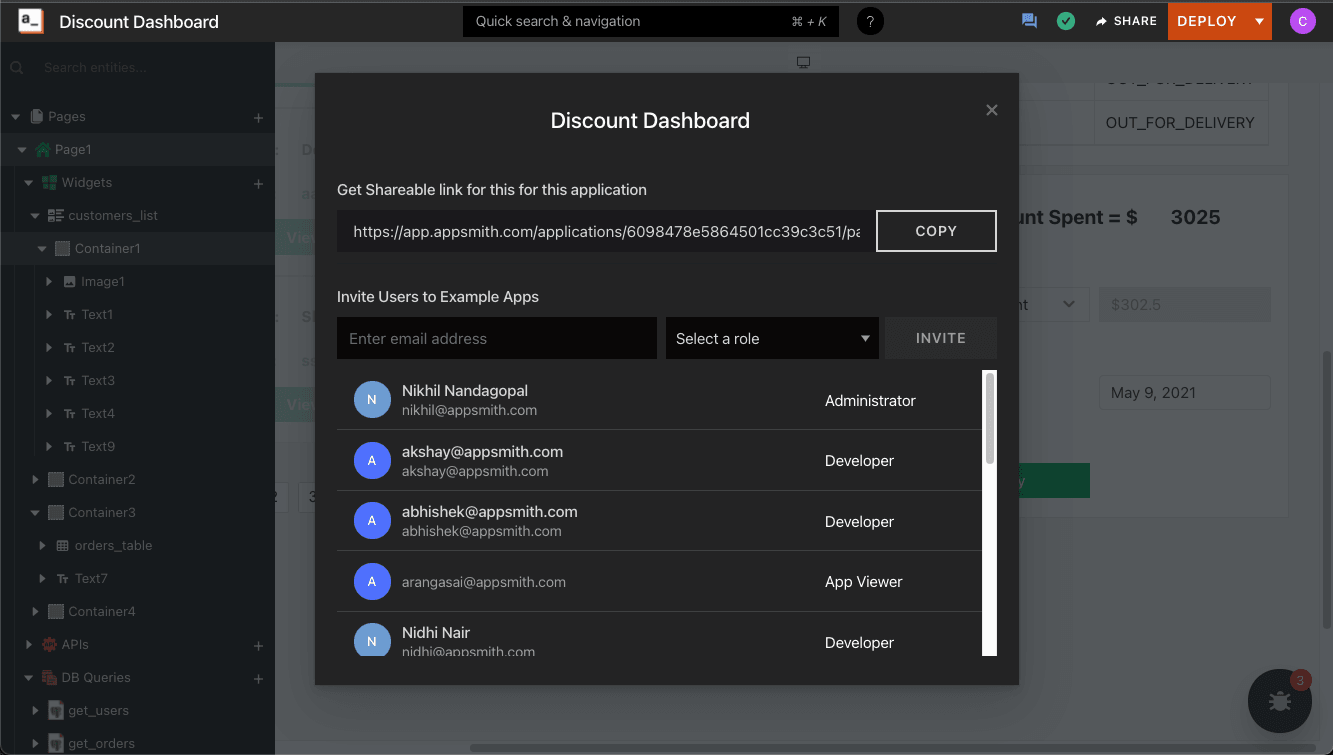
And lastly, you can publish all changes we made to the application by clicking on the DEPLOY button. Sweet!
Wrapping off
That’s a wrap! If you found this article helpful, please do leave a Like ❤️. Feel free to share any concerns or questions you may have in the comments section. Also, we’d love you to check out our Github page here https://github.com/appsmithorg/appsmith.
Credits: Photo by Karolina Grabowska from Pexels
