Build an Investor CRM with Google Sheets


Most founders talk to 10s, if not 100s of investors. Keeping track of the conversations, files shared, and specifics of each investor is hard. Most of the time, we find ourselves rummaging through our inbox for that last email received, the previous file sent or the following action steps. Many founders rely on spreadsheets (Google Sheets, usually) to list down the bare minimum of next steps, notion or google docs for the notes, and everything else on email to “streamline” the fundraising process. We know that’s not efficient from our experience, and we thought why not take a leaf out of our sales team and use a CRM to track our investor conversations. So we went ahead and built an investor CRM that we’ve been using for our fundraising. We used Appsmith and the Google Sheets Integration to build this. Feel free to develop or fork this application and extend it to however you want. In this tutorial, we’ll build an essential Investor CRM, which will let you:
Build unique profiles for the fund and investor
Filter saved investors by fund specifications and interests levels
Track conversations, see the most recent interaction
Set deadlines and reminders for action items
Manage file sharing by keeping track of files shared with each investor
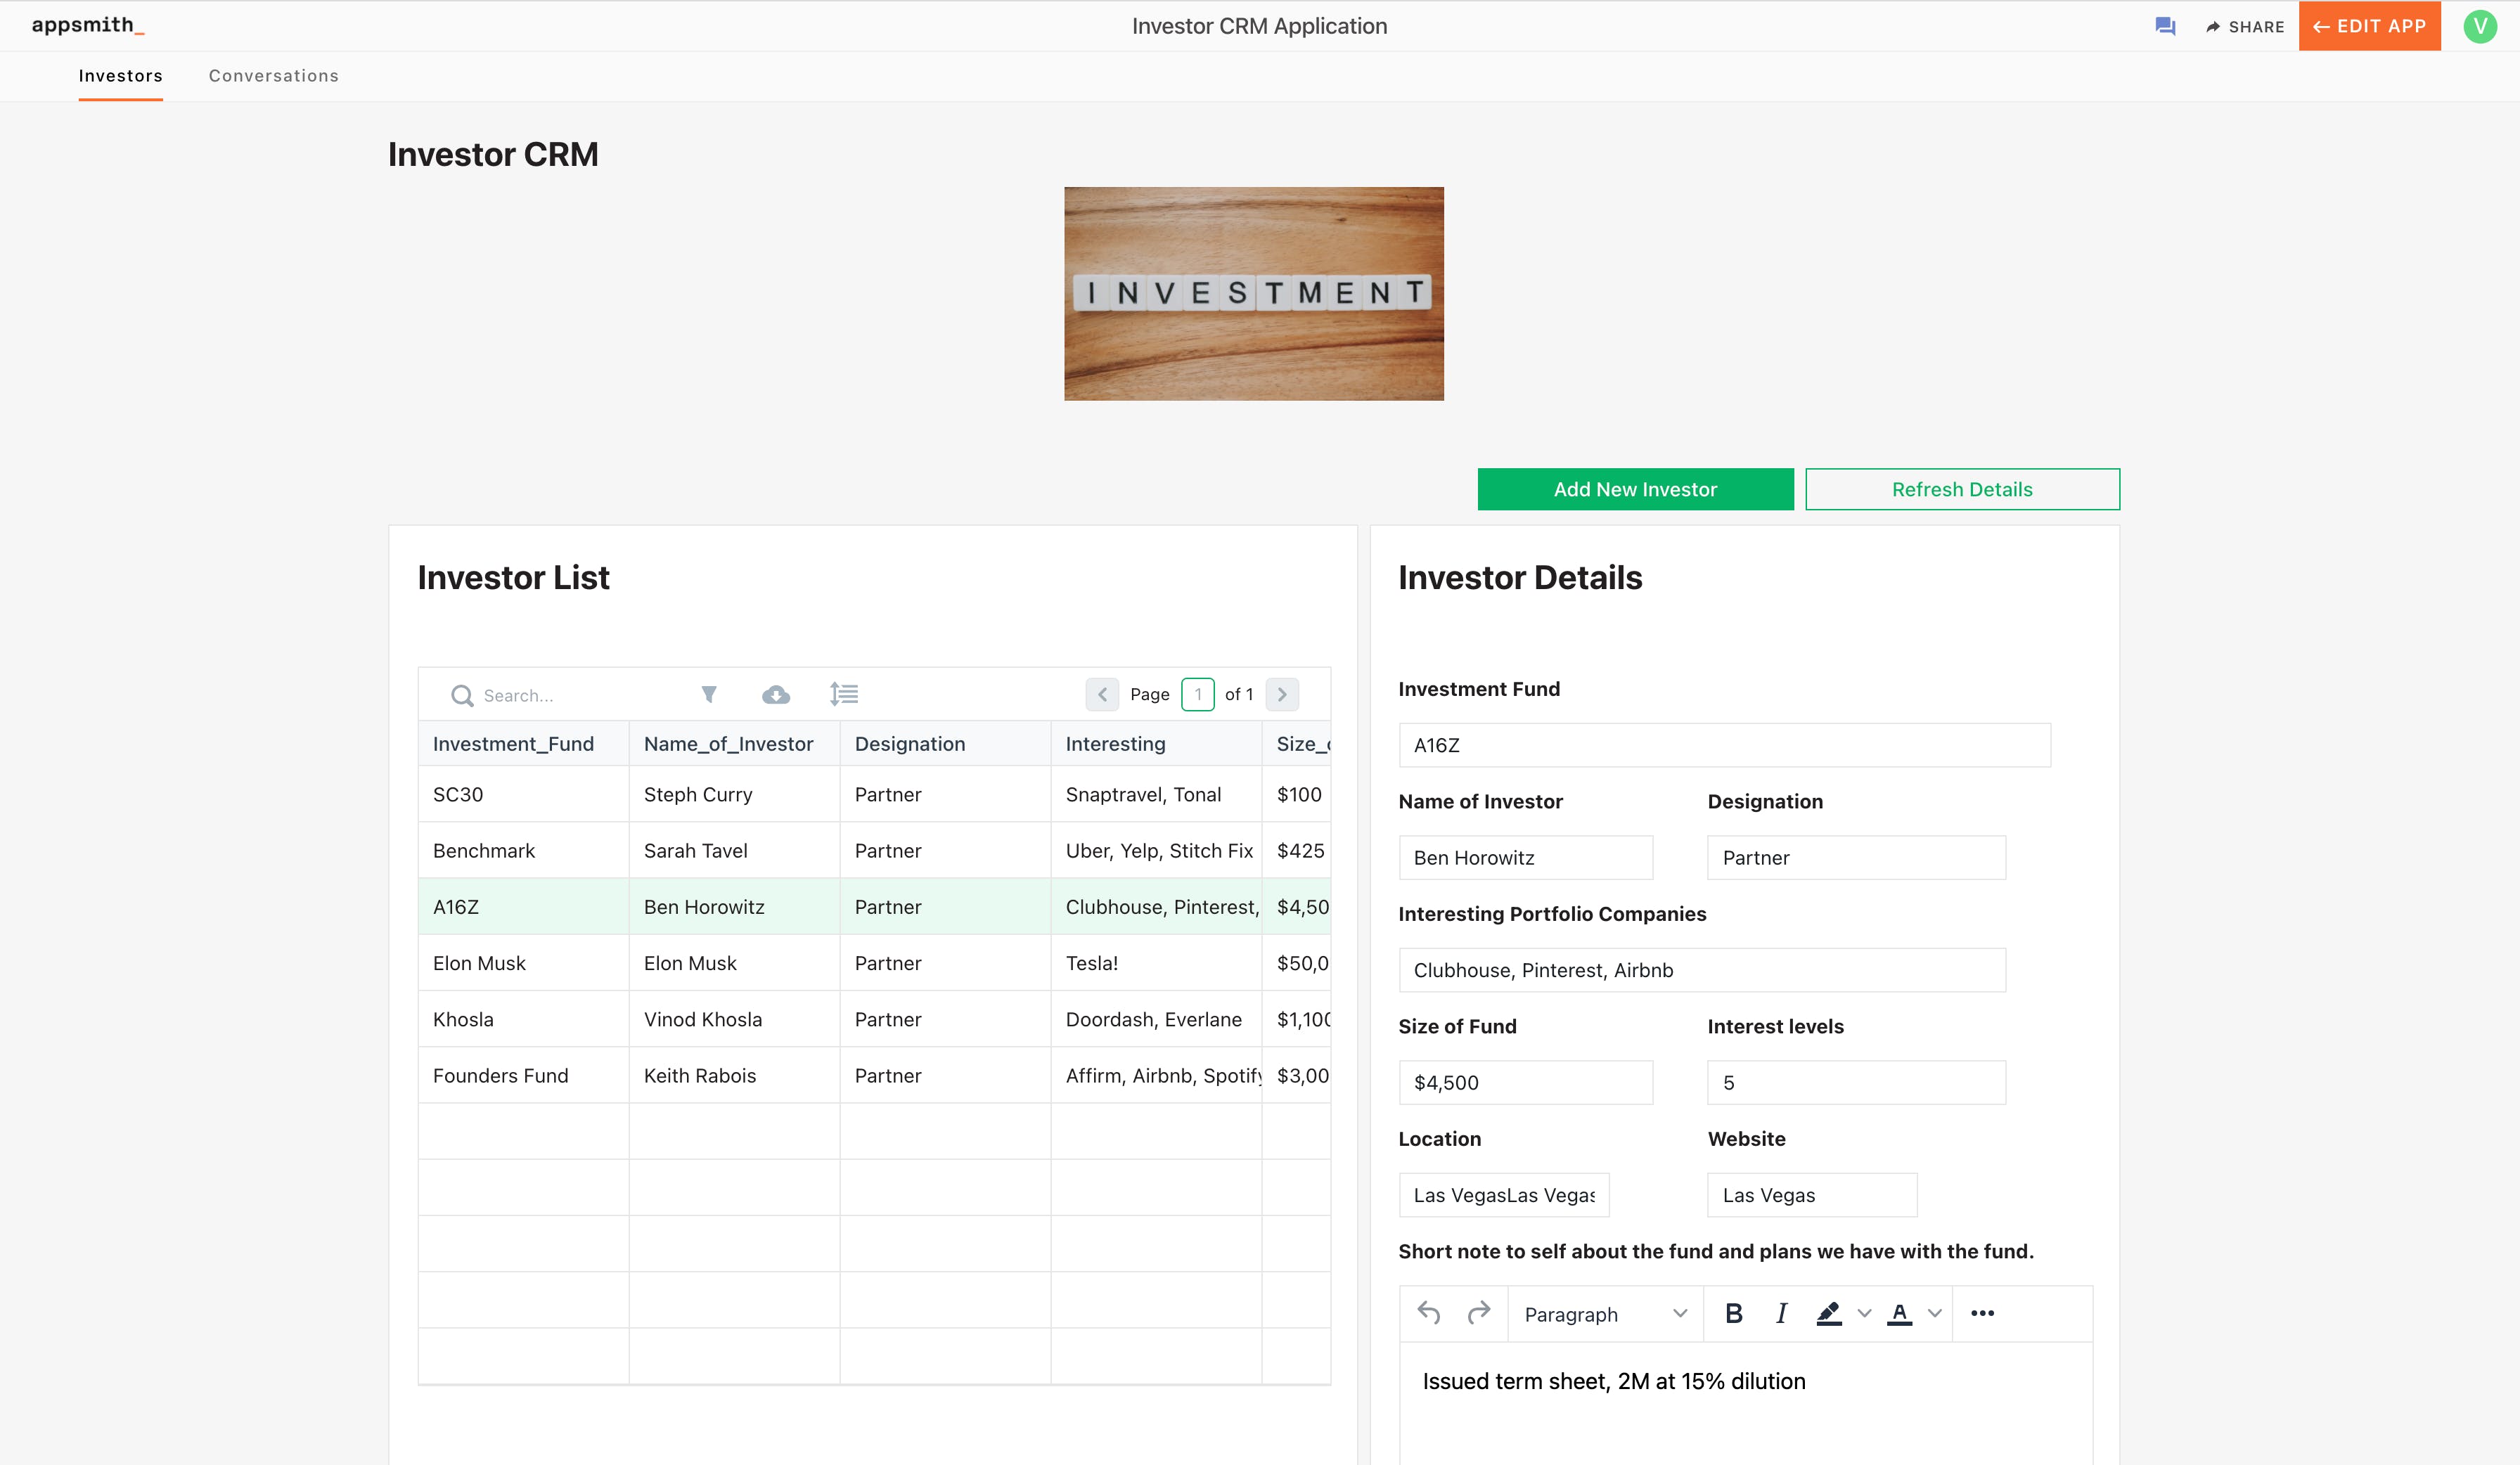
Here's a screenshot of how the app looks like:
Appsmith is an open-source framework that lets developers build dashboards, workflows, and CRUD apps with only the necessary code. You can connect to any API or databases like MongoDB, PostgreSQL, or MYSQL and get access to multiple widgets, including charts, tables and forms, for building a UI really fast. Let’s dive right in!
Setting Up Google Sheets and Appsmith
To build this application, we’ll be using Appsmith’s Google Sheet Plugin. This will allow us to use our Google Sheet as a data source and help us build a custom CRM with a beautiful UI on Appsmith. Follow the below steps to integrate Google Sheets with Appsmith:
Create a new account onAppsmith(it’s free!), if you are already an existing login to your Appsmith account.
Create a new application by clicking on the “Create New” button under the Appsmith dashboard.
We’ll now see a new Appsmith app with an empty canvas and a sidebar with Widgets, APIs and DB Queries.
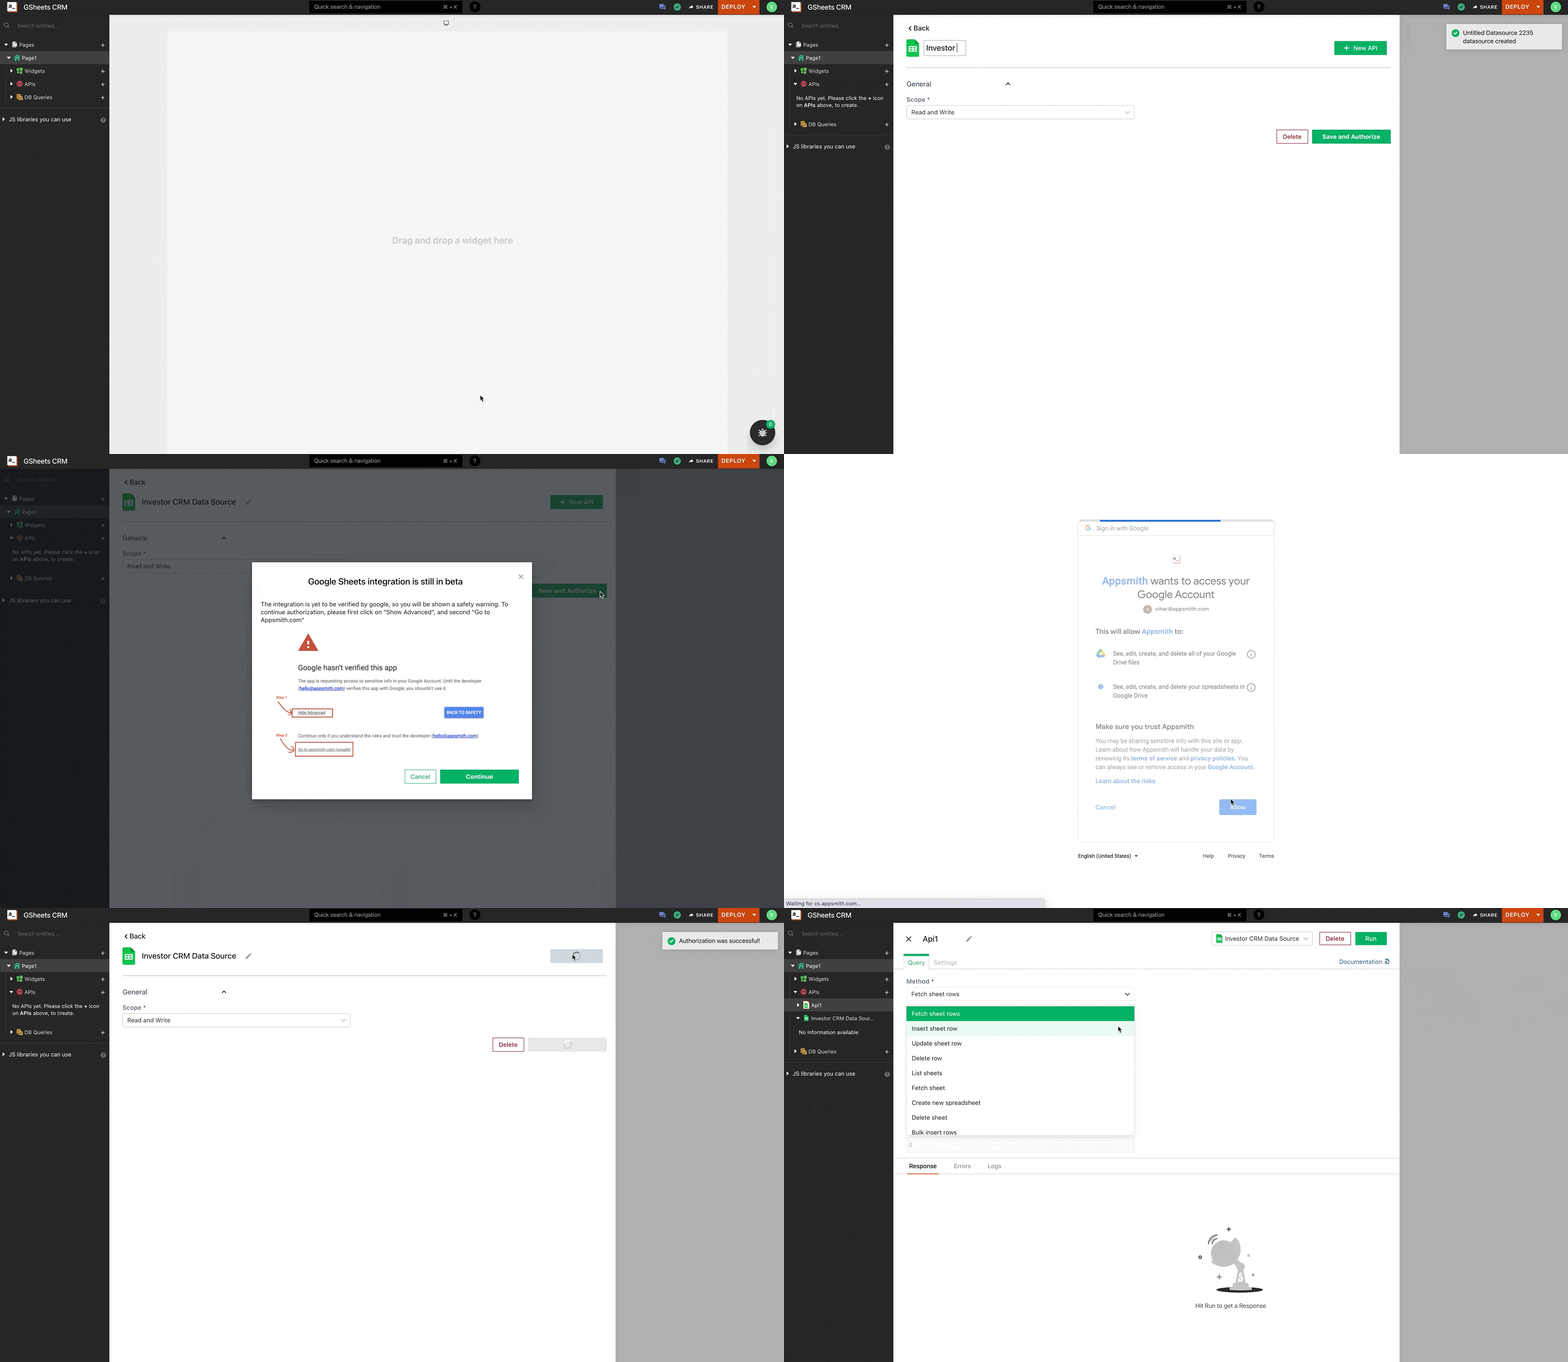
Click on the + icon next to the APIs section and choose the Google Sheets option. Next, click on the New Datasource button and set the scope to Read and Write and click Authorise.
This will ask us to log in from our Google Account, choose the account we want to access Google Sheets with and log in. After successful authorisation, this will redirect back to your Appsmith account.
Now, you’ll find your Google Sheets Datasource under your APIs, and you can create the necessary queries by choosing this data source.
Awesome! Now that our Google Sheets Plugin is set up, let’s create a new Google Sheet and add the necessary fields required for Investor CRM. Let’s divide our Google Sheet into two sheets; in the first Sheet named “Investor Details”, let’s add all the information regarding the inventors and their specifics. Following are the fields we’ll be considering:
Investment Fund
Location
Name of Investor
Designation
Interesting Portfolio Companies
Size of Fund
Ref Check Names
Ref Check Details
Website
Notes
Interest Levels
In the second Sheet, “Notes”, let’s add all the notes/conversations related to these investors; we’ll use an identifier named id to filter our discussions based on the Investors. Additionally, we will also save the links to media/pitch decks that need to be shared with the Investors. Following are the columns we would need in the second Sheet.
id
Notes
Date
Author
Files Shared Link
To make this more precise, we’ve made a sample Google Sheet with some mock data here. We’ll be using the same Sheet throughout this tutorial, and you can either follow with this or create your own based on our requirements. In the next section, let’s fetch all the investor information and display it on a beautiful table.
Fetch Data from Google Sheet to Appsmith
Now that we are connected to our Google Sheets data source, let’s connect to our Google Sheet and query all the data onto a table widget in Appsmith. To do this, navigate to the created data source under the APIs section and click on the New API button on the top right. Next, follow the below steps:
After clicking the New API button, you’ll be redirected to a new query tab, name your API to getInvestorDetails by double-clicking on the existing one.
Now set the method to Fetch Sheets Row, this method will query the data that’s present in the given Google Sheet.
In the SpreadSheet URL property, paste the URL of your Google Sheet, in this tutorial we’ll be following with the following URL:
https://docs.google.com/spreadsheets/d/19ewbxuiNwfD5etHpb__jMzFYjVdYaeLSviC951htlsI/edit#gid=333192
Next, in the Sheet name, add the name of our first sheet which is Investor Details
The Table Heading Row Index property takes in the row number that basically has our column heading, we’ll set this to 1.
Next, we’ll set the Row Offset to 1 and Row limit to 100, this will query only the first 100 rows of our Google Sheet.
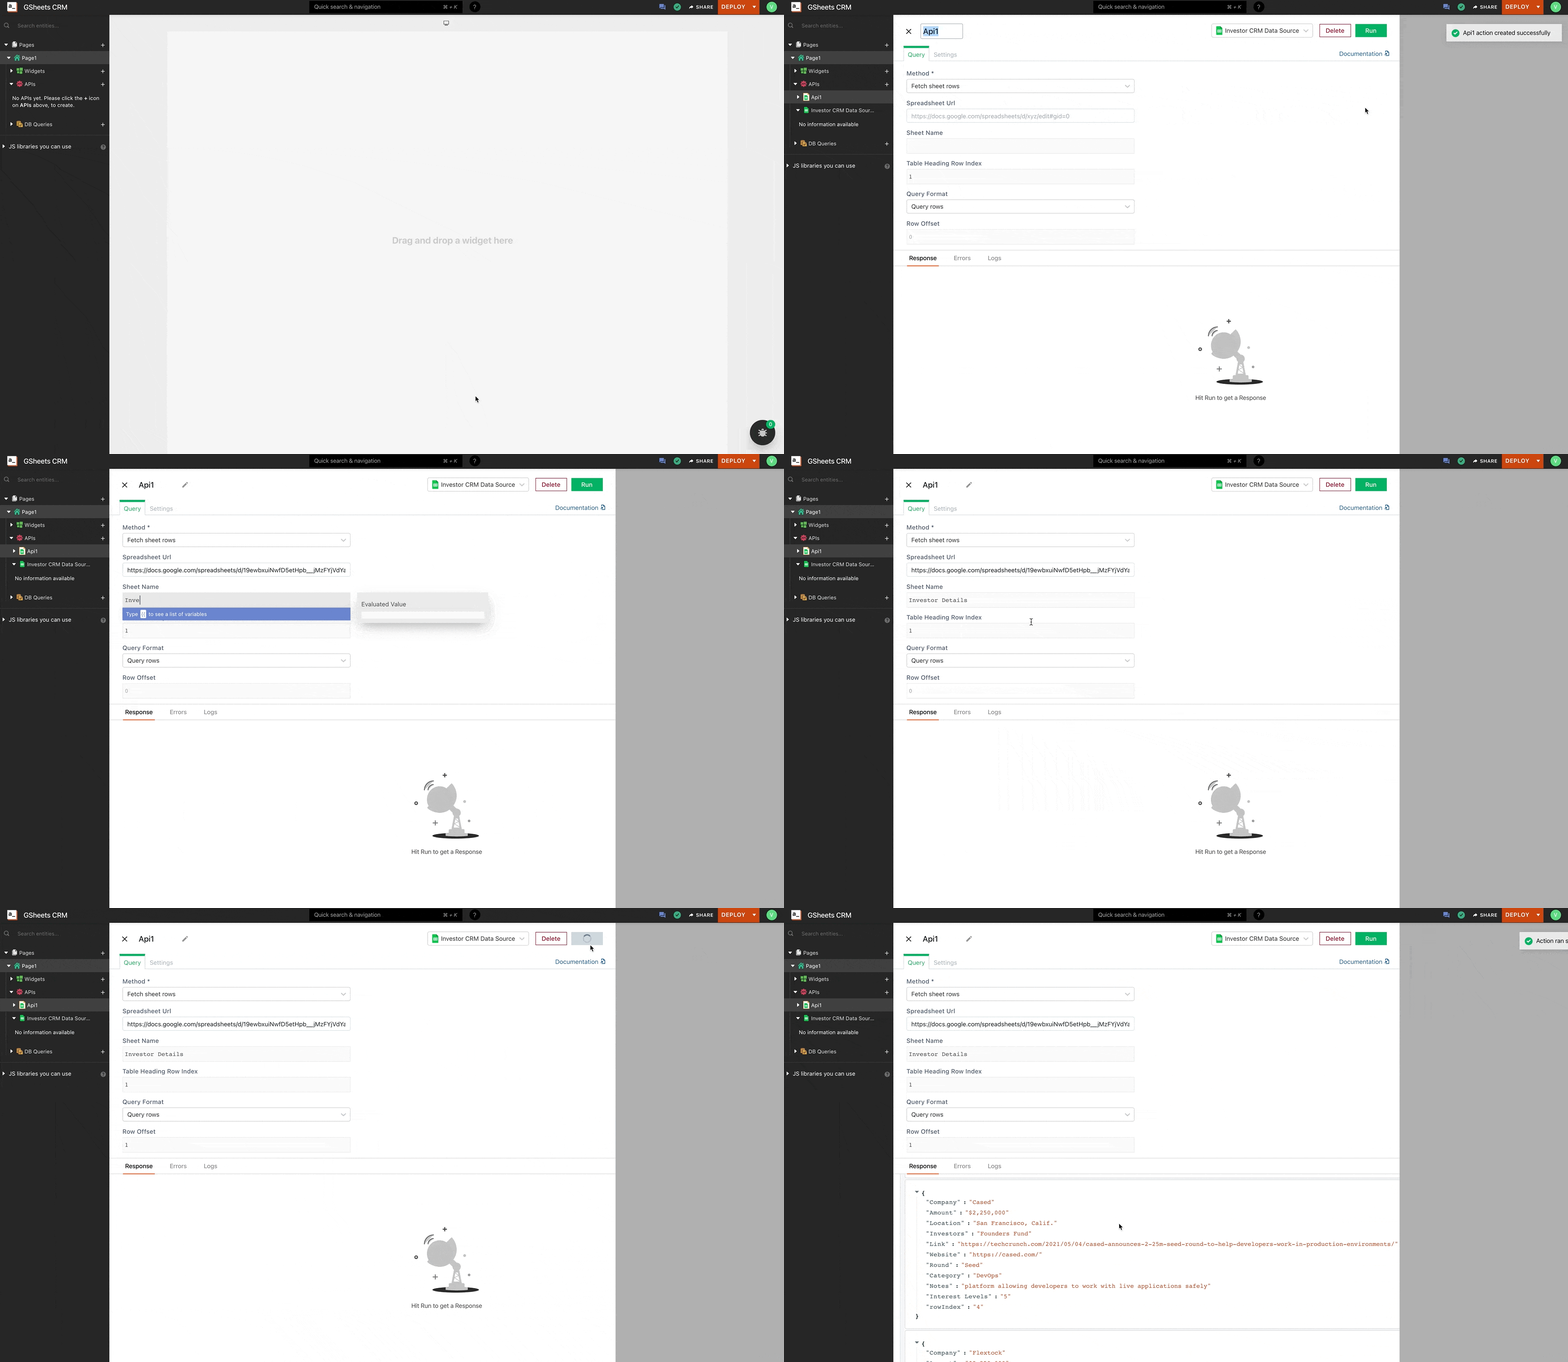
Lastly, click on the Run button on the top right, we should see the sheet information in JSON format in the response pane at the bottom. Below is the GIF showing the same:
Awesome, now that we have our data from the Google Sheet, let’s put this in a table; follow the below steps:
Make sure the API is saved as getInvestorDetails
Next, click on the + icon next to the widgets and drag and drop a table widget onto the canvas.
Open the Table property pane by clicking on the cog icon on the top right of the table.
Now under the Table Data property, paste the following code snippet:
{{ getInvestorDetails.data }}Here, we’re using the moustache syntax to bind the data from the API to the table widget.
With this, we should see the Table data with the investor details from the Google Sheet. Below is a GIF showing the same:
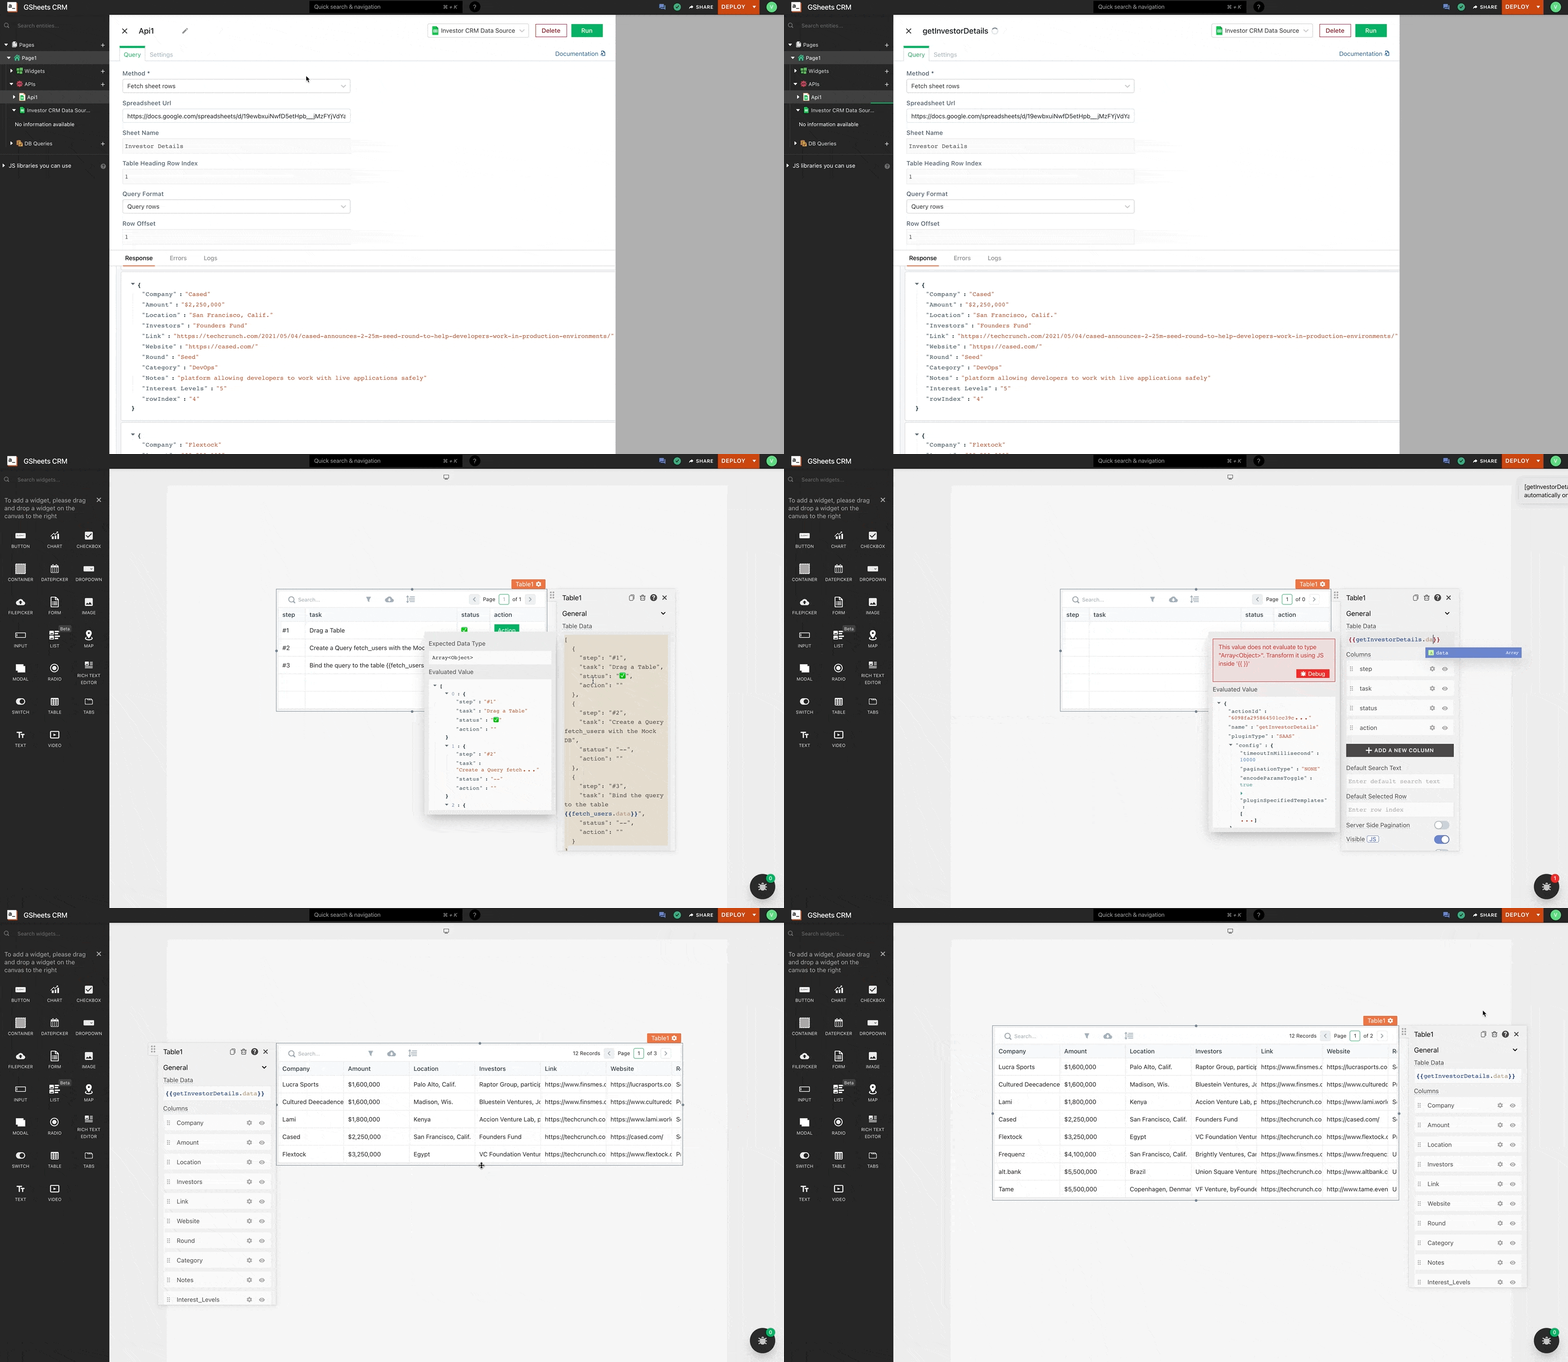
Perfect! We now binded our Investor Data into a table widget; you could play with it by opening the table’s property pane and displaying only required values or adding custom columns. Next, let’s add a feature to add new Investor Details to the Google Sheet from Appsmith.
Insert new data/rows to Google Sheet from Appsmith
In this section, let’s learn to add a new row from Appsmith UI to Google Sheet. With this, we should be able to add new investor details for our Investor CRM. Let’s start by adding a button and showing a modal that has a form to add all the details of the new investors. Follow the below steps:
Drag and drop a button widget on to the canvas and next open the property pane of the button by clicking on the cog icon on the top right of the button when selected.
Open the onClick property and select the Open Modal option and click on New Moda, this should open a new modal.
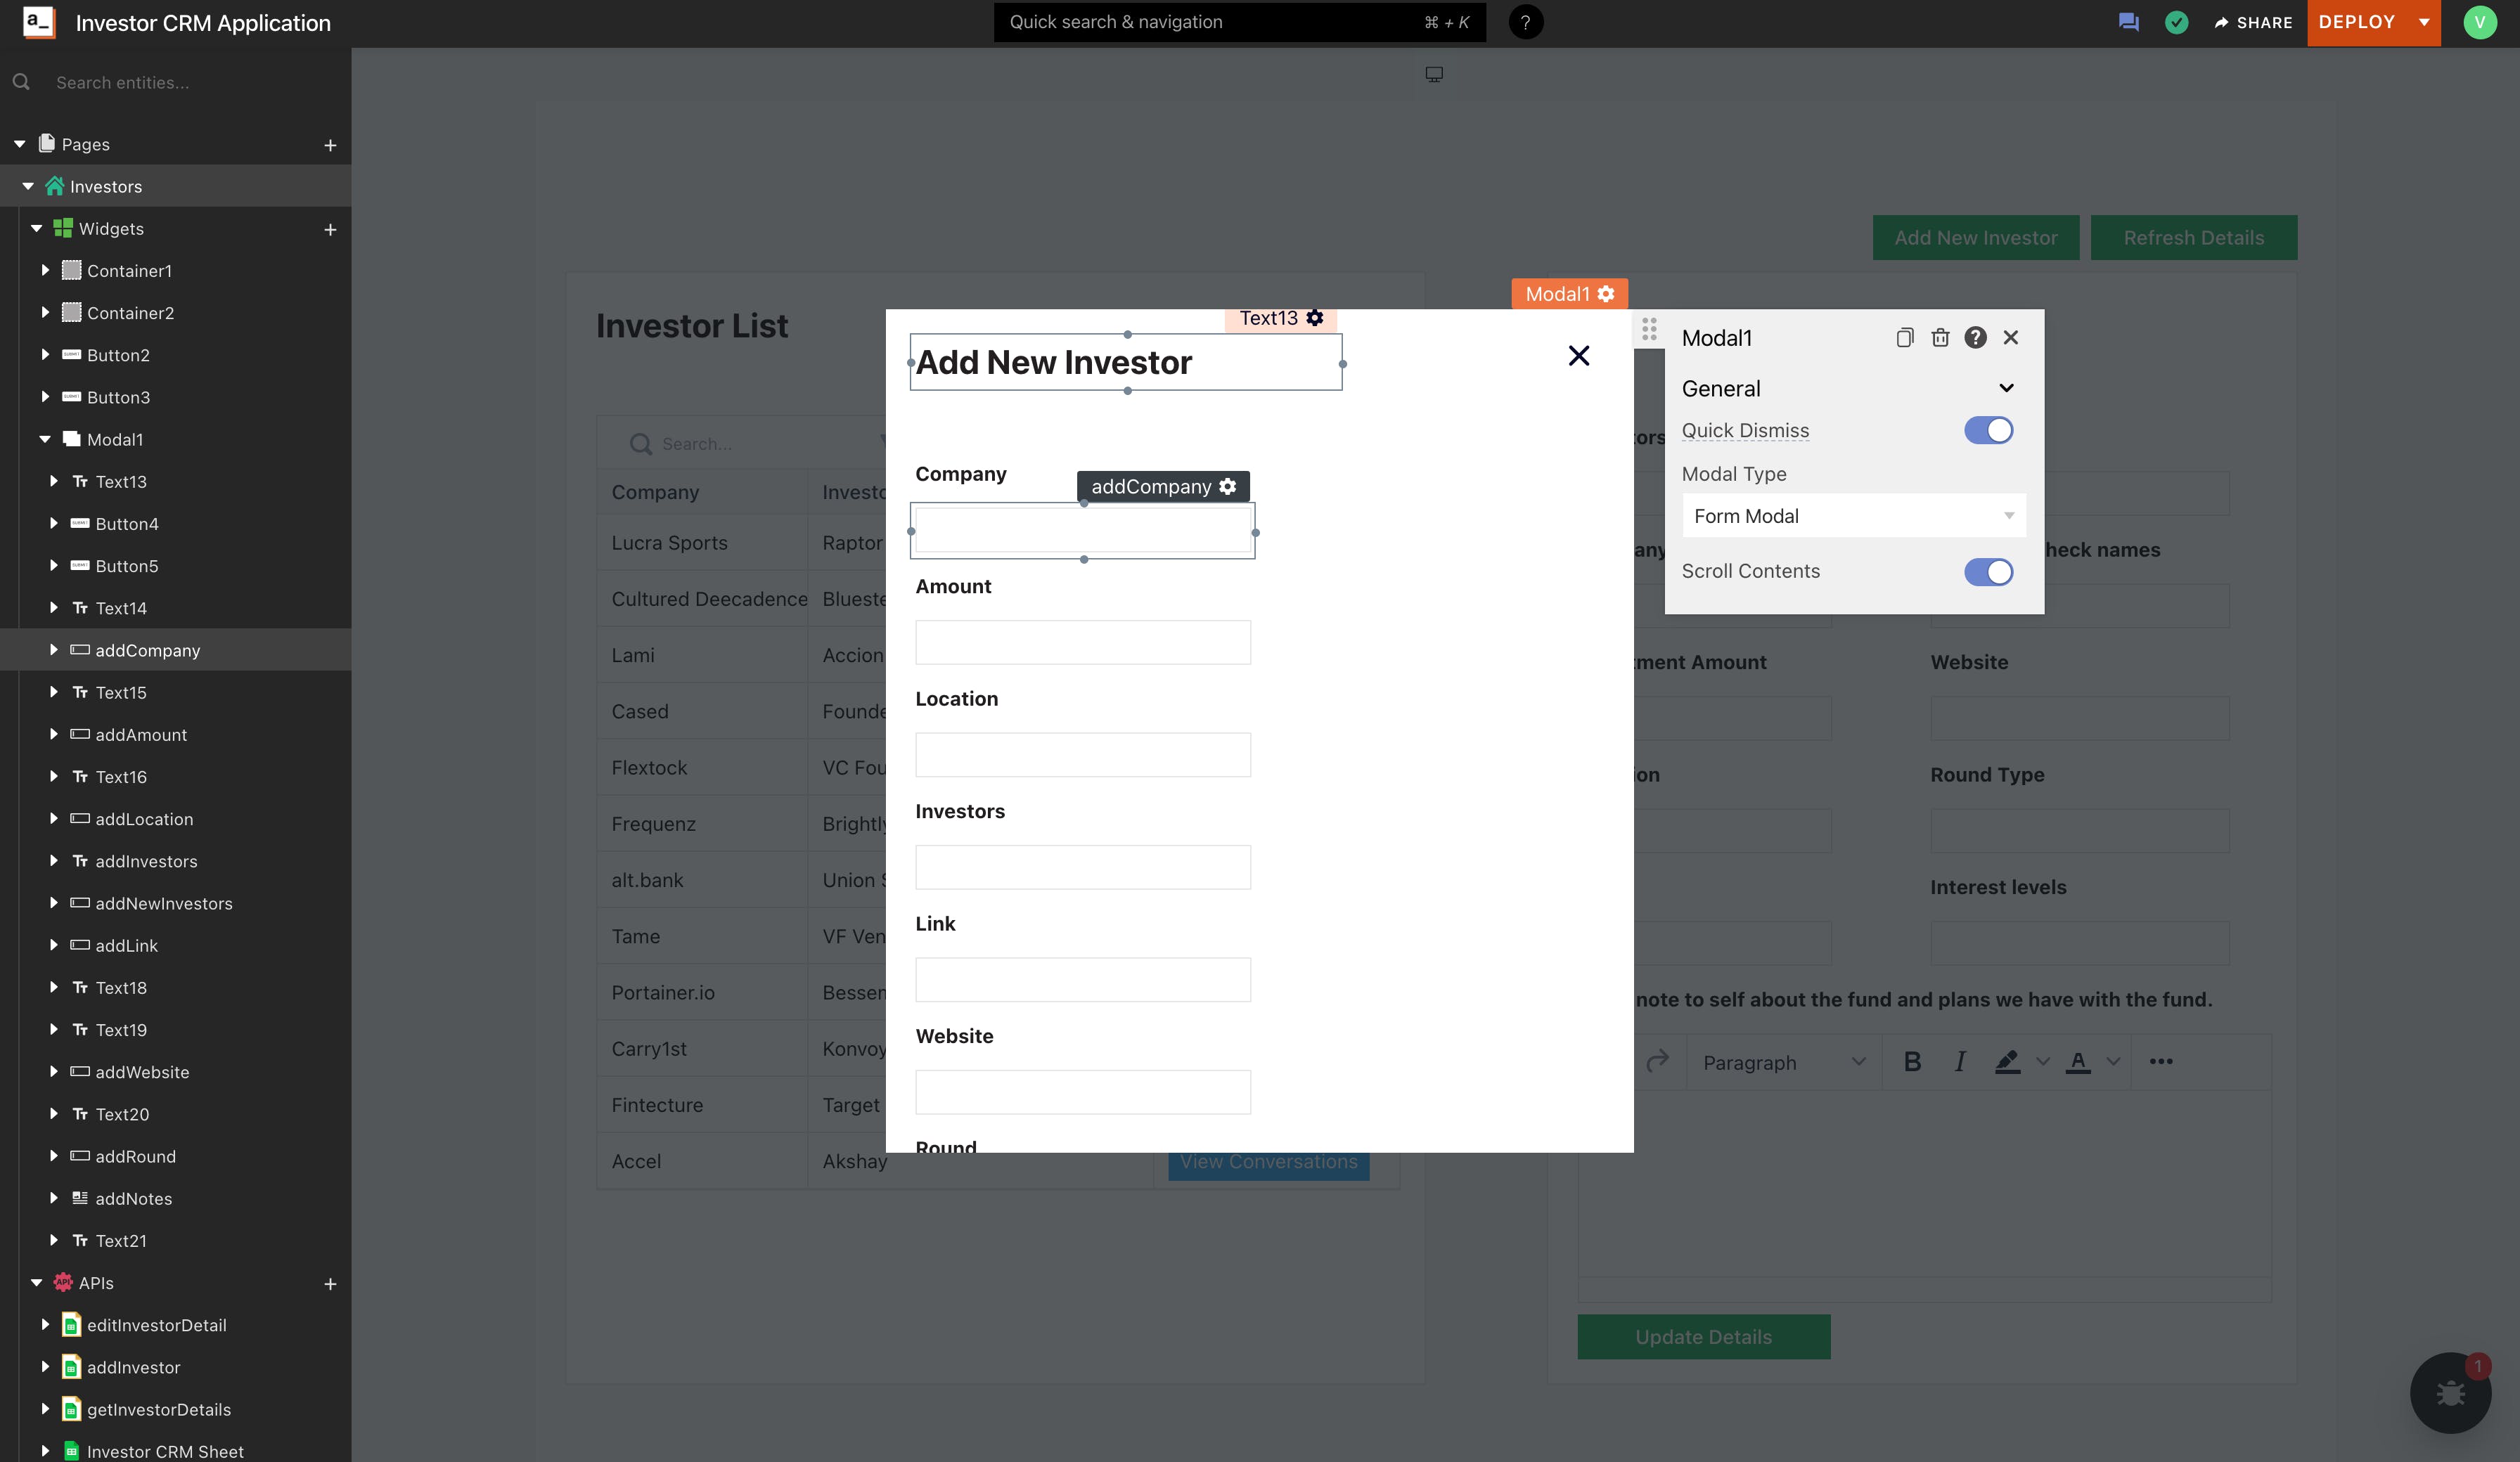
Now add the necessary form fields by dragging the Input widgets onto the Modal. In our case of Investor CRM, we will add the following fields:
- Investment Fund- Location- Name of Investor- Designation- Interesting Portfolio Companies- Size of Fund - Website- Notes- Interest LevelsName the input widgets to follow to easily use them for other operations for our CRM.
Investment Fund: addFund
Location: addLocation
Name of Investor: addInvestorInput
Designation: addDesignation
Interesting Portfolio Companies: addPortifolio
Size of Fund: addFundSize
Website: addWebsite
Notes: addNotes
Interest Levels: addIntrests
Below is a screenshot of how our form should look like:
Now that we have our form ready, let's write the logic to push the values from the form to the Google Sheet whenever submitted. Follow the below steps:
Create a new API from the existing Google Sheets data source and set the query method to Insert Sheet Ro. This query method helps us insert new data to the Google Sheet from Appsmith.
Name the query as addNewInvestor
Next, in the SpreadSheet URL property, add the link to our Google Sheet.
The Sheet Name will be Investor Details as named in our Google Sheet.
The Table Heading Row Index will be the row where the names of the columns are listed; in our case, this will be 1,
Lastly, the Row Object takes a JSON object with keys set to the column names associated with the desired values. In our case, below is how the Row Object should look like:
{
"Investment Fund": "{{addFund.text}}",
"Location": "{{addLocation.text}}",
"Name of Investor": "{{addInvestorInput.text}}",
"Designation": "{{addDesignation.text}}",
"Interesting Portfolio Companies": "{{addPortifolio.text}}",
"Size of Fund": "{{addFundSize.text}}",
"Website": "{{addWebsite.text}}",
"Notes": "{{addNotes.text}}",
"Interest Levels": "{{addIntrests.text}}"
}
Here, the key's are the column names in the Google Sheet, and the values associated with them are the names of the input widgets. The .text method is used to pick the text that's written in the input widgets. Lastly, in the form below for the submit button, set the on click property to Call an API and call the addNewInvestor API from the options. Our query is now complete, go ahead and try adding a new Investor Detail from the created UI. We should be able to see the updates on the Google Sheet automatically. Magical, isn't it? In this way, we could add new data using the Insert Sheet Row query. In the next section, let's see how we can edit existing row data from Appsmith.
Displaying and Updating Investor Details
Displaying on the table is cumbersome, hence let’s shrink our table and show all the details in a different container. Additionally, let’s give the functionality to edit the details when displaying them. With Appsmith, all these are pretty straightforward. Now, first, let’s reduce the width of the table and only show the Investor Name and Company, we can do this by opening the property pane and clicking on the eye icon to make the other fields invisible. Next, follow the below steps: Drag and drop a container and add necessary input widgets to display the Investor Details. In this case, we’ll be adding the following:
Investment Fund: editFund
Location: editLocation
Name of Investor: editInvestorInput
Designation: editDesignation
Interesting Portfolio Companies: editPortifolio
Size of Fund: editFundSize
Website: editWebsite
Notes: editNotes
Interest Levels: editInterests
Below is a screenshot of how our app should look like:
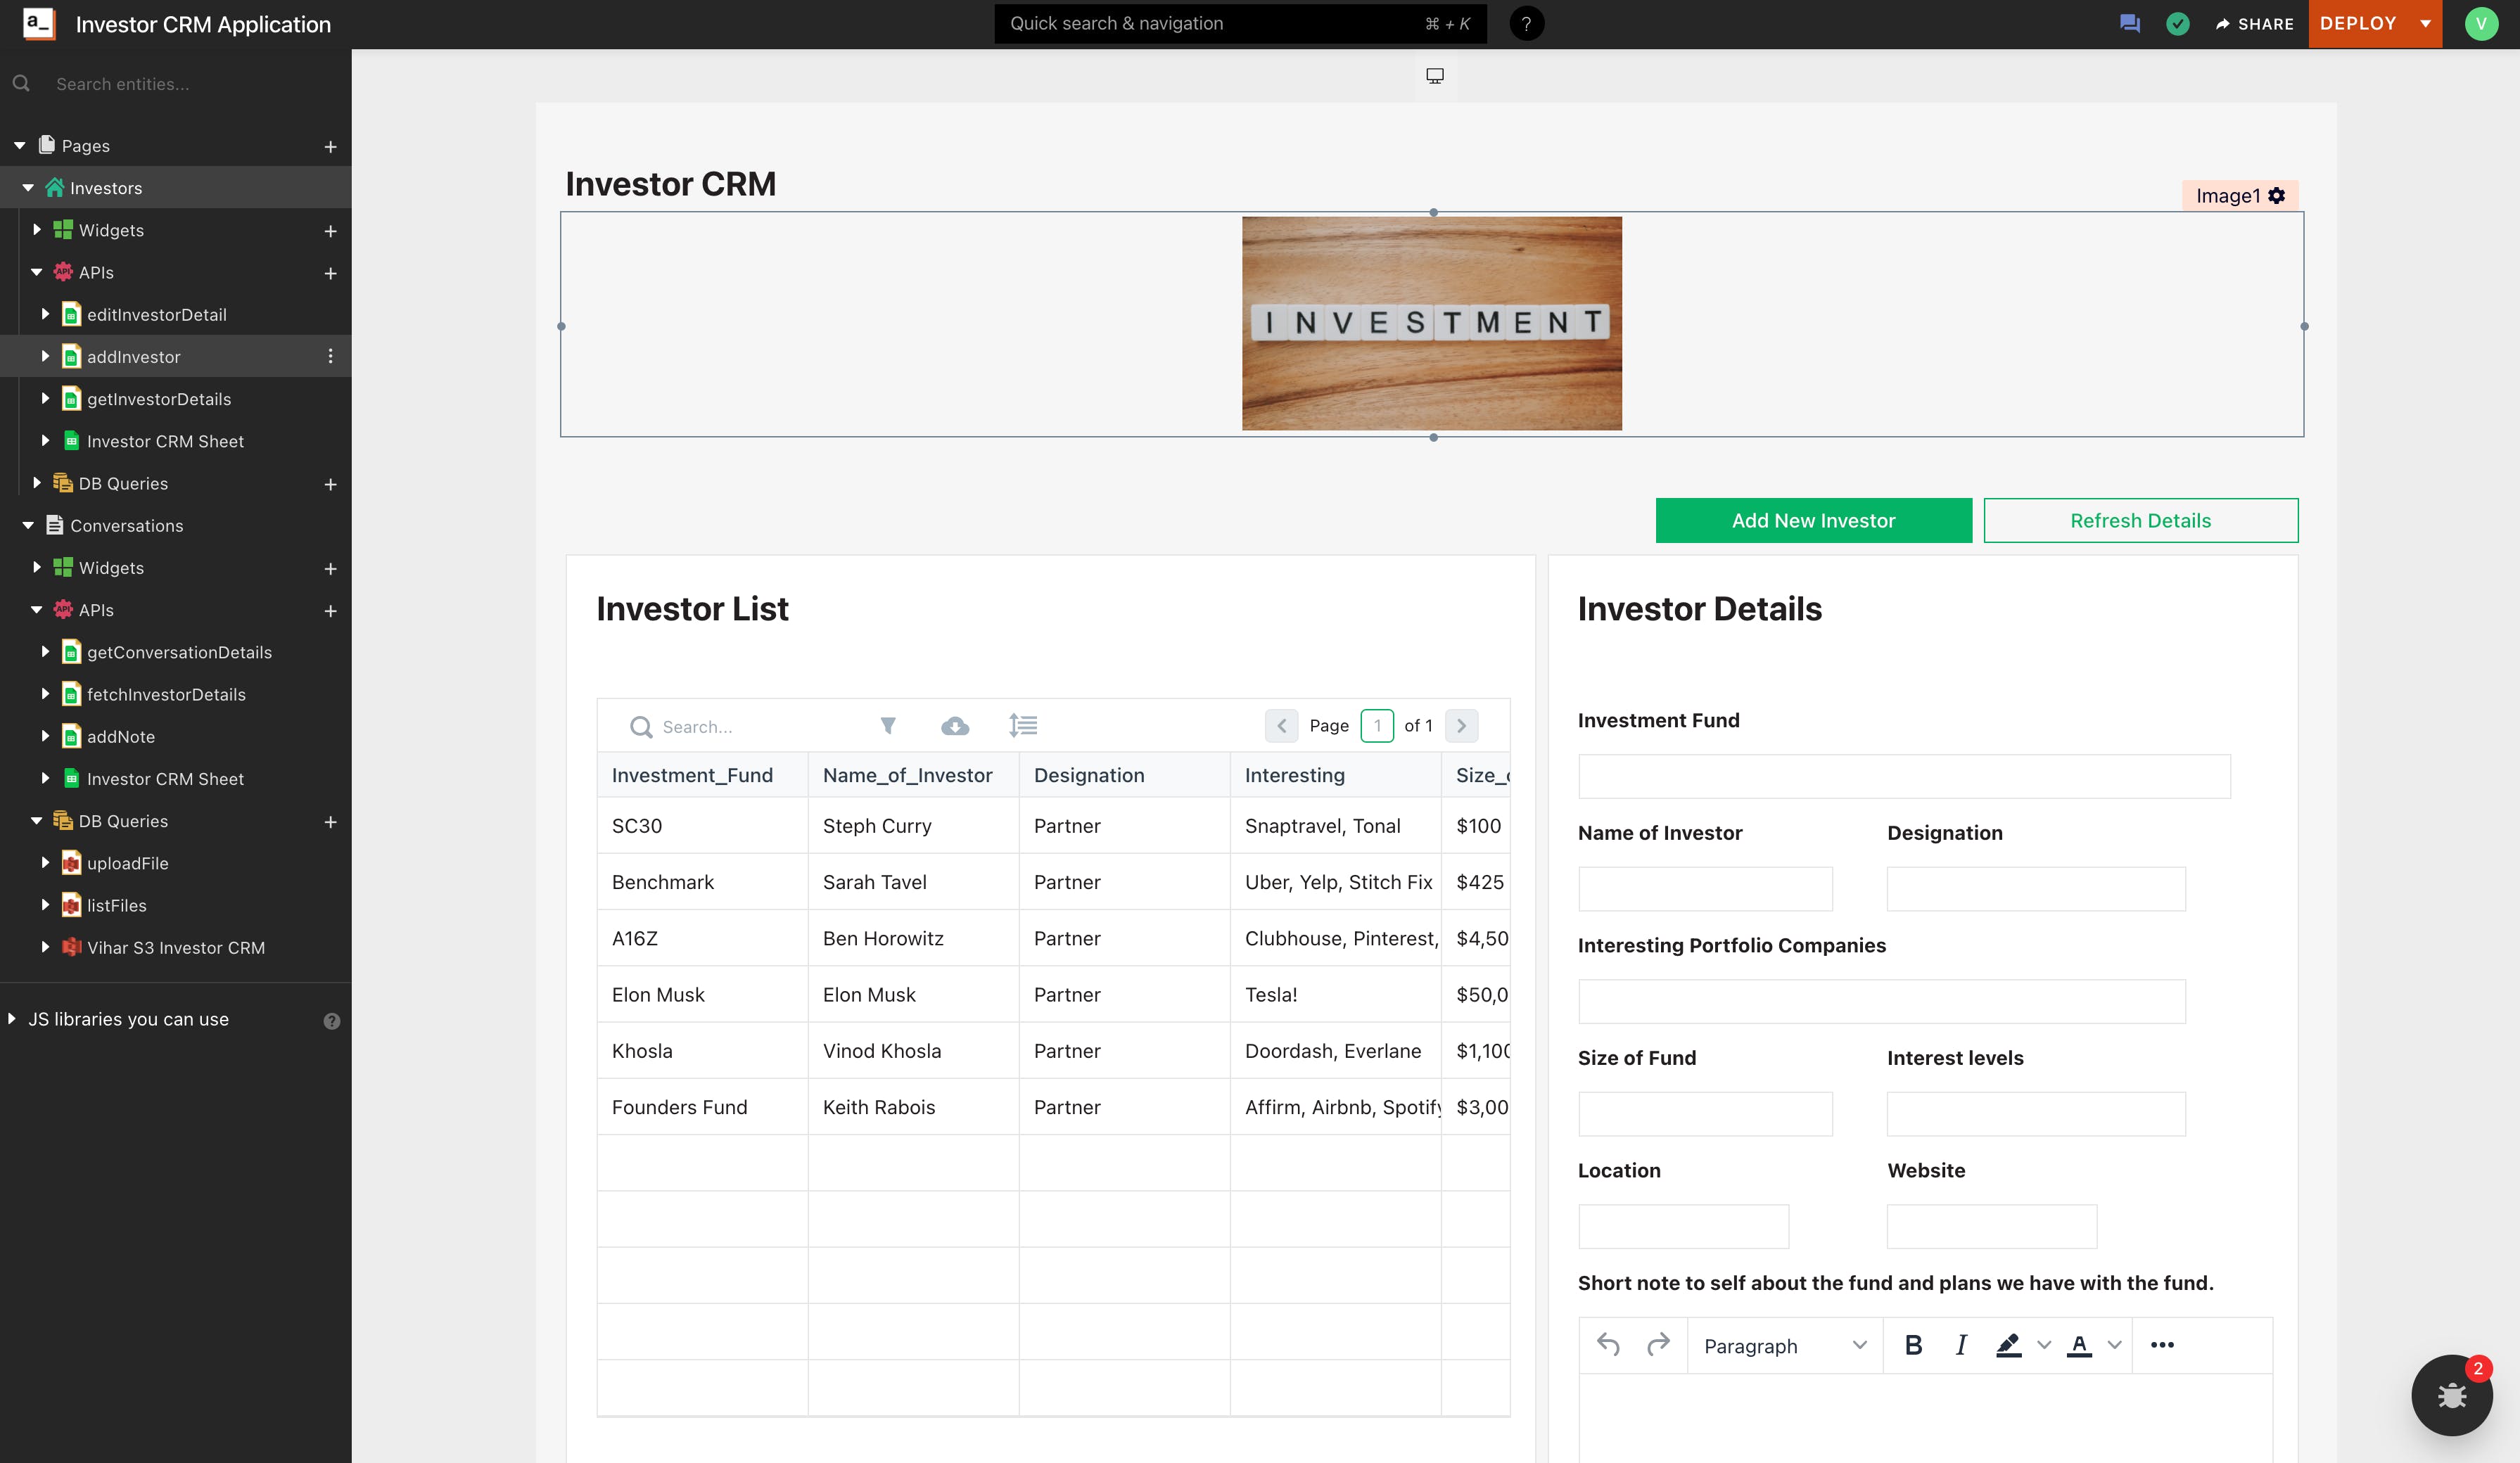
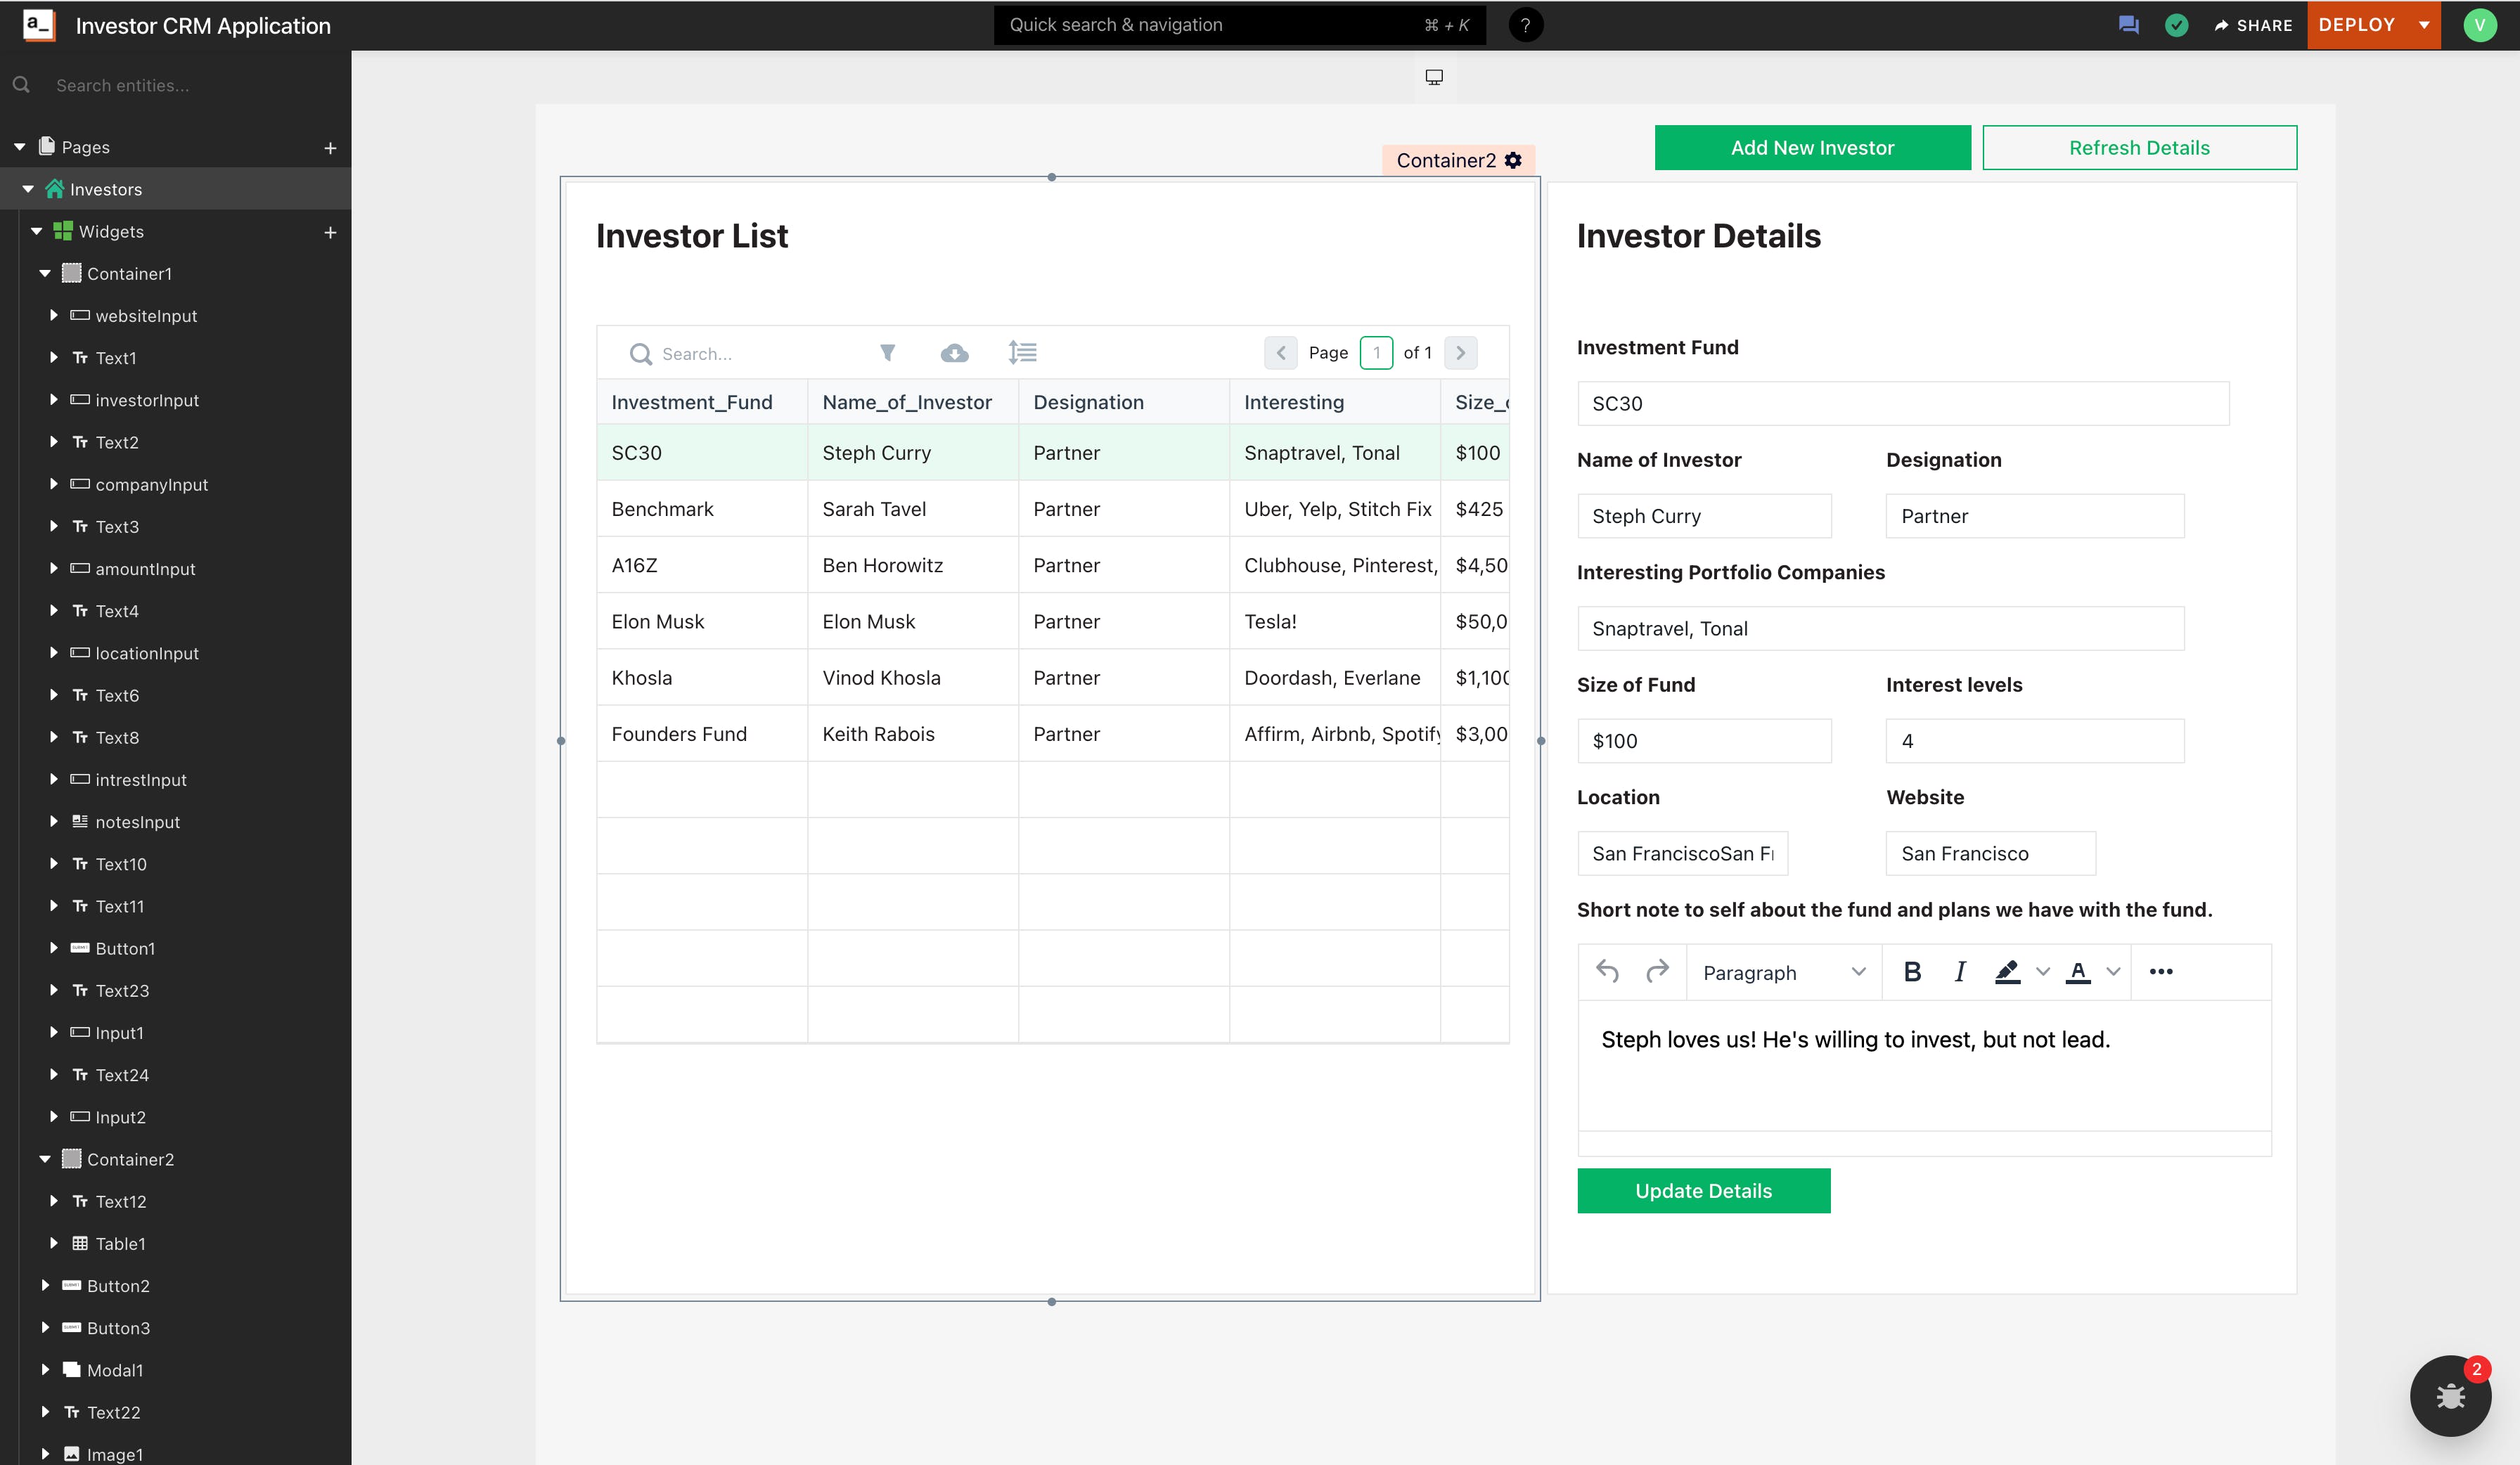
As we see in the image we have the Investor Table on the left, and the details on the right. Notice an Update Details button at the end? This button should help us the investor details wherever updated. Now in each of these inputs widgets, let’s use the selectedRow property from the table and display data. Set the following to the Default text of input widgets in the investor details container:
Investment Fund Input Widget: {{Table1.selectedRow.Investment_Fund}}
Name of Investor Widget: {{Table1.selectedRow.Name_of_Investor}}
Location Input Widget: {{Table1.selectedRow.Location}}
Similarly, add the default text to the other widgets. Now, when a row is selected in the table you should have all the details of the selected investor in the investor detail container. Below is a screenshot of how it should look like:
Awesome! Our CRM is almost ready, but we missed one more thing in here; whenever we made changes in the input widgets and hit update details, the associated investor details should be updated in the Google Sheet. For this, let’s write a new update API that’ll help us update the values in the selected row of the Google Sheet. Follow the below steps:
Create a new API from the existing Google Sheets data source and set the query method to Update Sheet Row. This query method helps us update row data in the Google Sheet from Appsmith.
Name the API to editInvestorDetail
Next, in the SpreadSheet URL property, add the link to our Google Sheet.
The Sheet Name will be Investor Details as named in our Google Sheet.
The Table Heading Row Index will be the row where the names of the columns are listed; in our case, this will be 1,
Lastly, the Row Object takes a JSON object with keys set to the column names associated with the desired values. In our case, below is how the Row Object should look like:
{
    "rowIndex":{{Table1.selectedRow.rowIndex}},
    "Investment Fund": "{{editFund.text}}",
    "Location": "{{editLocation.text}}",
    "Name of Investor": "{{editInvestorInput.text}}",
    "Designation": "{{editDesignation.text}}",
    "Interesting Portfolio Companies": "{{editPortifolio.text}}",
    "Size of Fund": "{{editFundSize.text}}",
    "Website": "{{editWebsite.text}}",
    "Notes": "{{editNotes.text}}",
    "Interest Levels": "{{editInterests.text}}"
}
Lastly, for the Update Details button, set the onclick property to Call an API and call the editInvestorDetail API. We should now be able to update the investor details by editing the necessary input widgets and clicking on the update button. Awesome, now we have a fully functional app that allows us to manage all our investor contacts. Now let’s extend this application by adding a new page to save all the conversations, media files related to each investor.
Creating new conversations page to save notes and files
A fully functioning CRM should also have all the details of conversations, files with the associated investor. For this, let’s create a new page where we display all the notes and conversations from the Investors. Follow the below steps:
Create a new page and name it “Investor Conversations”
On this page, add a query to the URL to show only details of the selected investor. Now to the Appsmith URL, you see on the top add ?id=1. With this, we will filter all the investor details related to row one.
Now your data source will also be copied to these pages as well, click on the create New API from the existing data source to fetch the data from the second sheet which is Notes
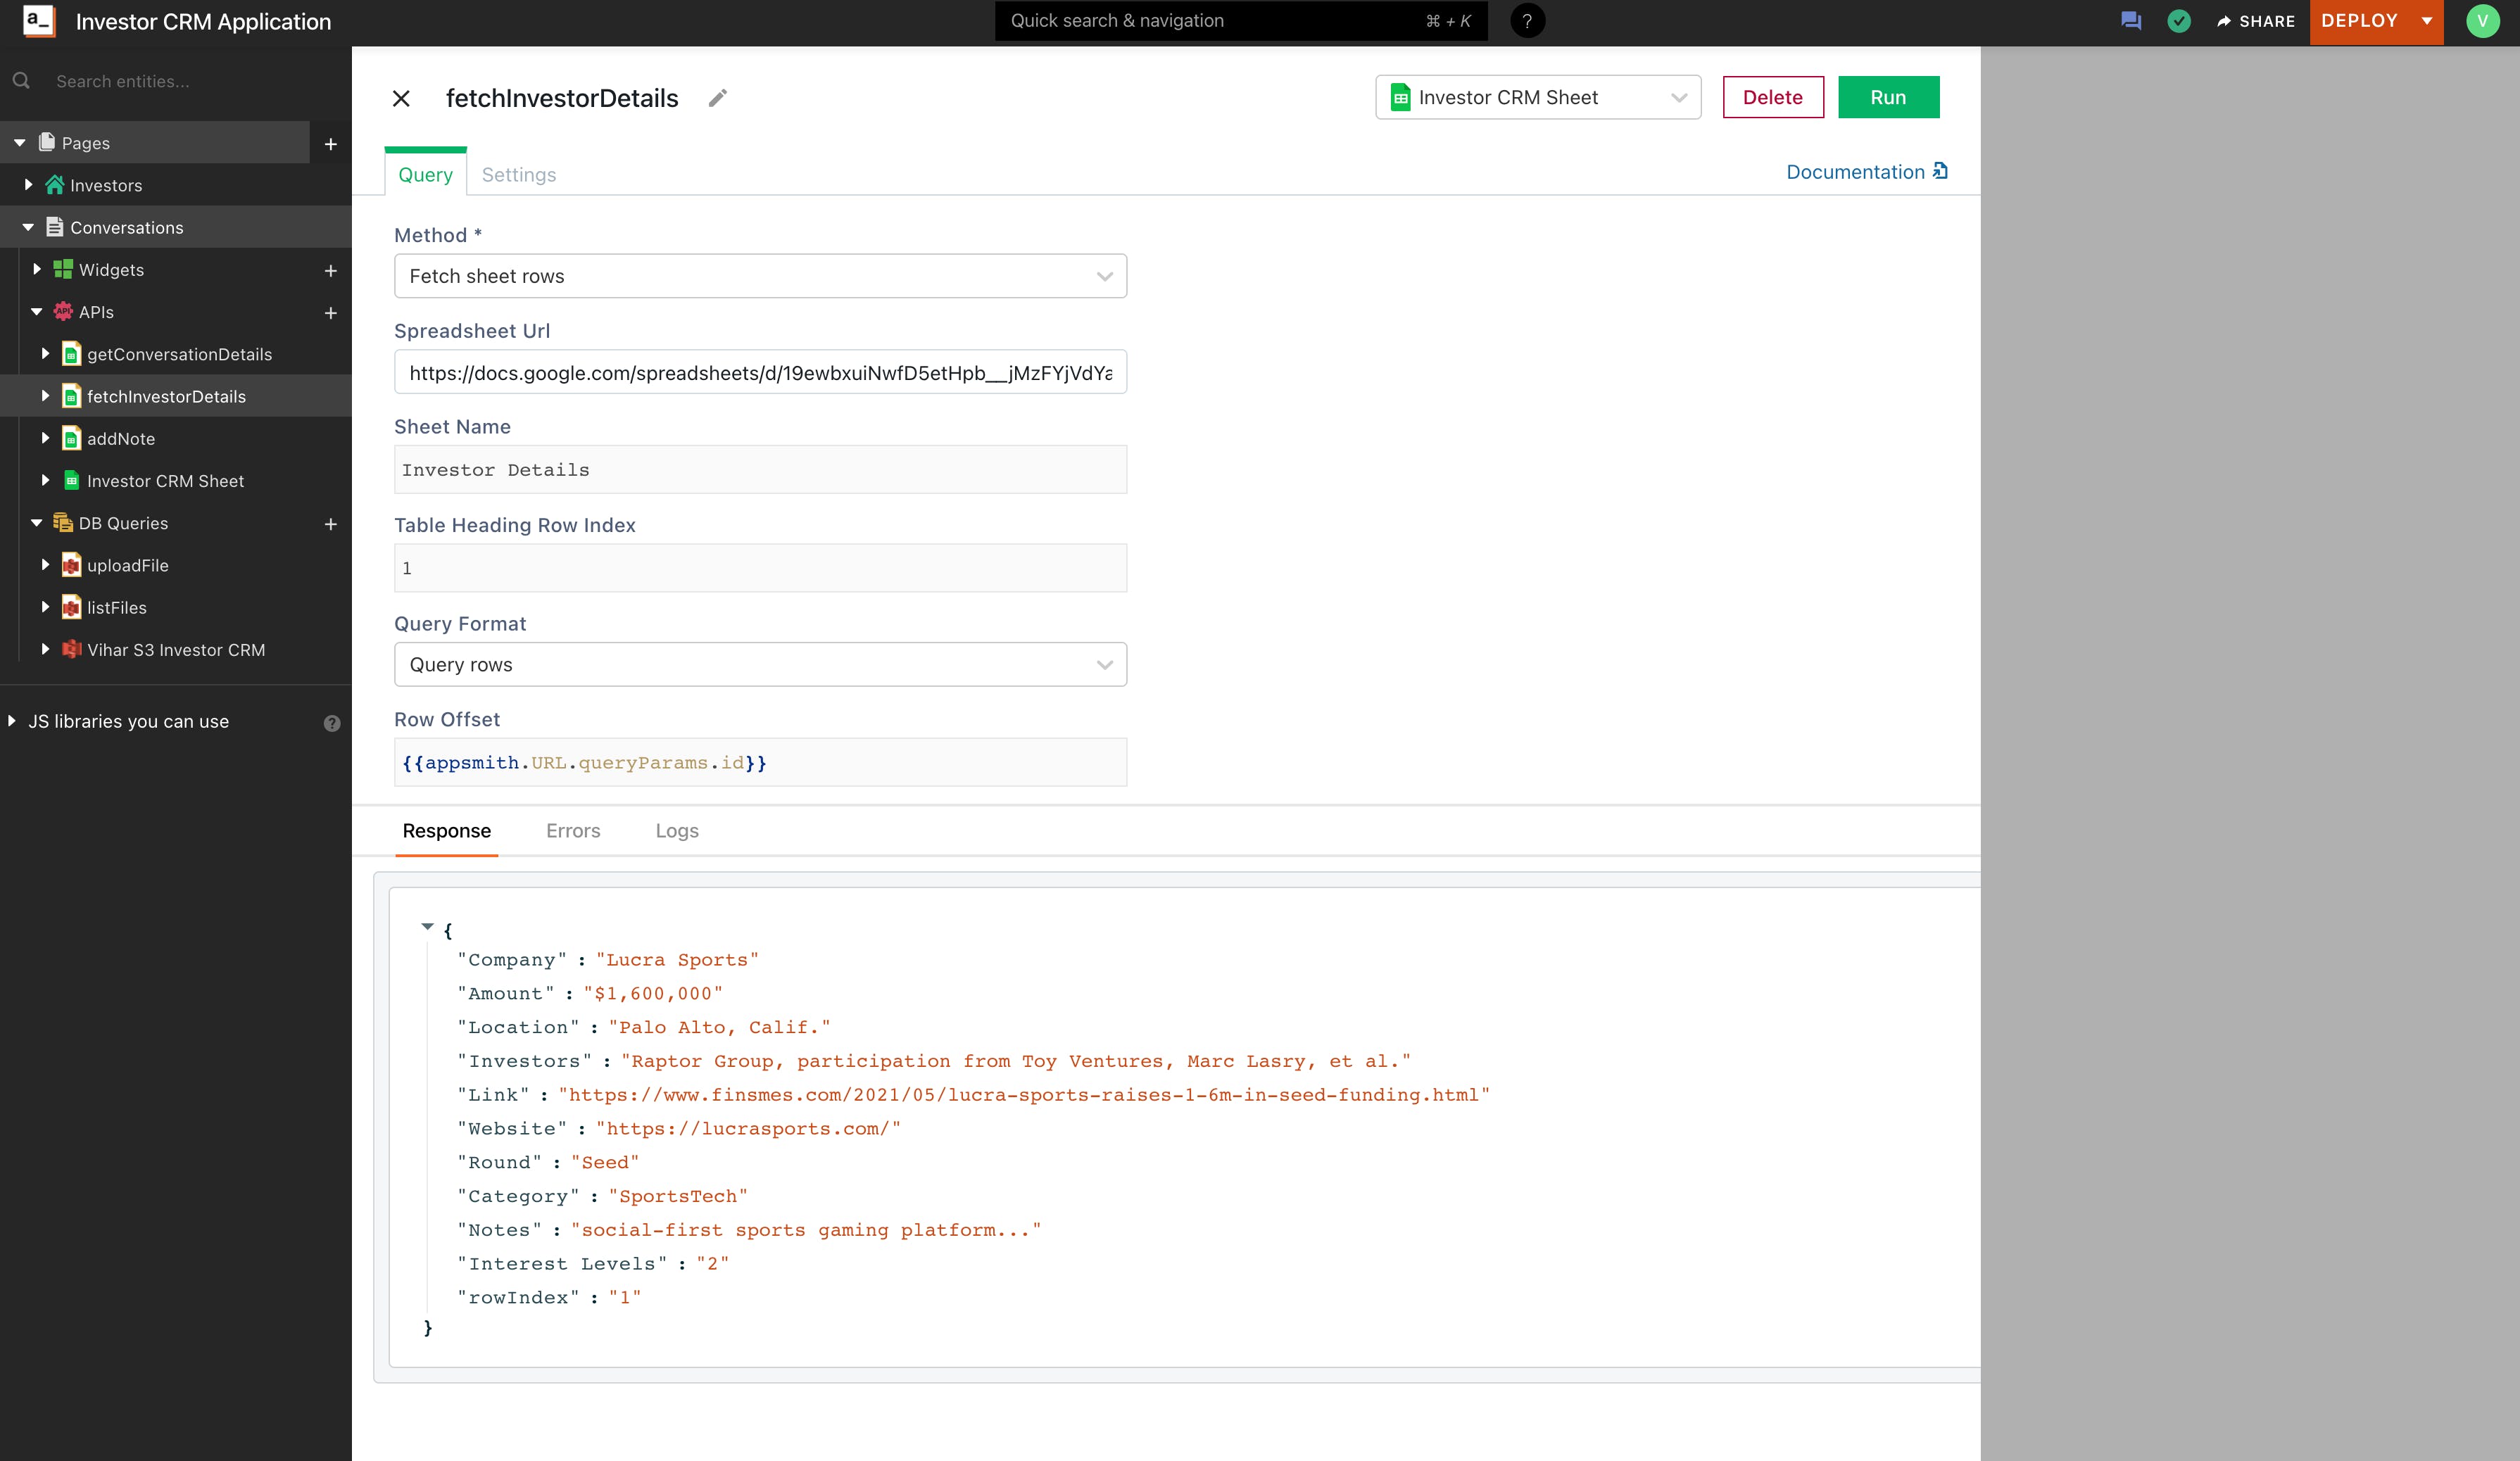
Name the API as fetchInvestorDetails, next add the SpreadSheet URL and set the sheet name as Investor Details
Set the row offset to {{ appsmith.URL.queryParams.id }}, this will query the row index given from the id param.
Lastly, set the row limit to 1, if you run the query you should see the details of investor details in the first row of the Google Sheet (as id is hard-coded to 1). Below is the screenshot showing the same.
Awesome, let’s add some details regarding the investor to the conversation page before we list down the conversations.
Now, on the conversation page, let’s add some Text Widgets to display the details of the Investors. Set the default text property to {{fetchInvestorDetails.data[0].Company}}
This will display the investor name based on the filtered id from the URL; later, we’ll have to pass this id dynamically from the investor table on the first page.
Now create one more API that fetches all the conversations from Sheet 2, which is notes.
Name the API to getConversationDetails, and set the query method to Fetch Sheets Row and add the link to Google Sheets URL under the Spreadsheet URL property.
Next, set the sheet name to Notes, and this will fetch all the information that’s listed in the Notes Sheet.
The Table Row Heading Index, Row Offset will be, and the Row limit will be 100; you can increase this based on the data on your Google Sheets.
Run the query. You should see all the notes listed down in the response pane in JSON format.
Next, drag and drop a table on the Canvas and in the table property pane under the Table Data, paste the following JS code snippet:
{{getConversationDetails.data.filter((note)=>note.id === appsmith.URL.queryParams.id)}}Here, we’re filtering the notes only based on the query parameter that’s passed in the URL. Remember, we set the id to 1. Hence, we should see the conversations only from the first investor.
Dynamically Passing the Query Params and Adding Notes
Now on our conversation page, we’ve hardcoded the id parameter; that’s why we were able to see only notes from the first investor. Now let’s add a new column in the table that’ll redirect to the conversation page of the selected investor. We should pass the ID dynamically based on the rowIndex. Follow the below steps:
First, open the table property pane in the Investor Details Page and click on Add A New Column.
Set the Column Type to Button and Label to View Conversations
Now when the button is clicked, it should navigate to the conversation page with the particular investor row id as a query parameter
Now set the onClick property to Navigate to Page, enter the Page name as Investor Conversations
Under the page name, you’ll find the Query Parameters property; add the following JS code snippet to pass the id as a query parameter:
{{ {id:Table1.selectedRow.rowIndex} }}Awesome, this will send the id variable as the query parameter when navigated to the Conversation page, thereby filtering the notes based on the investor. Now let’s add a new API that will add new conversations to the investor's details.
Firstly, add a new Rich Text Editor to the Investor Conversation page and a button to add these notes to the list. Set the RTE input name to addConversation.
Now create one more API that adds new conversations to Sheet 2, which is notes.
Name the API to addNote, and set the query method to Insert Sheets Rowand add the link to Google Sheets URL under the Spreadsheet URL property.
Next, set the sheet name to Notes, and Table Heading Row Index to 1.
In the Row Object paste the following JS code:
{
    "id":"{{appsmith.URL.queryParams.id}}",
    "Notes": "{{addConversation.text}}",
    "Author": "{{appsmith.user.name}}",
    "rowIndex":"0"
}
Awesome, this will add new notes to the Notes sheet in the Google Sheet. Also, make sure you call the addNote API when the “Add Notes” button is clicked.
Wrapping Up
Deploy your application on the cloud and share it with others, and that's it. We're done! You've seen how easy it is to build an application on Appsmith, specifically a CRM with Google Sheets as a backend. This guide covered how to create an Investor CRM and connect it to a Google Sheets, as well as how to create, read, update and delete data. You learned how to build interactive pages, work with widgets, and customize them for your purposes. We have made a slightly more robust application public here; try it out and let us know what you think. You can also check the live demo of our app here. Cover Image Credits: Photo by Daria Nepriakhina on Unsplash
