Build an Equipment Checkout App for the Admin Team at Your Company
On average, a mid-sized company uses 75 apps to run its businesses! As teams grow and scale, internal apps, primarily administrative and departmental tools, help in sustaining growth. When manual processes get automated, it leaves more time for organizations to focus on their core growth-related work. Low code tools are an excellent way for businesses to solve their dilemma in allocating engineering resources. Low code platforms can help developers build custom internal applications at a fraction of the time traditional development takes. In this blog, we will build a web application using two low-code tools: Appsmith and Supabase. Appsmith lets us drag-and-drop UI components into our application to develop the applications visually. It helps us connect the datasource to the UI components within a browser window. This speeds up the application building process. Supabase is a “Postgres database on the Cloud.” With Supabase, we only need to define table structure and SQL functions. Supabase takes care of generating REST APIs from the database schema.
As part of this tutorial, we will build an equipment management application. Creating such an application from scratch is laborious and time-consuming. We will use Appsmith and Supabase to rapidly iterate design and development and get feedback from our users early on. Both tools will significantly cut down development time, allowing us to deliver this solution in far less time.
Let us first understand the application and its uses in more detail
The Use-case
Consider a video production company. This company has an inventory containing video cameras, lenses, and tripods. Employees borrow the equipment for photoshoots and then bring it back after the photo shoot is completed. The company needs to keep track of the equipment. They also need to make sure that people are accountable for the equipment they take. The company would need to know which employee has the equipment and when it will get returned at any given time.
Although we are using a video production company as an example in this blog, this scenario applies to other industries, for example, sports clubs that lend equipment to players and software companies that provide computers to their employees for remote work. An inventory system is needed for any organization where employees borrow the equipment to take it to a job site or work remotely.
We can implement this by using a simple spreadsheet or in paper form. But, spreadsheets or booklets are unmanageable once the equipment list or the number of employees grows. An equipment management system becomes a necessity.
In this blog, we will learn the following:
Use Appsmith to build web pages and use Supabase as a data store.
Connect Supabase with Appsmith using REST APIs. This approach eliminates the need to use master database credentials in Appsmith.
Use Appsmith’s UI widgets to display data.
Build Forms in Appsmith.
You can see the finished application here.
We will switch back and forth between Supabase and Appsmith to complete this project. Keep Supabase and Appsmith open on different browser tabs to follow this tutorial. We have a lot to cover, so let’s get started!
Appsmith and Supabase: Setting Up a Project
Get Started on Appsmith
Create a new account on Appsmith (it’s free!), if you are an existing user, log in to your Appsmith account.
In Appsmith, create a new application. You will see a new Appsmith app with an empty canvas and a sidebar with two directories: Datasources, Widgets, and JS Objects [This is a new feature, read more about it in this blog ].
Visit Supabase.io and create an account in another browser tab if you don’t already have one.
Start a new project in Supabase and create a new organization name with the help of a random name generator tool, project name, database password, and the region near your user’s location
Define Database Table
The first step is to use Supabase to create database tables. Here are the steps needed to create tables.
Use the left-hand sidebar to visit Table Editor and create a table by clicking + New table.
Create a Table ‘equipment’ and add varchar field’ name’ and varchar field ‘image’.
You can populate the database with sample data. Use ‘Import Data from SpreadSheet’ and this CSV file to follow this tutorial.
Create another table and name it the ‘employee’ table. This table contains three fields - id, name.
Add another table and name it the ‘checkout’ table. This table stores checkout transactions; it contains which employee checked out which equipment.
This table will have the following fields:
- id,
- created_at,
- equipment_id,
- employee_id,
- due_by,
- returned_on and notes. Fields’ equipment_id’ and ‘employee_id’ are foreign keys into table ‘equipment’ and ‘employee’, respectively.
We will be using this dataset.
Connect Appsmith and Supabase
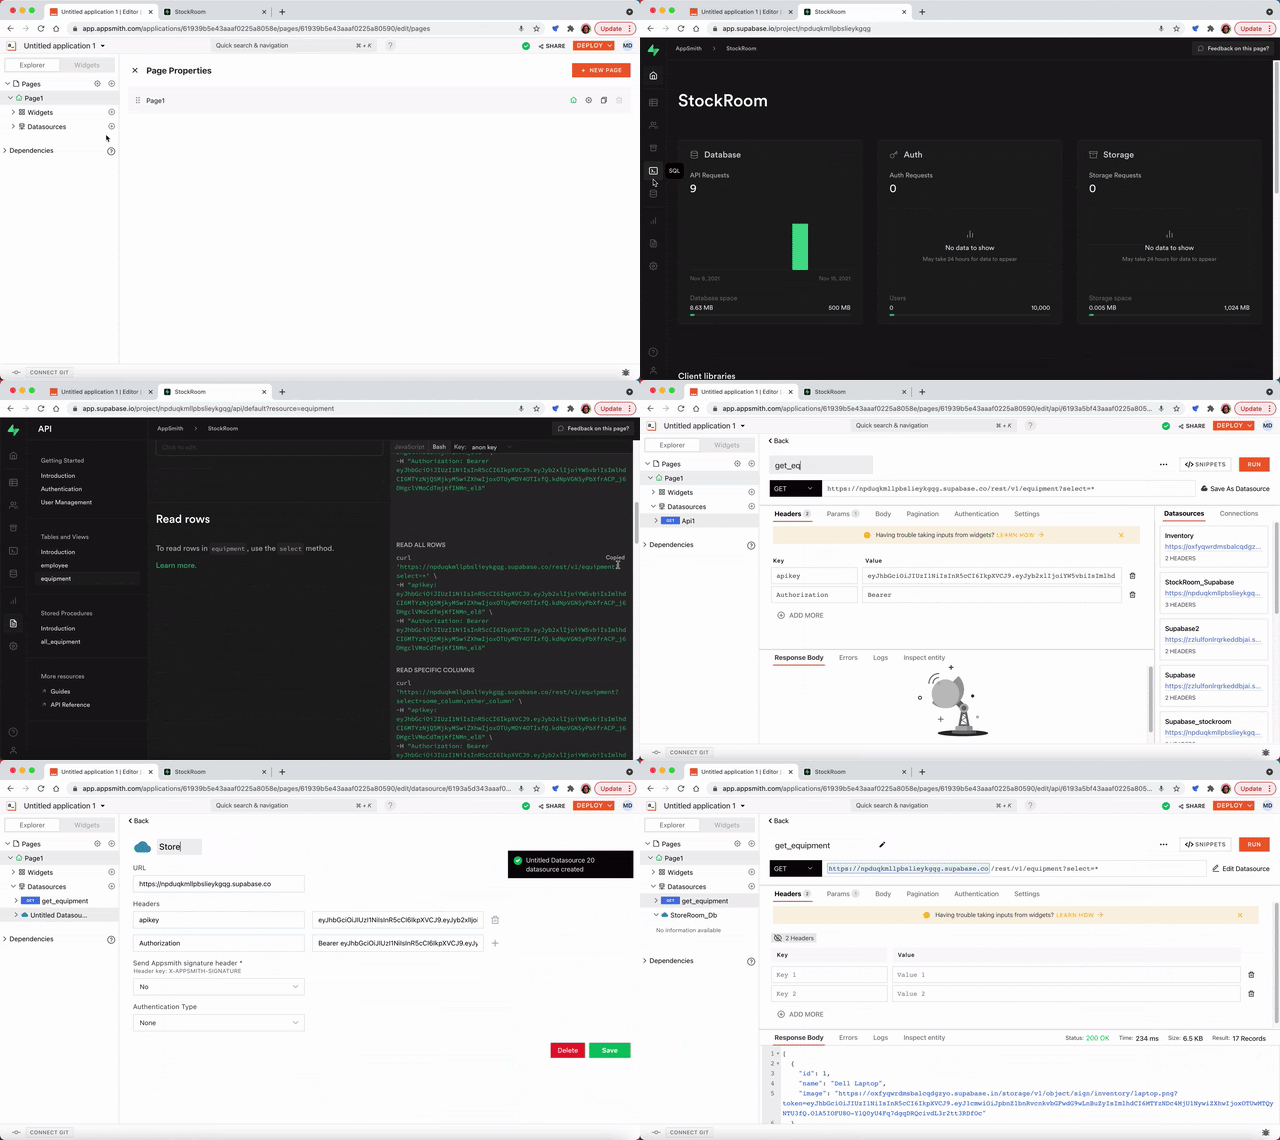
Go to the Appsmith window. [ See accompanied gif]
Click on Datasource, create a new datasource and find a new “Curl Import”.
Goto Supabase dashboard left sidebar, open menu ‘API’ and click on Table ‘Equipment’ and find corresponding Bash API and select a key as ‘anon key’.
Copy this text into your clipboard.
And Paste the text into the Appsmith Curl text box.
Click ‘Import’.
Let us rename this API as ‘get_equipment’.
Save this as a DataSource - name it as ‘StoreRoom_DB’. From now on, we only need to modify the relative URL path (the part with /rest/v1/table_name?query_param) to read other tables, views and invoke functions. Now that is cool! 😎
Run the API get_equipment and see that we get a successful result.
Note: You can also use SQL from Supabase and write them as queries.
Appsmith: Display Table Containing Equipment
If you successfully followed the previous step, you will see that the API has successfully returned data. Now, we will display the equipment data in a table.
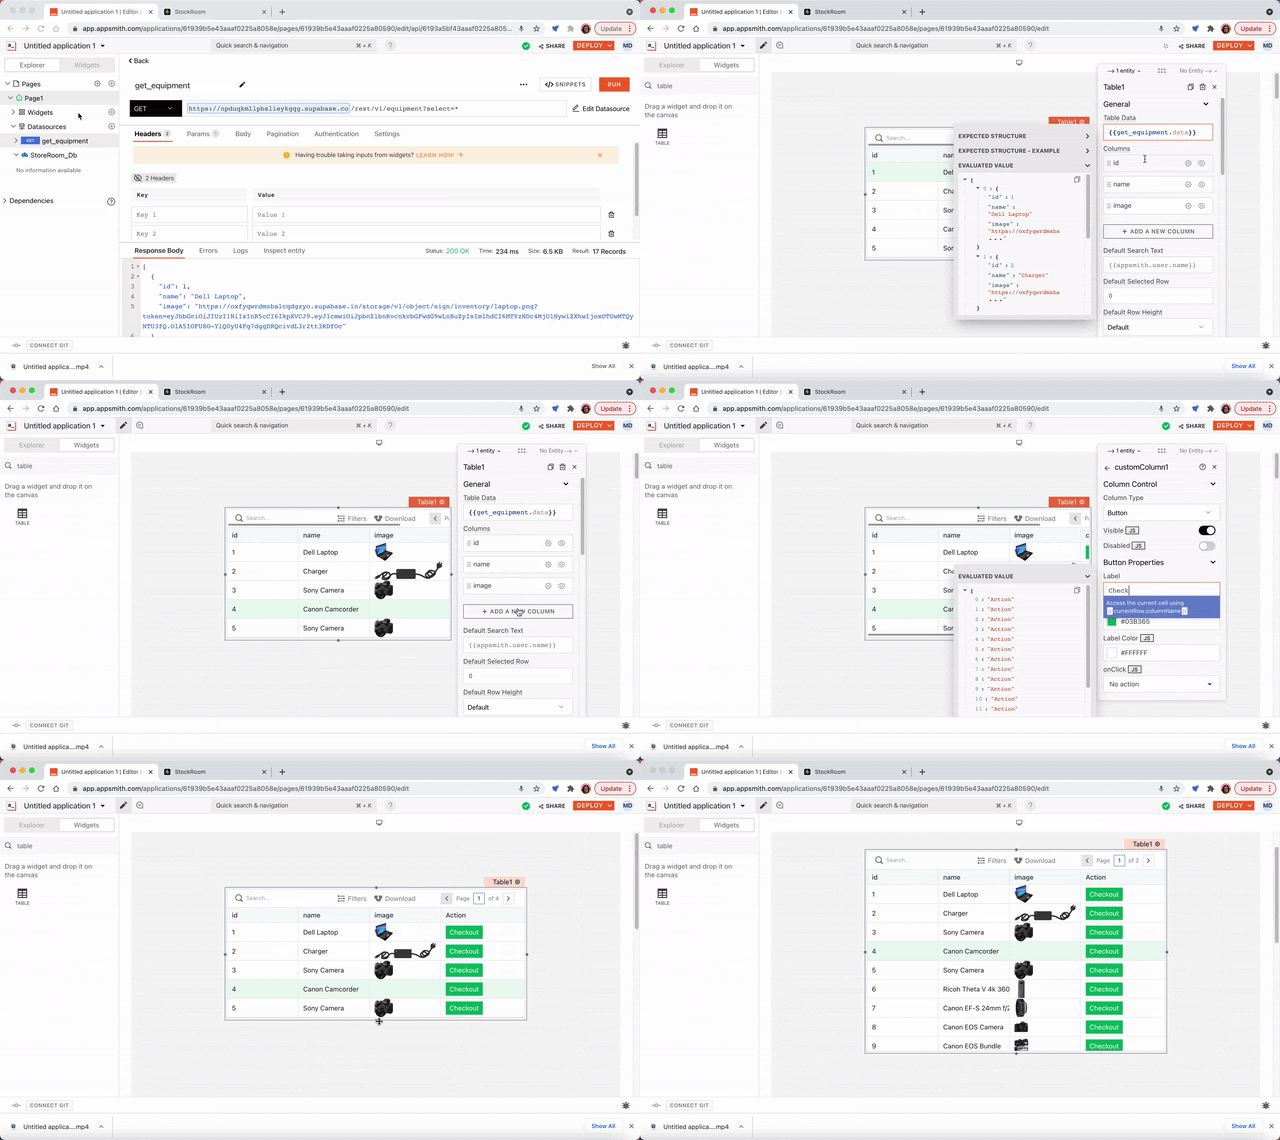
On the right-hand side menu under Pages, you will find the ‘Widgets’ option.
Select a Table Widget and drag it to canvas.
Open its property pane by clicking on the cog icon on the top-right next to its name. Now to bind the data, use the moustache syntax {{ }} and enter the query name: {{ get_equipment.data }}. This will populate all the data from the query onto the table. The table widget has built-in search, pagination, and filters - without us coding a single line!
Column ‘image’ field is displayed as a text URL instead of an image. Update the column type for the image field to ‘image’. Now, you should see the image.
Now, let us add a Button for Checkout. Adding a column to the table widget.
Change the Column Type to ‘Button’ and change the label to ‘Checkout’.
We will code the checkout logic bit later.
Appsmith: Read Employee Table
Follow these steps to read the employee table:
Duplicate the get_equipment API - and rename it to ‘get_employee’.
Change the relative endpoint to /rest/v1/employee?select=*
Run to make sure you can read all employees.
Appsmith: Build Equipment Checkout Form
We can now build the Checkout form.
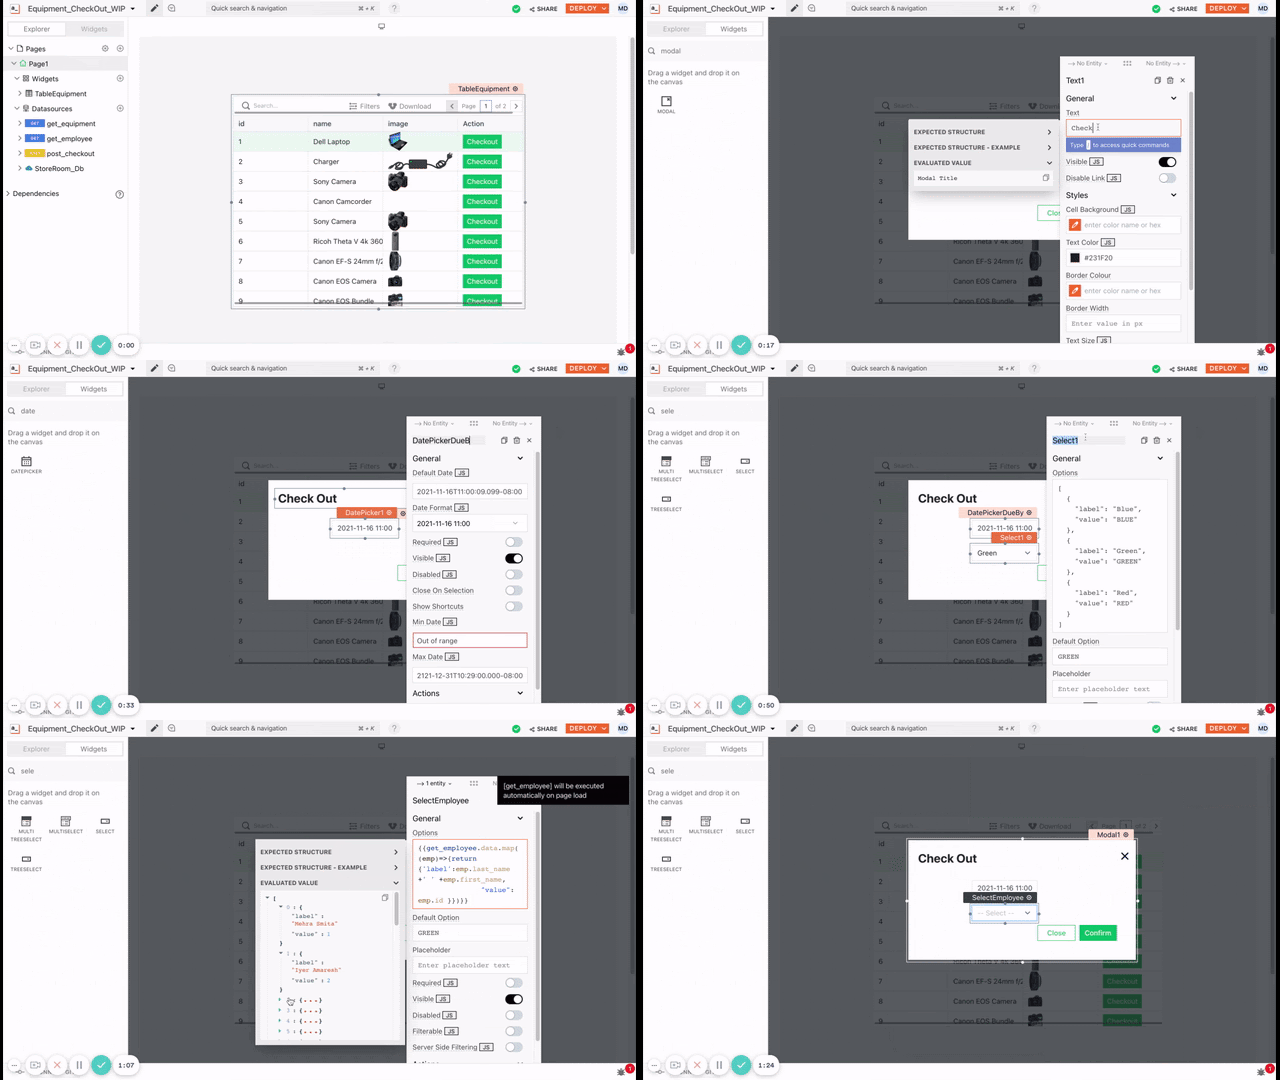
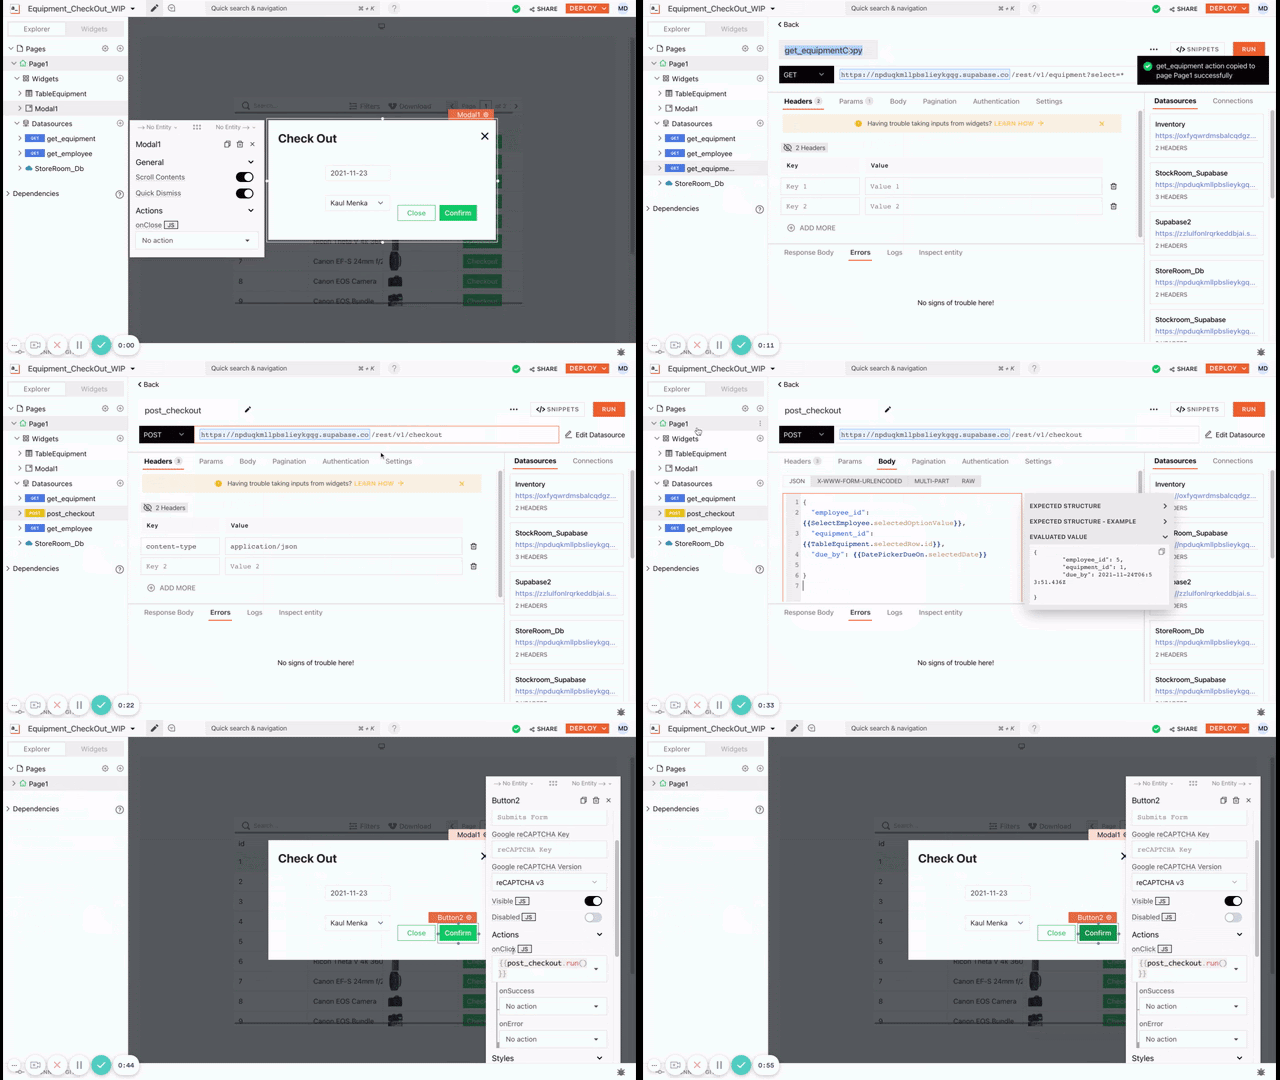
When the user clicks on the checkout button, we will open a modal containing a form. The form will allow users to select an employee and the date when equipment will be returned.
Here is how we can do it!
Drag a Modal widget into the canvas.
Add a DatePicker to pick the date to return the equipment.
We want to set the default return date to a week from today’s date. We can calculate the default return date by adding 7 to today’s date. We can use external libraries such as moment.js inside our Appsmith application, which we will use in our application.
Replace default date with
{{moment().add(7, 'd')}}
You can read about using external libraries in the Appsmith application here. Now, we need to Select an Employee who will check out the Equipment. For selecting an employee - drag a ‘select' Widget.
Inside the options, we like to populate the list with employee names. We can derive the full name of an employee by concatenating last_name and first_name.
{{get_employee.data.map(
(emp)=>{return {'label':emp.name, "value": emp.id }})}}
Appsmith Code Checkout Form Submit Button
When user checks out, duplicate the get_equipment API - and rename it to ‘post_checkout’.
Change the relative endpoint to /rest/v1/checkout
And this code inside the body
{
"employee_id": {{SelectEmployee.selectedOptionValue}},
"equipment_id": {{TableEquipment.selectedRow.id}},
"due_by": {{DatePickerDueBy.selectedDate}}
}This code essentially says: Construct a JSON with employee_id = Employee Id of the selected drop-down box, equipment_id = Current Row of Equipment Table, and Due_by = Value from the date picker.
Connect this API when the user presses the ‘Confirm’ button.
Run to make sure you can successfully read the checkouts.
View Outstanding Equipment Checkouts
We must provide a way to view a list of outstanding equipment checkouts. Let us create a new page.
First, let us build an API to read the checkout table. The process is similar to reading equipment or employee tables.
The only twist is that our checkout table is normalized. That means we have chosen to store ids for equipment and employees' tables instead of duplicating the record. In our UI, we don’t want to show ids.
For people familiar with REST APIs, that means multiple REST API calls to retrieve complete information. To avoid multiple REST API, we would need to use GraphQL. However, we don’t have to use GraphQL.There are simpler alternatives available.
Supabase’s REST API is based on PostgREST. PostgREST can detect foreign relationships and automatically returns embedded data. All we need to do is include the names of tables with fields. In our example, we like to retrieve all fields from the checkout table with corresponding records from employee and equipment tables.
Follow these steps to read the checkout data table:
Duplicate the get_equipment API - and rename it to ‘get_checkout’.
Change the relative endpoint to
/rest/v1/checkout?select=*,employee(*),equipment(*)
Run to make sure you can successfully read the checkouts. It would be best if you got nested JSON.
This will return values in JSON
[
{
"employee": {
"id": 1,
"first_name": "Smita",
"last_name": "Mehra",
},
"equipment": {
"id": 1,
"name": "Dell Laptop",
"image": "url..."
}
}
]
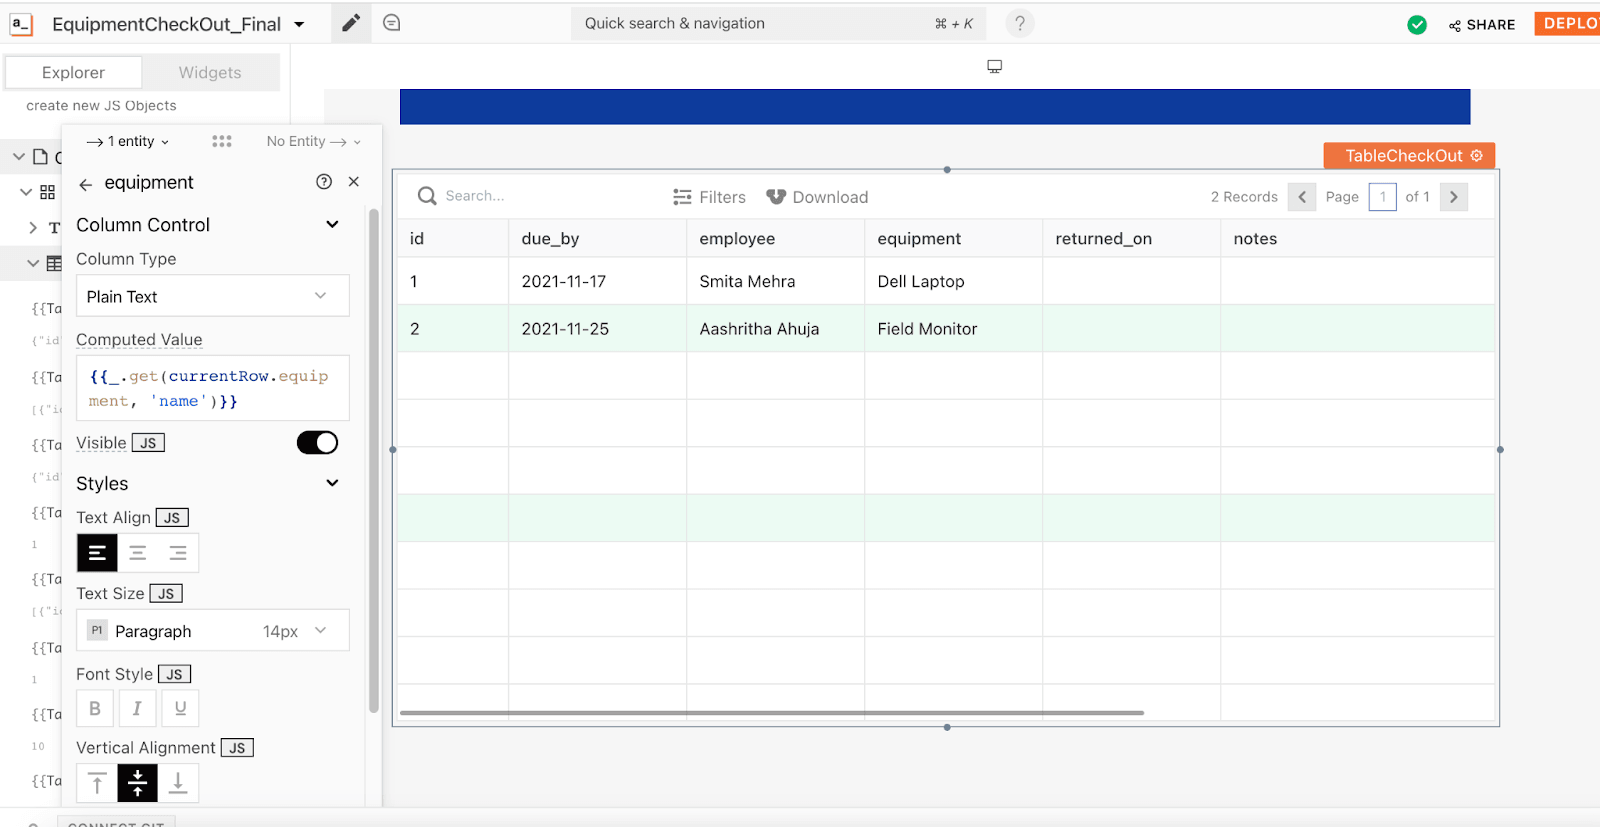
Drag a Table widget onto the canvas.
Use ‘get_checkout’ as a data source for the table widget.
Because employee and equipment are nested fields, we need to adjust column values for ‘employee’ and ‘equipment’
Update the computed value for employee to {{_.get(currentRow.employee, 'name')}}
Update the computed value for equipment to {{_.get(currentRow.equipment, 'name')}}
[See screenshot]
And you are done! We hope this was a great starting point for you to build the application. You can expand it further to include more features and make it as complex as you’d like.
If you’re feeling stuck, feel free to reach out to me! Email me at meera.bavadekar@gmail.com. This article was written as part of the Appsmith Writers Program. If you wish to participate, send an email to writersprogram@appsmith.com expressing your interest.
Meera Datey is a freelance web developer based in the San Francisco Bay Area. She specializes in helping small businesses design software solutions that deliver immediate value. This article was sent in as part of the Appsmith Writers Program.
